Service Level Agreement
Here is how Service Level Agreement on VisionCore works.
A. Inventory Item
Under the Setup tab of the Inventory form, Service Level Agreement Setup grid is added. This is where you can configure the contracts for a specific item.
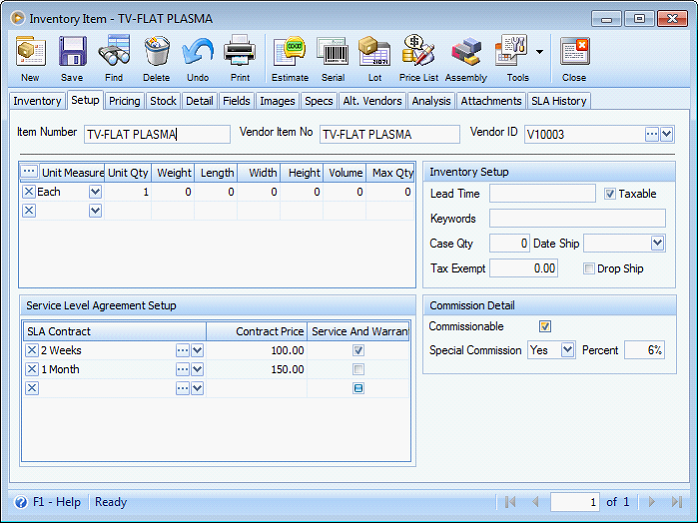
•The SLA Contract field will serve as the default agreement/s for an item. The ellipse button will open the Service Level Agreement List form.
•The Contract Price is the price of SLA contract for the item.
•The Service and Warranty field is used by Quote, Order, and Invoice to determine if the item will be included in the SLA Contract or not. If this is checked, it will be included otherwise, it will be ignored.
![]() Note: Only Inventory, Assembly, and Service item types are allowed to be assigned an SLA template. SLA History is also hidden on other items except for the aforementioned item types.
Note: Only Inventory, Assembly, and Service item types are allowed to be assigned an SLA template. SLA History is also hidden on other items except for the aforementioned item types.
The Service Level Agreement List form is where the contracts that can be used in the items are maintained. Records on this form are displayed on SLA Contract’s combo box list.
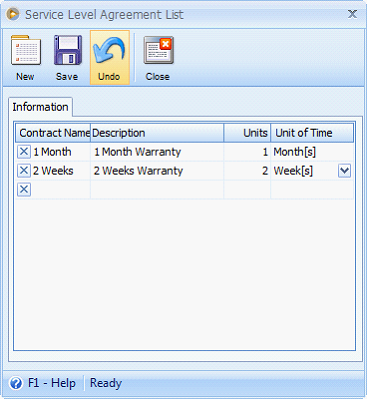
•The Contract Name is where the Contract Name is entered.
•The Description is where you enter additional information to describe a contract.
•The Units field is used to determine the X value in “Units of Time” before a contract expires.
•The Unit of Time field is used by the system to compute the End Date of the Service and Warranty. This is a drop down that allows the user to select between Day, Weeks, Months, or Years.
A new tab called SLA History is also added to Inventory form. It will contain the history of contracts associated with the item. The same tab can be found on Quote, Sales Order, Invoice, and Customer forms but it will show the history of contracts according to customer.
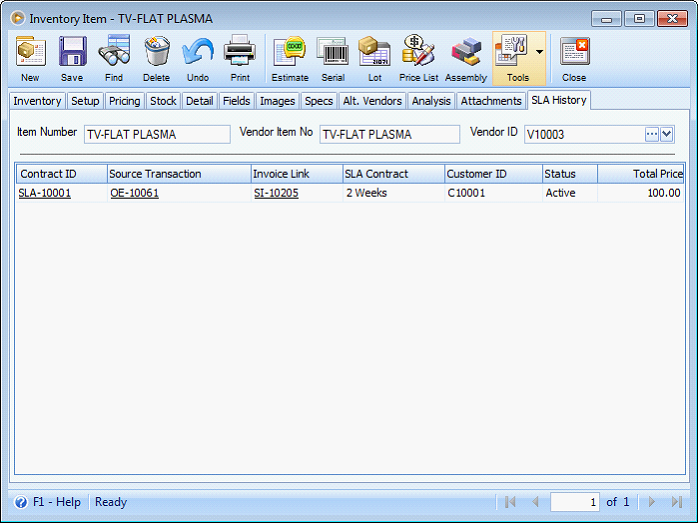
•The Contract ID hyperlink will load the Service Level Agreement transaction for that Contract ID.
•The Source Transaction hyperlink will load the corresponding transaction. This is the transaction ID where the SLA contract originated.
•The Invoice Link hyperlink will load the Invoice transaction created from the SLA contract.
B. Company Preferences
A new company preference called ‘Create the Service Level Agreement when processing a Quote to Order/Invoice’ is added on Company Preferences’ Sales tab.
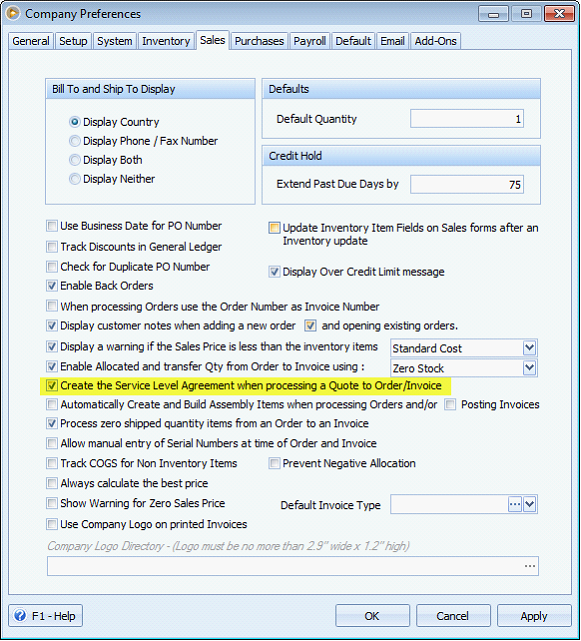
When the new preference is enabled and a user converts a Quote to Order or Invoice, the system will automatically create the SLA contract based on the setup of the item. After the Quote is converted, the system will display the Service Level Agreement form over the Order or Invoice.
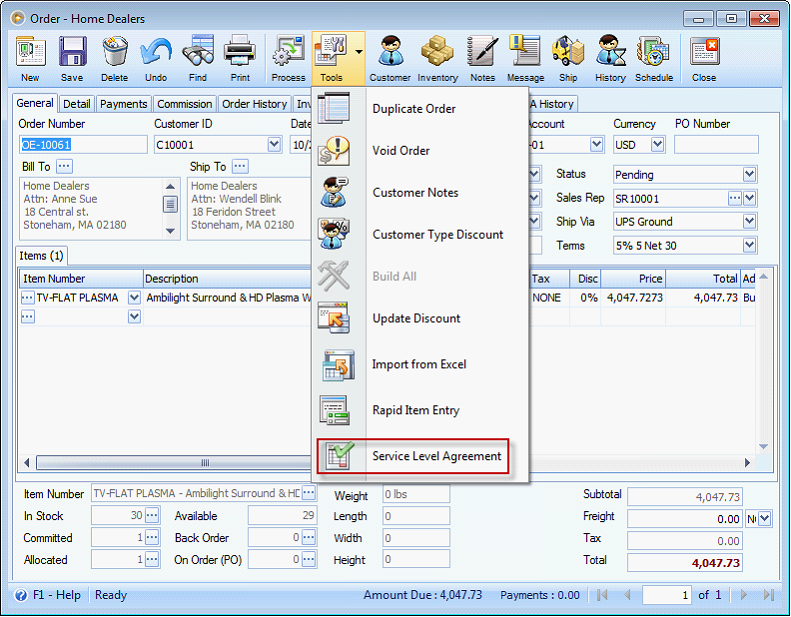
C. Order/ Invoice
On Tools menu of Order and Invoice form, you will see a new Service Level Agreement button which will open the Service Level Agreement form if the Order/Invoice contains item with SLA setup. This button will allow the user to create or view the SLA from Order or Invoice form.

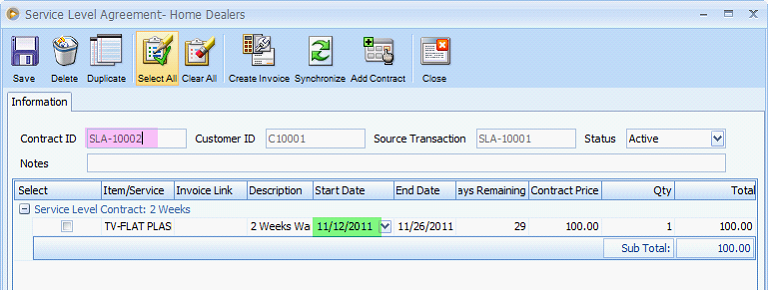
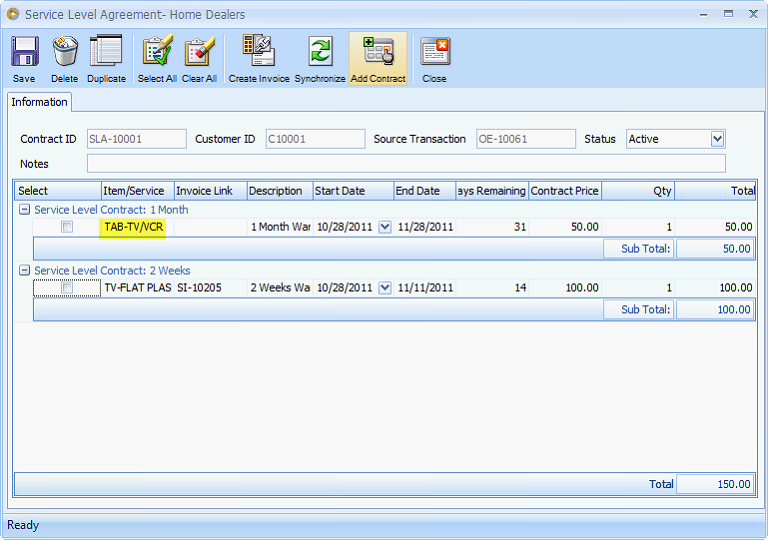
•The Contract ID is the Service Level Agreement transaction ID.
•The Customer ID is the customer ID to whom the contract is for.
•The Source Transaction is the transaction ID where the SLA contract originated.
•The Status field is used to set the current status of the contract. It can be set as:
Active – The contract is still active. One or more of the details has a non-zero remaining days. This is the default value.
Expired – All the details of the contract are expired or manually tagged as expired.
Close – The contract is manually closed by the user. You can also use this status to avoid it from displaying in the dashboard.
•The Notes is where the user can input any additional information about the transaction.
•Select is a checkbox that allows the user to select a contract detail.
•The Item/Service will display the item/service associated to the SLA.
•The Invoice Link is the sales Invoice associated to the contract detail.
•The Start Date by default is equal to the sales Order Date. If the SLA is created from the Invoice and it does not reference to a sales Order, the Start Date will default to the Invoice Date.
•The End Date will be computed after the Start Date is specified.
•The Days Remaining is the remaining days before the warranty expires.
•The Contract Price is the cost for the warranty and service. The default amount is the contract price on Inventory form’s Setup tab. This field can be edited.
The Delete button will delete the selected contract on grid area. When all contracts on the grid area are selected and you clicked the Delete button, it will delete the SLA record. Note that only the contract with blank Invoice Link can be deleted. You can only delete the SLA when all the invoices of the detail items are deleted.
The Duplicate button is used to duplicate a contract that needs to be renewed. The start date of the duplicate contract will start where the other one left off, though the user can still change the start date when needed. Note that like Create Invoice button, the system will only duplicate the contract that is selected on the grid area. Thus, if one contract detail is selected and the Duplicate button is clicked, it will create one duplicate SLA record for the selected contract. If multiple contract details are selected, it will create one SLA record for all of the selected contracts.

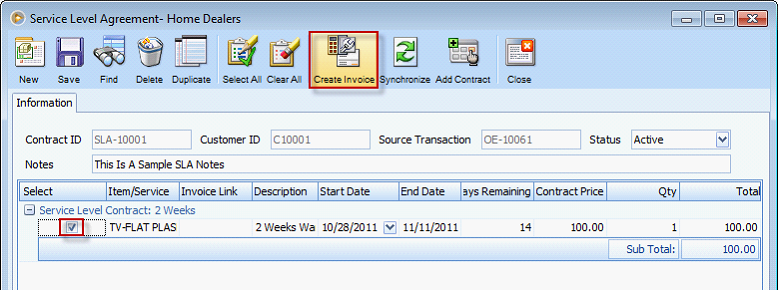
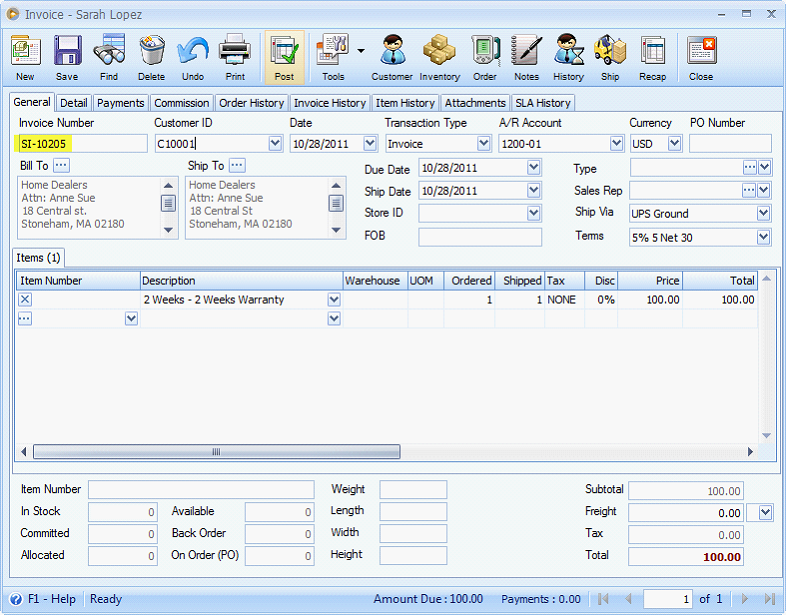
The Create Invoice button creates the invoice for the selected contracts on grid area. If one contract is selected, it will create one Invoice for the contract. If multiple contracts are selected, it will still create one Invoice for all the selected detail items. The Invoice Link field will be filled in with the invoice transaction number.

The Add Contracts button allows the user to add a new contract on the current transaction. This button will open the Add Contracts form. The grid area will display all items that support the contract shown on Contract Name field. For example using below screenshot, only the items with 1 Month contract will be displayed on the grid.
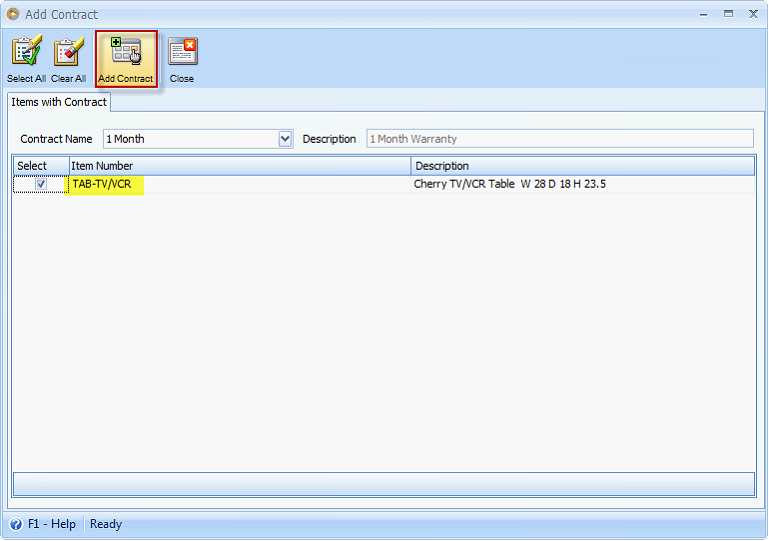
Once you finally decided the contract to be added, tick the Select checkbox then click Add Contract button. A confirmation message will prompt and once you provide a positive confirmation, the selected contract will be added and displayed on Service Level Agreement (SLA) form.
Take note that Service Level Agreement form is also accessible from Sales’ Service Level Agreement menu. By clicking this menu, the Find Service Level Agreement form will open displaying all existing contract records.
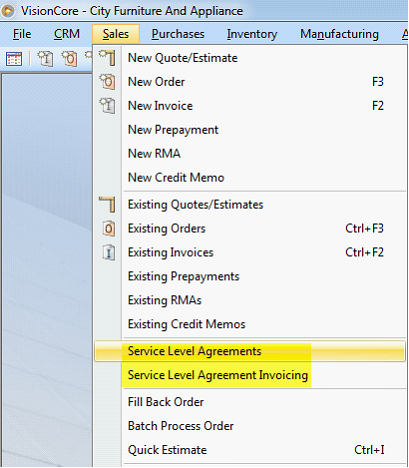
The Service Level Agreement Invoicing menu will open the Service Level Agreement Invoicing form. In this form, the user can specify the criteria for generating and posting Invoices for the SLA contracts.
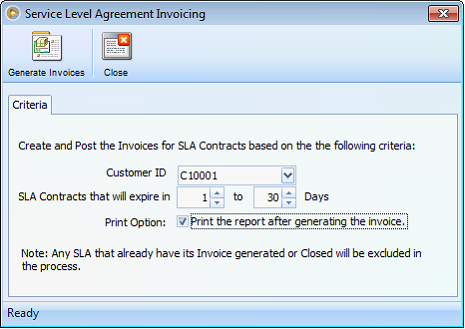
If all the Invoices are generated and posted successfully, the system will show a message informing the user the number of invoices it has generated and posted. If the Print Option is checked, the system will show a preview of the invoice/s that was successfully generated and posted. Note that created Invoices from Service Level Agreement Invoicing are automatically posted.
D. Email Campaign
In Email Campaign form, Customer with SLA is added on the Table combo box. From the Criteria tab, the user can customize the criteria or select a customer that needs to be invoiced.
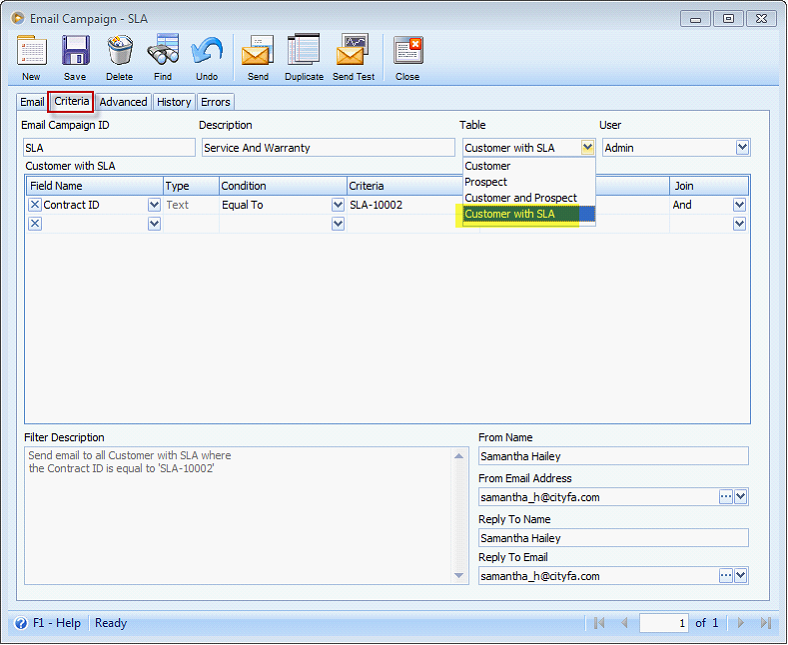
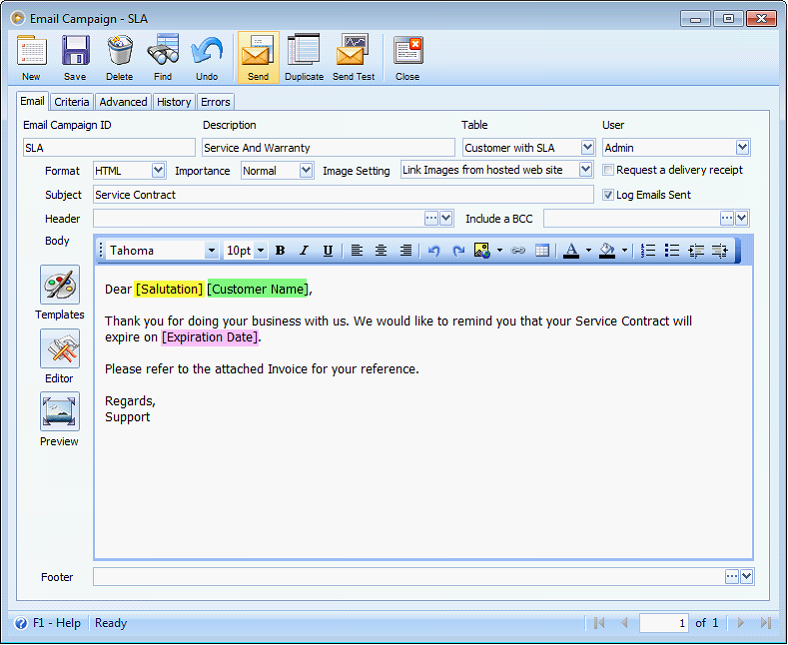
The user can also use Keywords in the Email Body. These keywords will be replaced by records from the database before sending. Here are the keywords that can be used.
•[Salutation] – This is the Salutation from the customer table. Examples are like Mr., Mrs., Ms., etc.
•[Customer Name] – This is the Name of the Customer from the customer table.
•[Expiration Date] – This is the End Date from the Service Level Agreement.
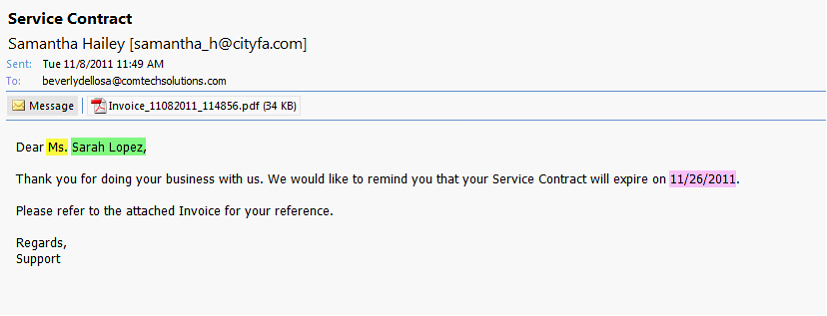
Here is the received email from above Email Campaign.
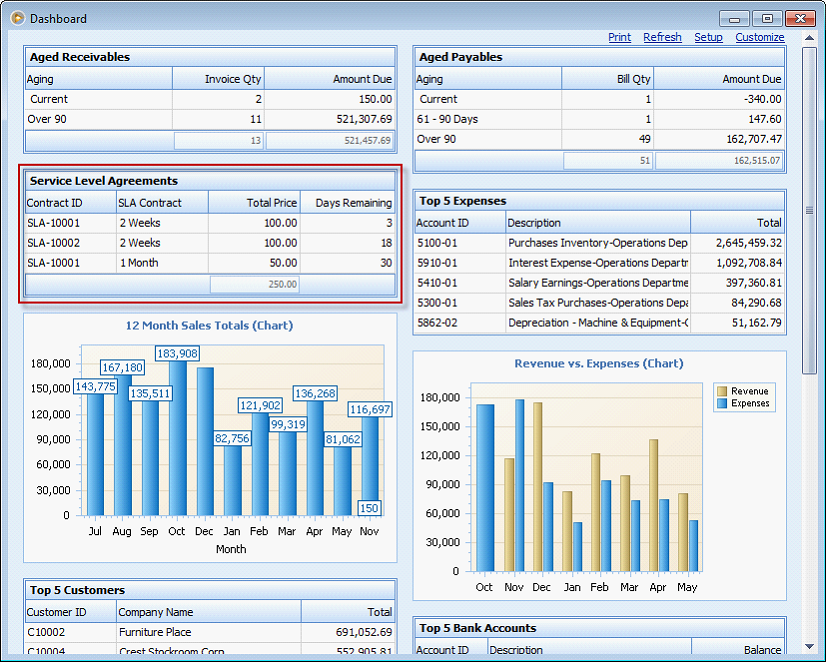
E. Dashboard
Service Level Agreements is added to the Dashboard for easy tracking. SLA with Satus set to Closed and expired SLA that is more than 30 days old will not be displayed in the Dashboard. Clicking a contract from the table will open the Service Level Agreement form. The dashboard data is arranged in the grid in ascending order according to the value of the Days Remaining.
F. Reports
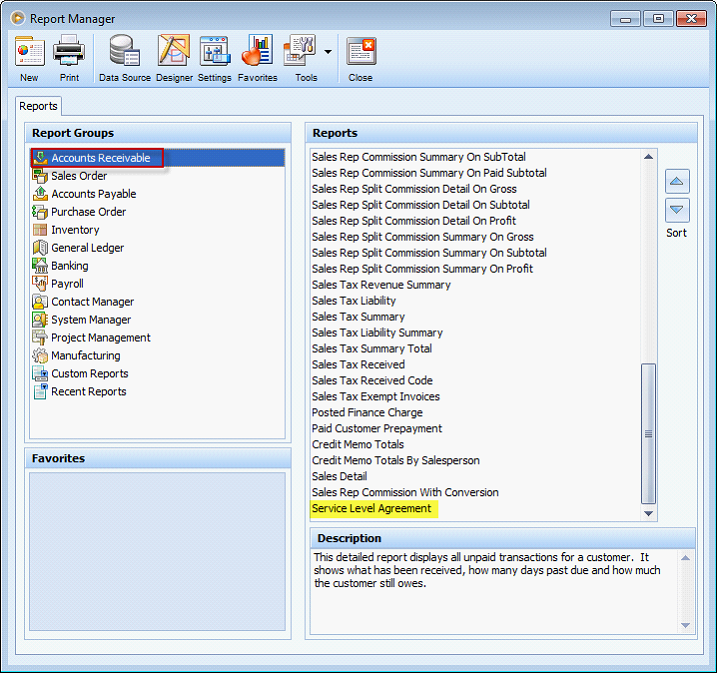
In the Report Manager under Accounts Receivable, there will be a new report called Service Level Agreement.
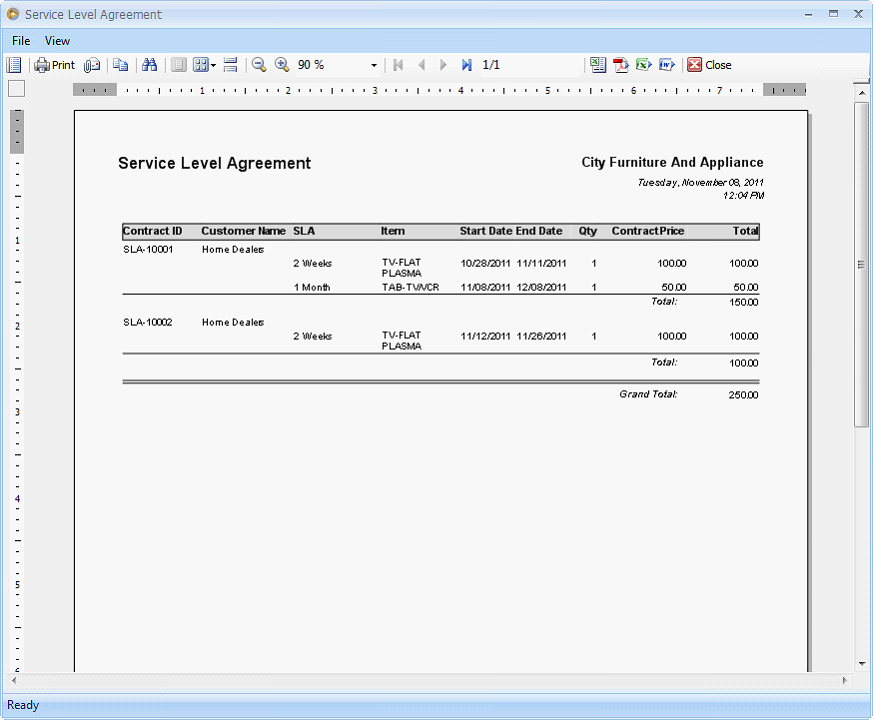
Here is how the report will look like.
Reference : Task - 2847