Project Management Process
I. JOBS
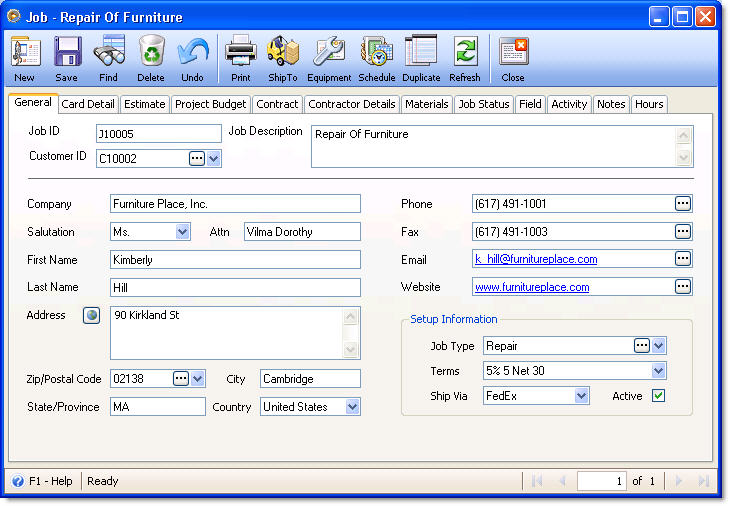
1. Create new Job. Job form can be opened under Contacts menu, then select Jobs. Enter necessary information in General tab.
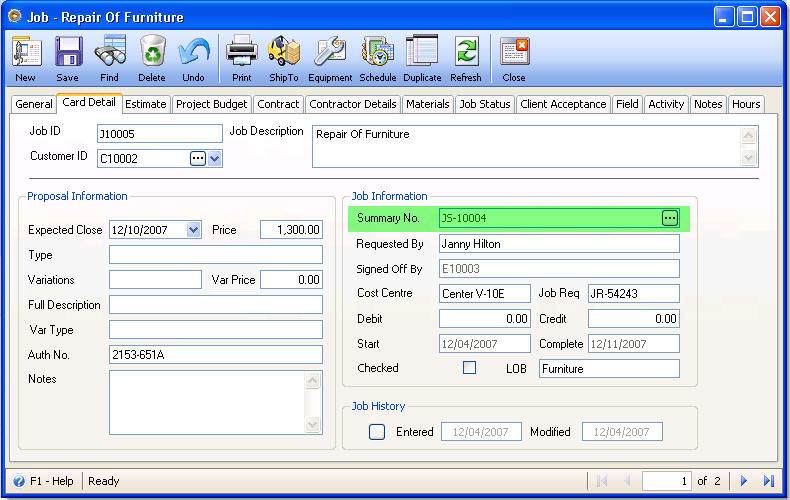
2. Enter necessary information in Card Detail tab - Proposal Information area.
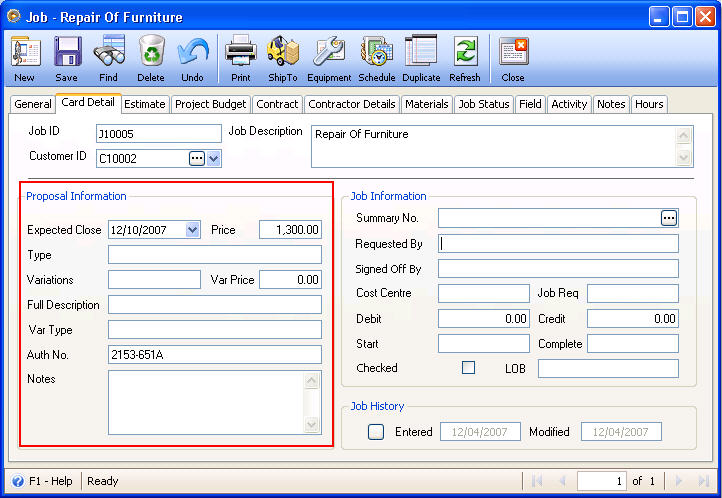
In the Expected Close field, enter a date when a Job is expected to be finished. Enter information as needed in the Proposal Information area.
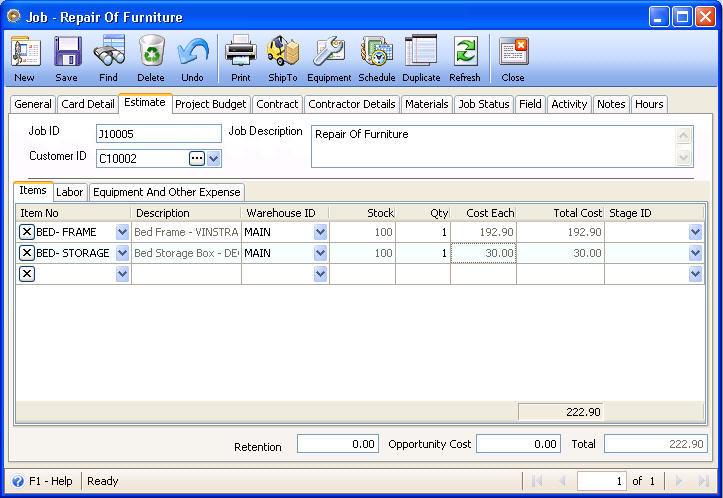
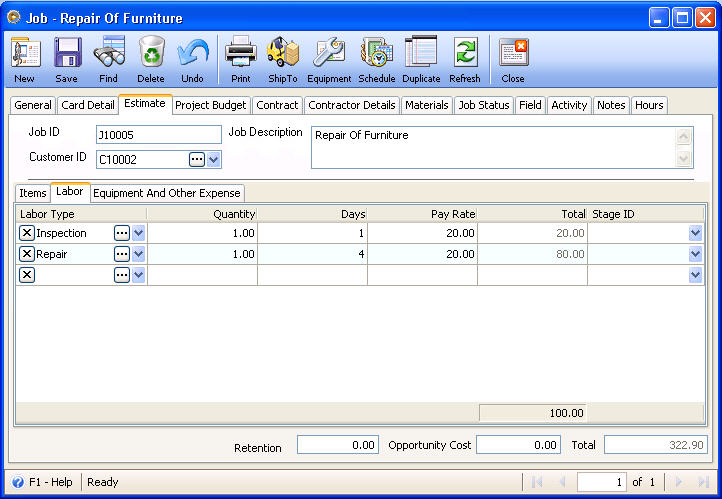
3. In the Estimate tab enter items estimated to be used for the job, the labor costs and other costs estimated to be incurred for the completion of the job.
Items tab
Select an item to be used for the job in the combo box list. If the item needed for the job is not yet in the list, add that item first into your inventory before that can be selected here.
To add an item to your inventory list, go to Inventory menu and select Inventory. You will be brought to the Find Inventory form. Click the New button at the upper left hand corner of the form to open a new inventory item form where you can start entering item’s information.
Enter how many of that item is needed for the job in the Quantity field.
Labor tab
In the Labor tab, select the labor type needed for the job. If the labor type is not yet in the list, click the ellipse button in the Labor Type field. This will open the Type form where you can add labor types.
Enter the Quantity and Days needed for that labor type and its Pay Rate.
Equipment and Other Expense tab
Select the equipment or other expense needed for the job. If the equipment or other expense is not yet in the list, click the ellipse button in the Equipment Expense or Other Expense field. This will open the Expense form where you can add equipment and/or other expenses.
Enter an amount of that expense in the Amount field.
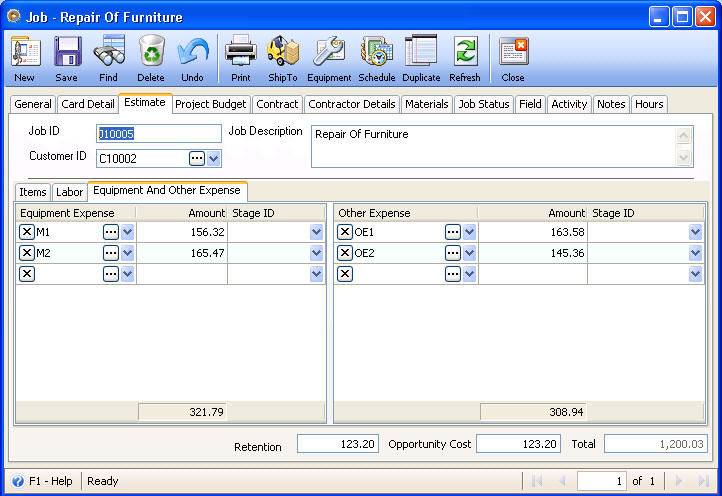
Enter Retention Cost and/or Opportunity Cost if you have it.
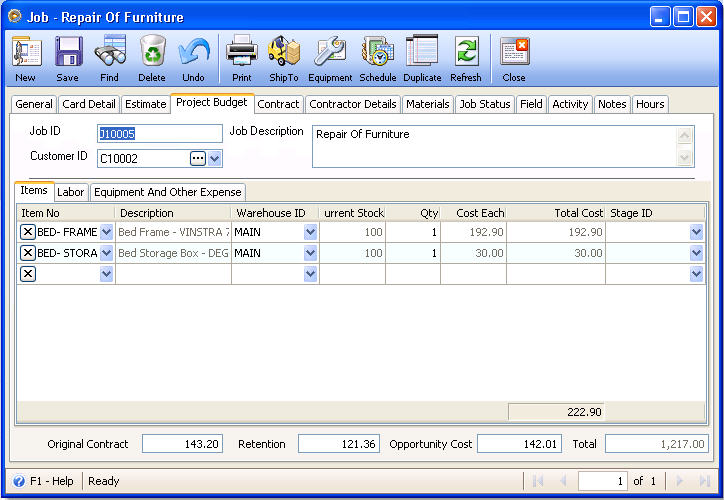
4. Move to Project Budget tab. Almost all information entered in the Estimate tab is carried over into this tab so you will not have to enter that information twice. You can change any field in this tab as necessary.
Enter Original Contract amount if you have it.
![]() Note that if you want all information entered in the Estimate tab be carried over into the Project Budget tab, you must not save the job record unless all information needed in the Estimate tab is completely filled out. It is during the first time the record is saved, where information from the Estimate tab is carried over to the Project Budget tab.
Note that if you want all information entered in the Estimate tab be carried over into the Project Budget tab, you must not save the job record unless all information needed in the Estimate tab is completely filled out. It is during the first time the record is saved, where information from the Estimate tab is carried over to the Project Budget tab.
5. There is a Job Equipment form that you can use to enter equipment/s needed for the job that is loaned. You can open this form by clicking the Equipment button in the toolbar.
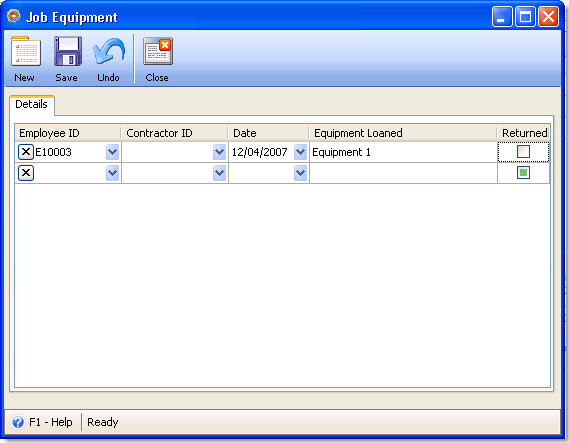
In the Job Equipment form, you will have to select either Employee ID or Contractor ID, then the Date and Equipment loaned. There is also a Return checkbox that you can choose to mark with a check when equipment loaned is returned.
6. In the Field, Activity and Notes tabs, enter any information if you have it.
II. JOB PROJECT
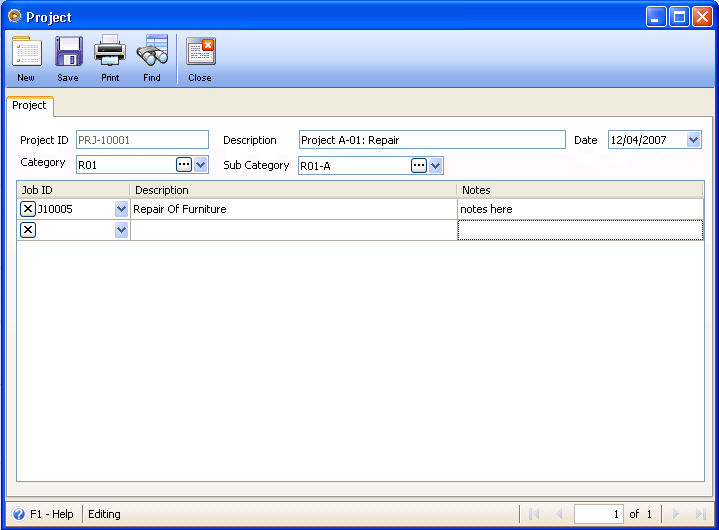
1. Create new job project.
To open Job Project form, go to Contacts > Project Management > Job Project, this will open the Find Project form. Click New button at the upper left hand corner of the form to open a new job project form.
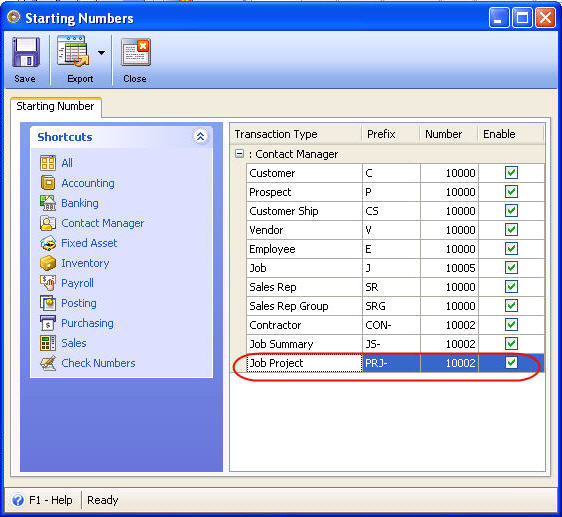
By Default, VisionCore will automatically assign a unique Project ID for each job project. You may disable this automatic assigning of Project ID by going to the VisionCore program's Main Menu, clicking on the following: the Company Preferences, the General Tab, the Starting Numbers button, Contact Manager, click the little white box to the right of the Job Project ID field to uncheck it. With the Job Project ID field disabled, you may assign a unique Job Project ID.
2. Enter project description, category and sub-category if you have it. Then select job ID in the grid area. There is also a Notes field where you can put some notes on the selected job.
III. JOB PLAN
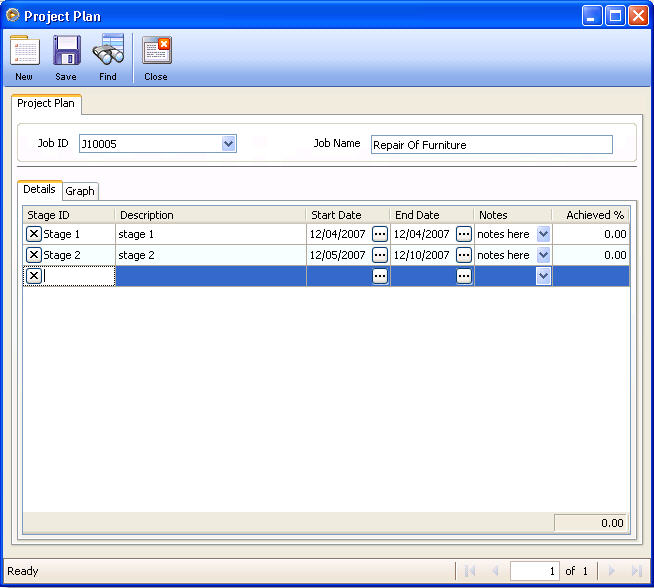
1. Create new job plan.
To open Job Plan form, go to Contacts > Project Management > Project Plan, this will open the Find Job form. Select a job on this form to bring you to a new project plan form for the selected job or click the New button at the upper left hand corner of the form if you want to open a new project form where Job ID field is not yet filled in with any Job ID. From there you can click the drop down arrow on the Job ID field and then select a Job ID for the said project plan.
2. In the Detail tab, enter different stages of the job and other fields like Description, Start Date, End Dates, Notes and Achieved %.
In the Achieve % field, enter a percentage equivalent to the work achieved/done per stage. You will have to change this field every now and then as the work is in progress until its completion.
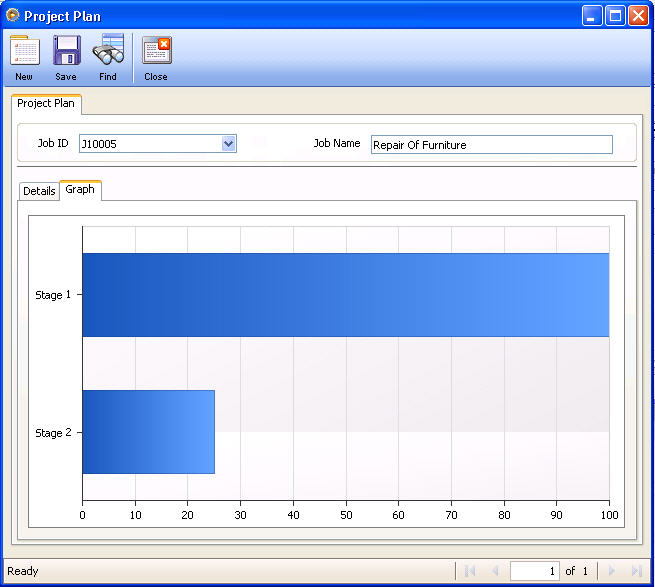
3. In the Graph tab, you can graphically view the percentage of the work achieved for each stage. As percentage is entered/changed in the Achieved % field in the Details tab, the percentage of the work achieved shown graphically is directly changed, too.

Example, if the shown percentage is entered in the Achieved % field,
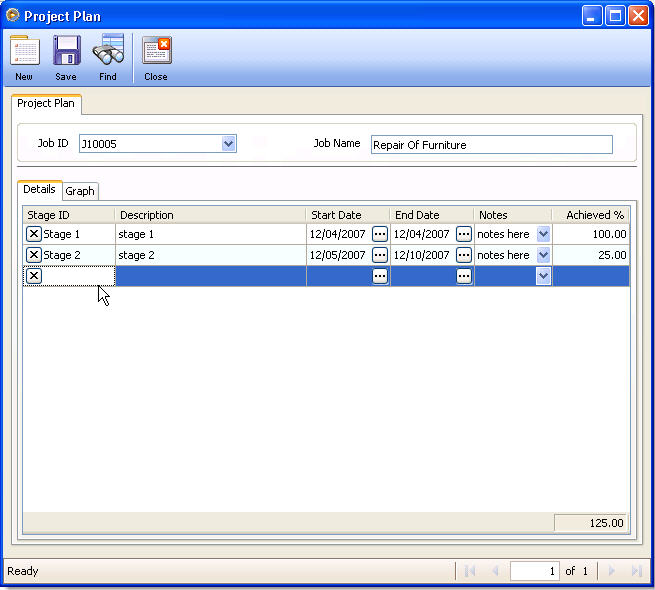
Then this is how your graph will look like.
IV. ASSIGN STAGES FOR JOB COSTS
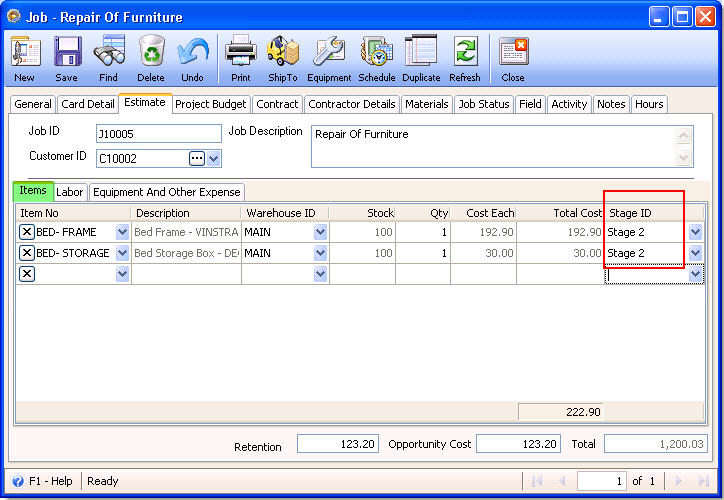
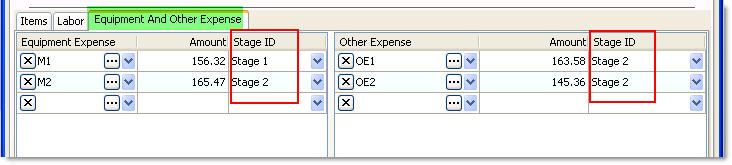
Now that you have already setup the job project and project plan, you can go back to the Estimate and Project Budget tabs and assign stages for Items, Labor Costs, and Equipment and other expenses that are to be used.
Examples:

VI. CONTRACTORS/CONTRACTS
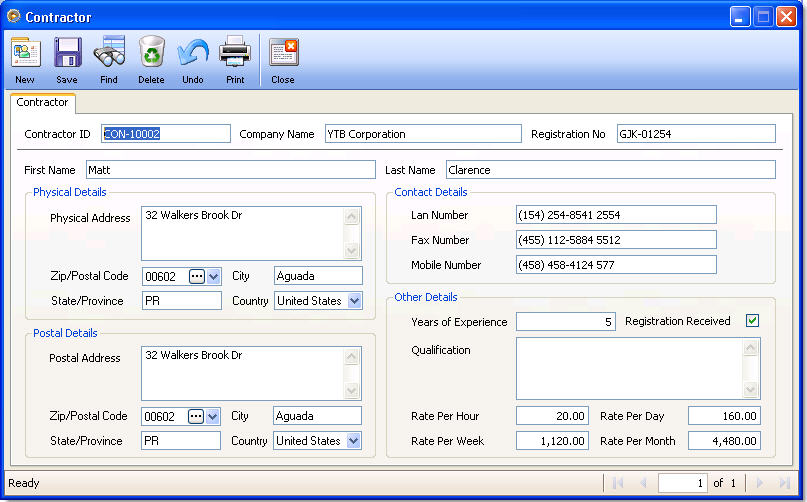
1. Create new contractor.
To open Contractor form, go to Contacts menu > Contractors.
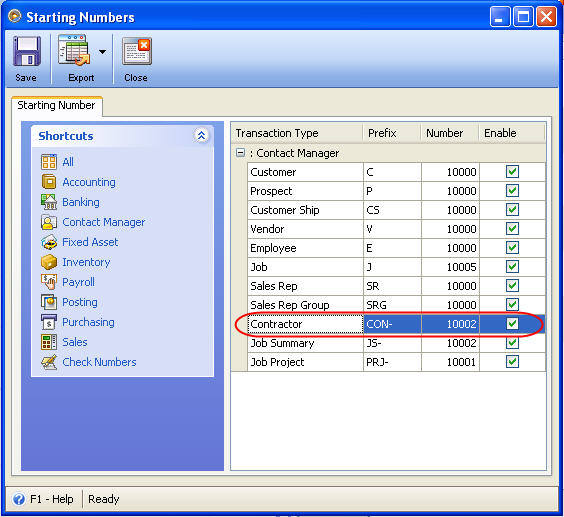
By Default, VisionCore will automatically assign a unique Contractor ID for each contractor. You may disable this automatic assigning of Contractor ID by going to the VisionCore program's Main Menu, clicking on the following: the Company Preferences, the General Tab, the Starting Numbers button, Contact Manager, click the little white box to the right of the Contractor ID field to uncheck it. With the Contractor ID field disabled, you may assign a unique Contractor ID.
Enter Contractor’s information you may have like Company Name, Registration No., First Name, and so on.
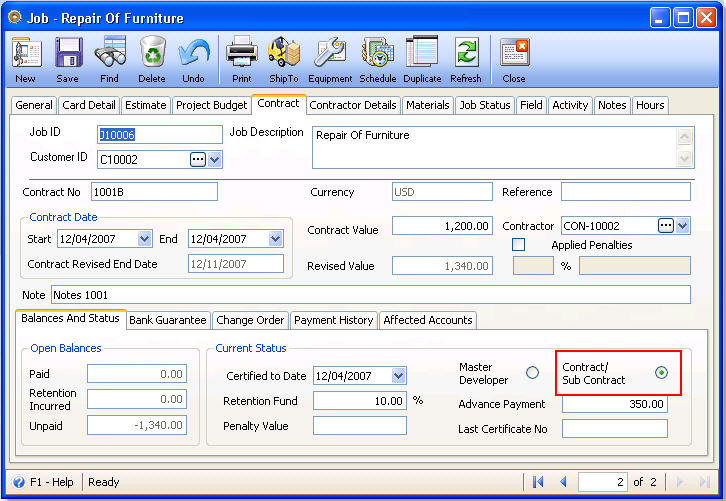
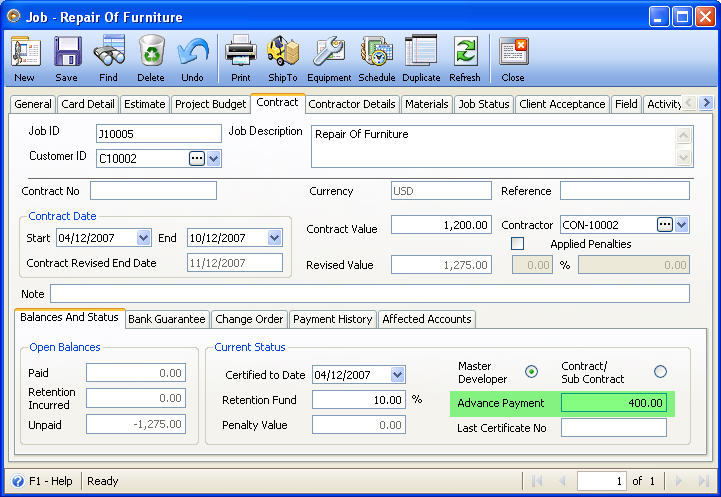
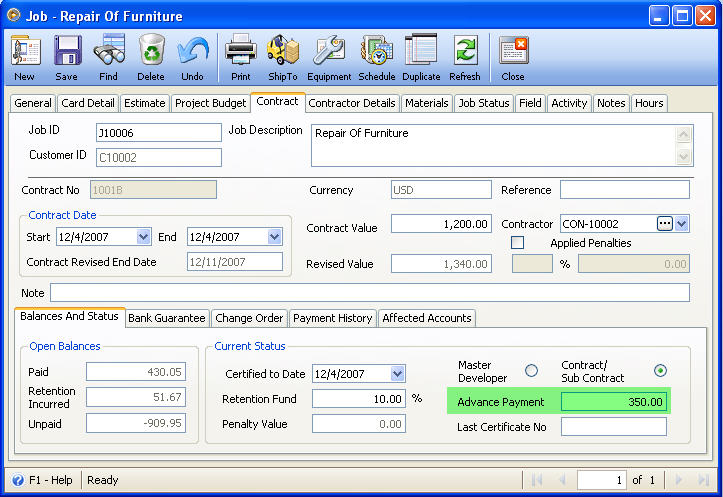
2. In the Job form - Contract tab, enter appropriate information like Contract No., Reference, Contract Dates, Contract Value, Contractor and so on.

Balances and Status tab
You will be able to monitor Paid amounts, Retention Incurred and Unpaid balances in the Open Balances area.
In the Current Status area, enter values for Certified Date, Retention Fund (in percent), Advance Payment and Last Certificate No.
Select Master Developer if you are the main developer. This option will allow you to create transactions like Jobs Bill, Inventory Issue, Inventory RMA, Job Transfer, Process Paycheck and Banking transactions using the Project Clause.
Select Contract/Sub Contract if you are the contractor or sub contractor. This option will allow you to create transactions like Jobs Invoice, Inventory Issue, Inventory RMA, Job Transfer, Process Paycheck and Process Invoice from Hours tab, and Banking transactions using the Project Clause.
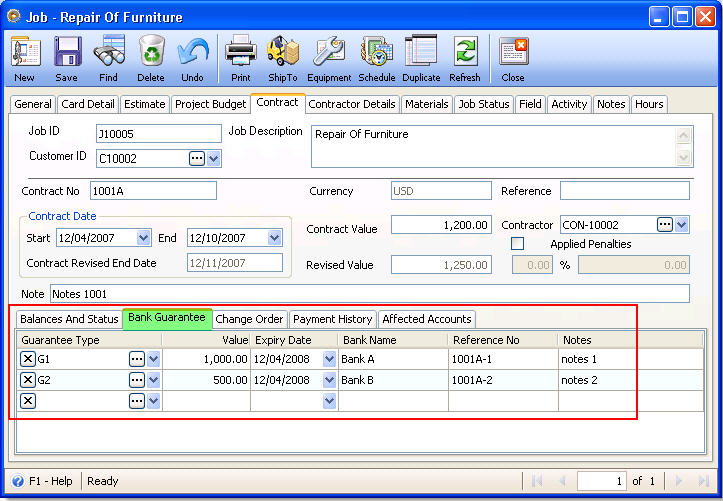
Bank Guarantee tab
The Bank Guarantee tab is for record keeping of deposited or funded amount on a certain bank.
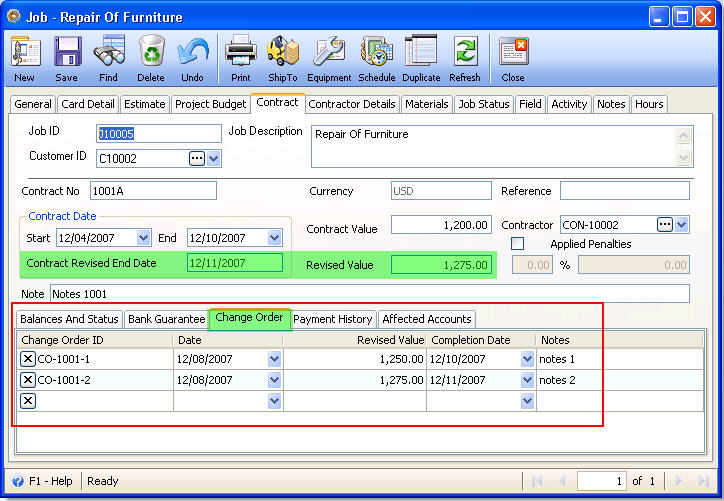
Change Order Tab
The Change Order tab is where you may enter new contract values. The latest added value will be the new contract value. Notice that as you enter a new line item on this tab, the Contract Revised End Date and Revised Value is updated in accordance to the added line item.
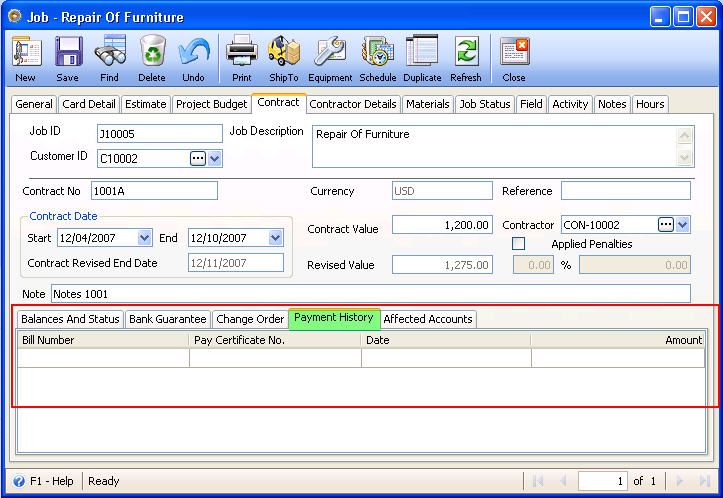
Payment History Tab
This tab will display all jobs bill or jobs invoice transactions for the selected job.
![]() Take note that Bills are for Master Developer while Invoices are for Contractors/Sub Contractors.
Take note that Bills are for Master Developer while Invoices are for Contractors/Sub Contractors.
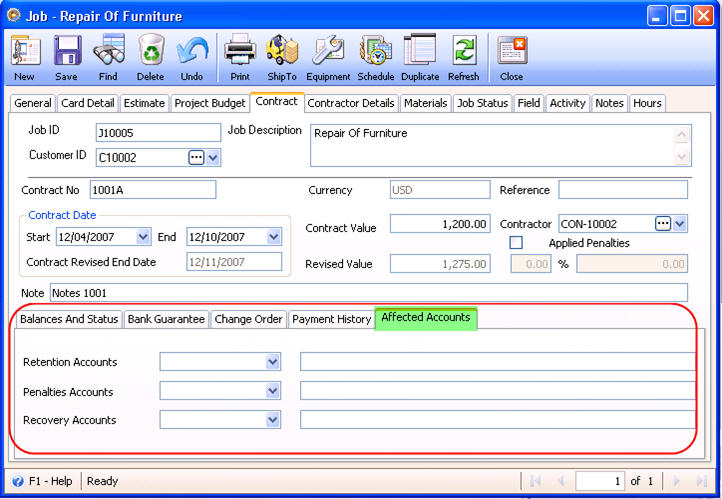
Affected Accounts Tab
This tab is where you enter affected accounts for the job bill or job invoice transactions involved in the contract.
3. Job form - Contract Detail tab,
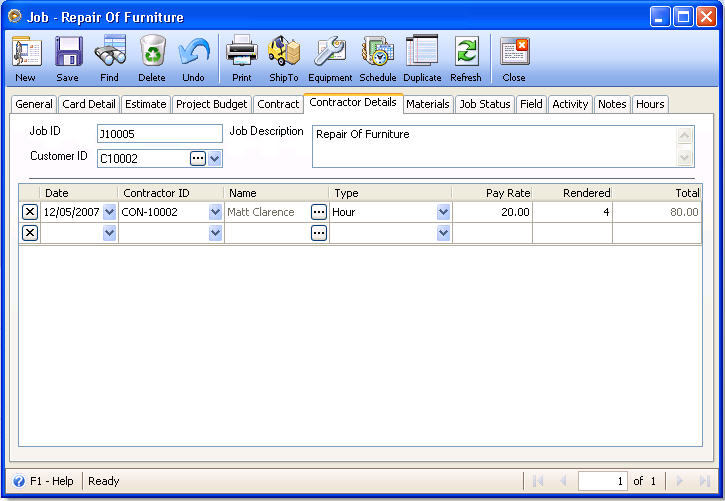
Select a contractor/s in the Contractor Details tab.
Enter Date and Contractor ID. The Contractor Name will automatically be filled in. Click the ellipse button in this field to open the contractor’s record.
In the Type combo box, you have the option to select Hour, Day, Week or Month. As you select a Type on this field, Pay Rate field will automatically be filled in with the amount you had set in the Contractor form.
In the Rendered field, enter the:
![]() Hours worked if Hour is selected in the Type field
Hours worked if Hour is selected in the Type field
![]() Days worked if Day is selected in the Type field
Days worked if Day is selected in the Type field
![]() Weeks worked if Week is selected in the Type field
Weeks worked if Week is selected in the Type field
![]() Months worked if Month is selected in the Type field
Months worked if Month is selected in the Type field
Total field is derived by multiplying the Pay Rate to the value entered in Rendered field.
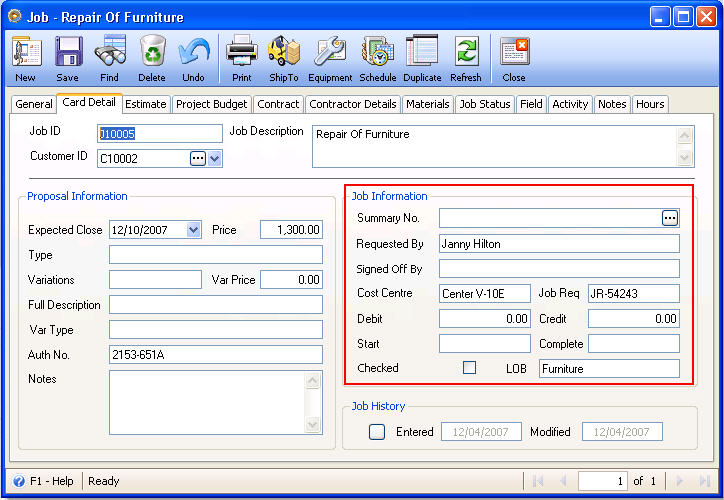
VI. JOB INFORMATION
Enter job’s information in this area if you have it. Other fields here are read-only. These are automatically filled in with information as we go on with the Job process.
VII. JOB SUMMARY
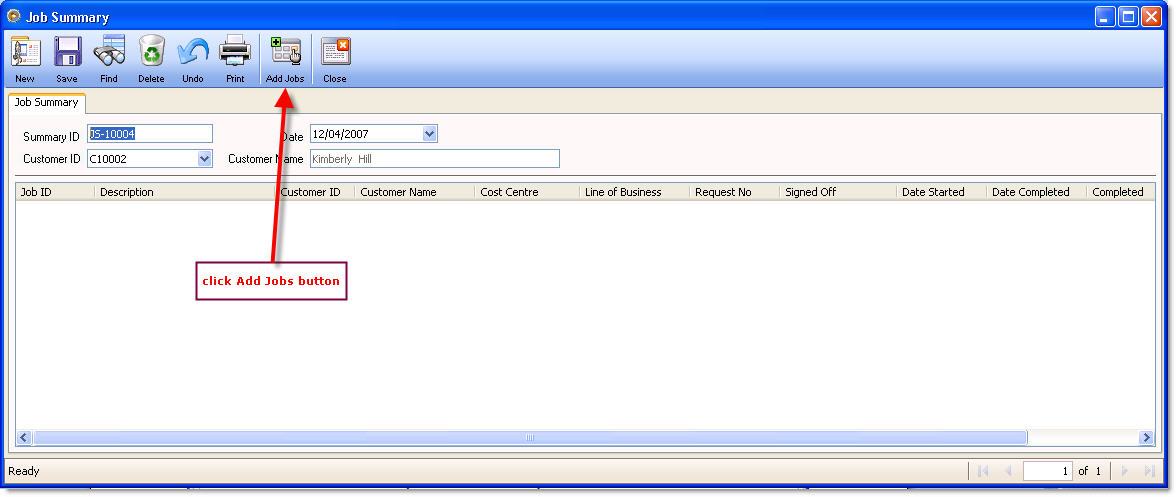
1. Create new Job Summary. To open Job Summary form, go to Contacts > Project Management > Job Summary form or you may open Jobs form > Card Detail tab > click ellipse button on Summary No. field.
The Find Job Summary form will be opened. Click New button at the upper left hand corner of the form to open a new Job Summary form. When Job Summary form opens, select a customer from the Customer ID combo box.
Click Add Jobs button to add jobs on the job summary list. Once a job has been selected to a job summary it cannot be selected again in another job summary.

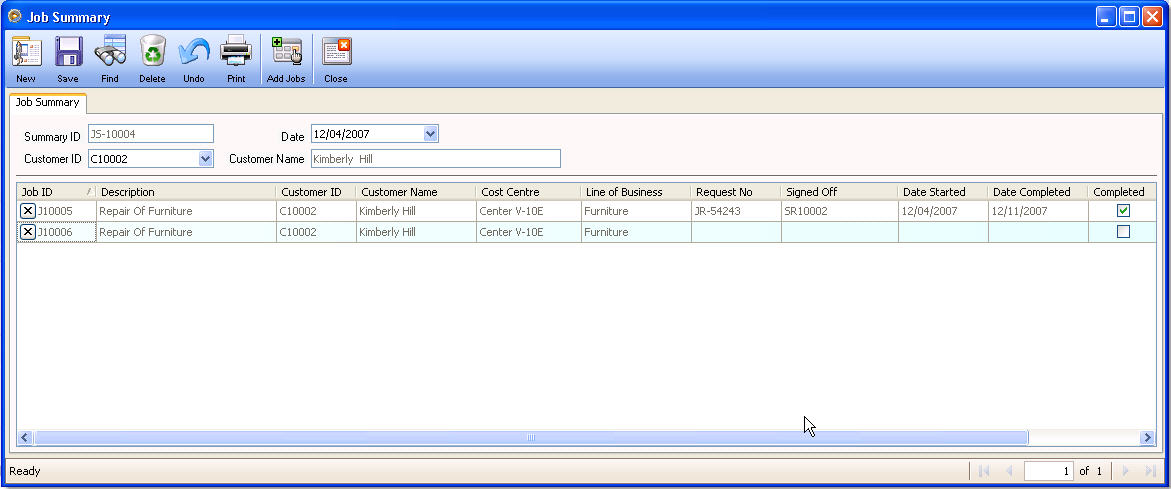
If there is an existing job summary for a client and a new job is completed for the same client, you may click on the Add Jobs button and select that job. That will then be added in the list of that job summary.
Now when you open the Jobs form > Card Detail tab, Summary No. field will display the Summary No that we had previously assigned to it.
You may then enter the person who requested that job summary in the Requested By field.
VIII. PROCESS HOURS
In the Hours tab fill in the Date, Employee ID, Earning ID and Work Code. Then enter the Pay Hours, Pay Rate, Bill Hours and Bill Rate fields.
![]() Note that only jobs set as Contractor/Sub Contractor are allowed to process paycheck/invoice. Therefore, for those jobs set as Master Developer, Process Hrs button will not be shown in the toolbar.
Note that only jobs set as Contractor/Sub Contractor are allowed to process paycheck/invoice. Therefore, for those jobs set as Master Developer, Process Hrs button will not be shown in the toolbar.
Notice that the previous job record (J10005) that is used in the previous illustrations is not used in this example since that job (J10005) is set as Master Developer. To allow the Process Hours feature to work, the job should be set as Contractor/Sub Contractor. Job record (J10006) will be used to explain how this process works.
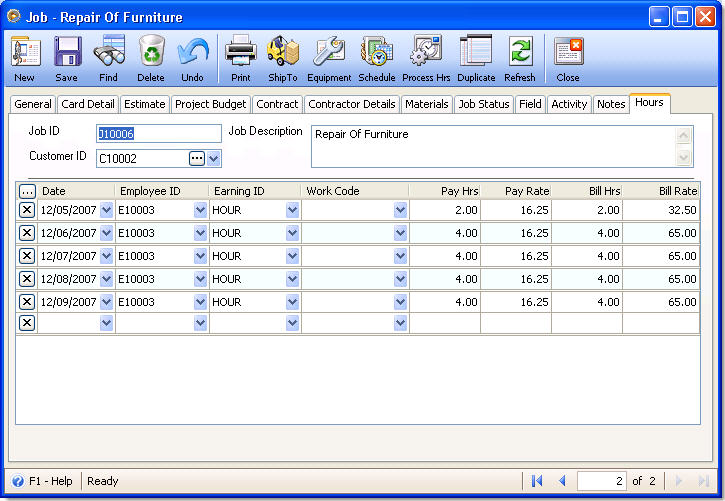
When all information is entered in the Hours tab correctly, click Process Hrs button.
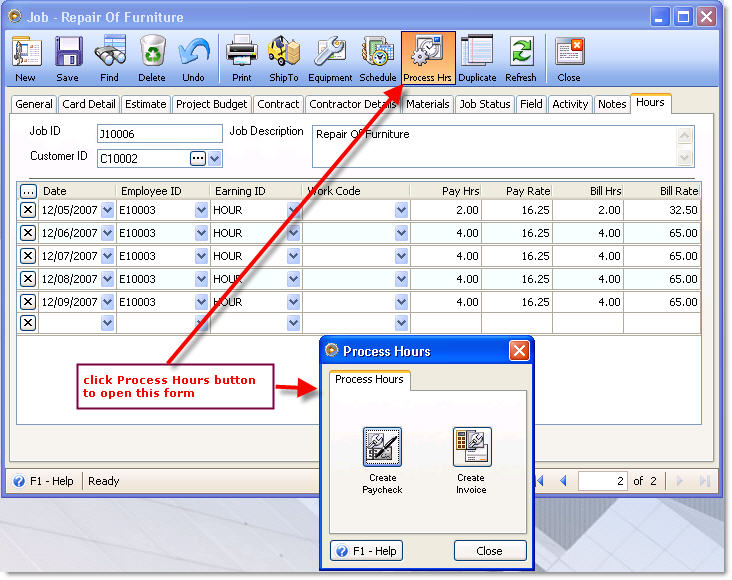
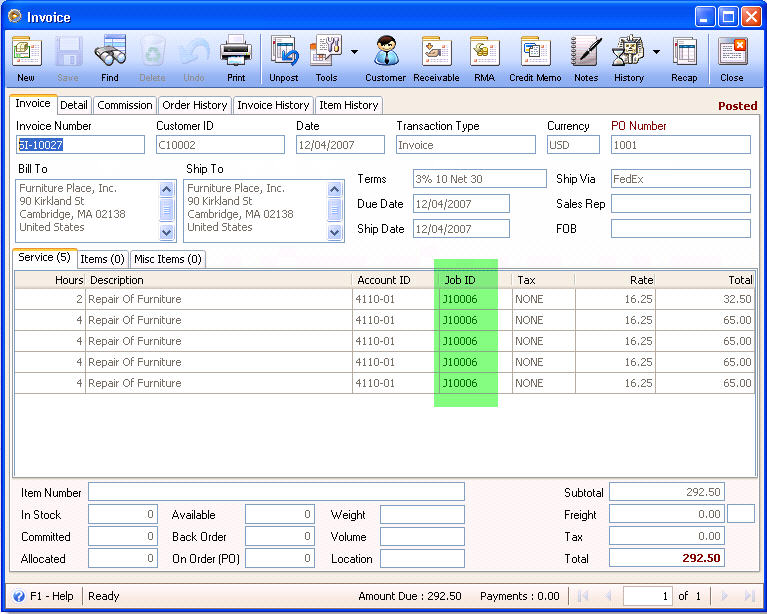
![]() Click Create Invoice button to create an invoice for the customer you have specified in the Jobs form. To view, verify, post or print that invoice you will need to go to Sales menu > Existing Invoices and find that invoice.
Click Create Invoice button to create an invoice for the customer you have specified in the Jobs form. To view, verify, post or print that invoice you will need to go to Sales menu > Existing Invoices and find that invoice.
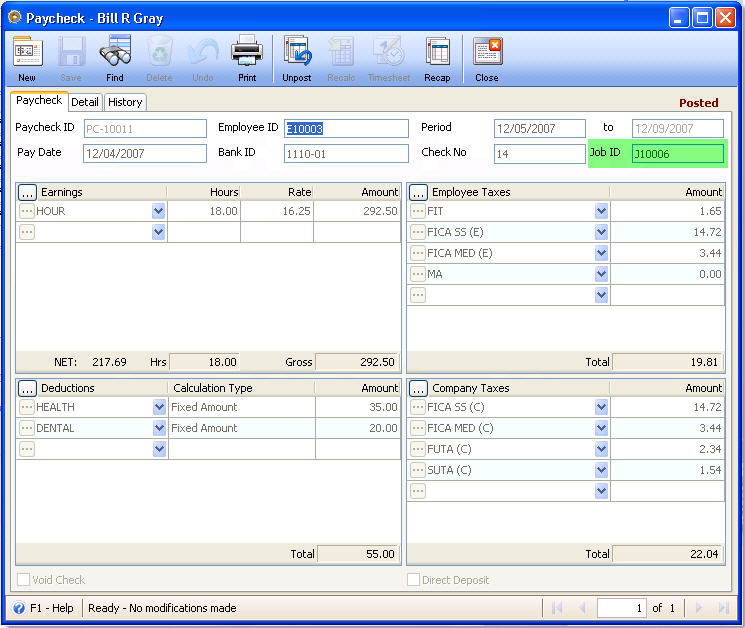
![]() Click Create Paychecks button to create a paycheck for the employee you have specified in the Jobs form – Hours tab. To view, verify, post or print that paycheck you will need to go to Payroll menu > Existing Paychecks and find that paycheck.
Click Create Paychecks button to create a paycheck for the employee you have specified in the Jobs form – Hours tab. To view, verify, post or print that paycheck you will need to go to Payroll menu > Existing Paychecks and find that paycheck.
Examples:
Invoice created from Process Hours.
Paycheck created from Process Hours.
IX. INVENTORY ISSUE
1. Create new adjustment to issue materials to a Job.
To open Inventory Adjustment form – Material Issue, go to Contacts> Project Management> Inventory Issues, this will open the Find Inventory Issues form. Click New button at the upper left hand corner of the form to open a new Material Issue form.
Select a Job ID in the Job ID field. Once you place the focus on this field, an ellipse button will be shown. Click on that button to open the Job ID record selected.
In the Installer ID combo box, all contractors entered in the Contractor form will be displayed. Selecting a Contractor or Installer ID on this field will then fill in the Contractor Name or Installer Name. Next to this field is the Clerk Name. Enter a clerk name on this field.
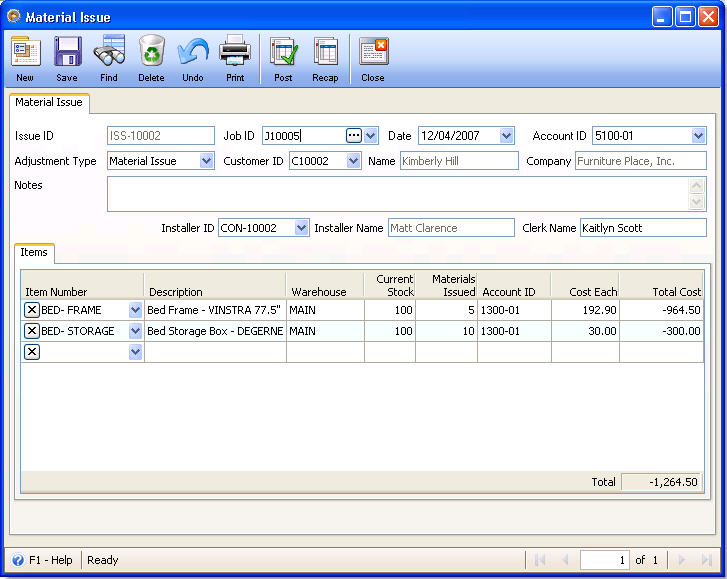
These are the accounts affected when this material issue transaction is posted. Posting this transaction will also decrease the in stock qty of the selected item.
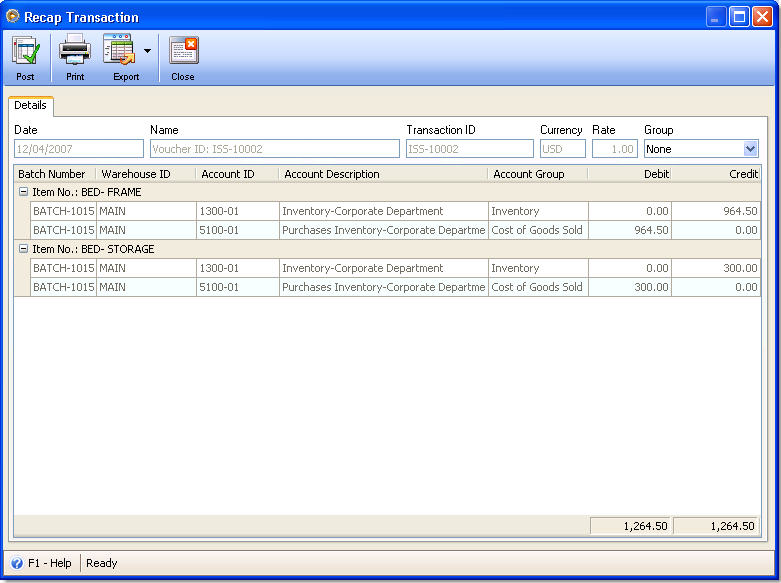
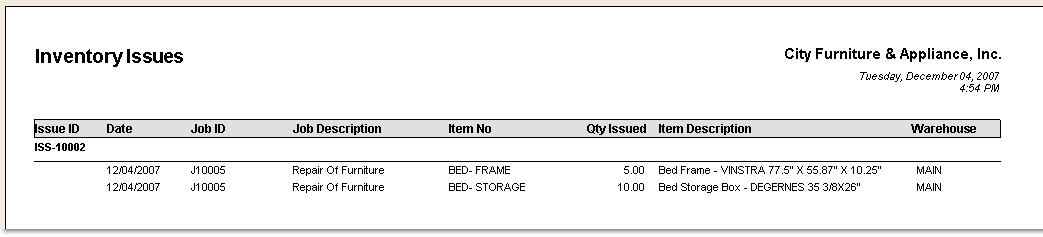
After posting a material issue transaction, VisionCore will ask if you want to print the Material Issue report. Click YES to print.
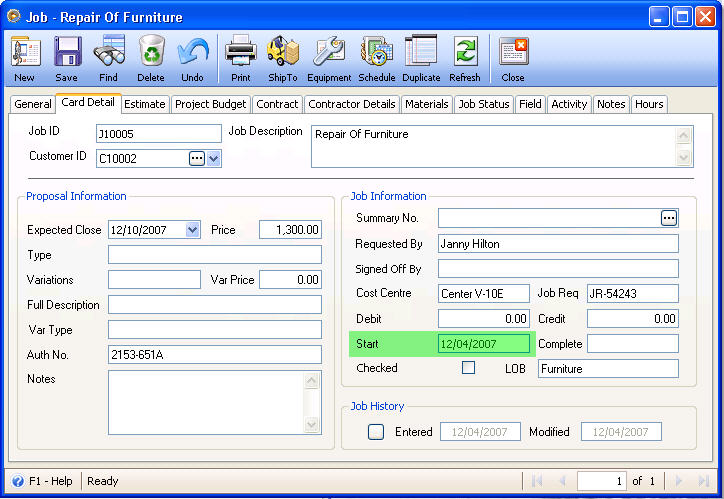
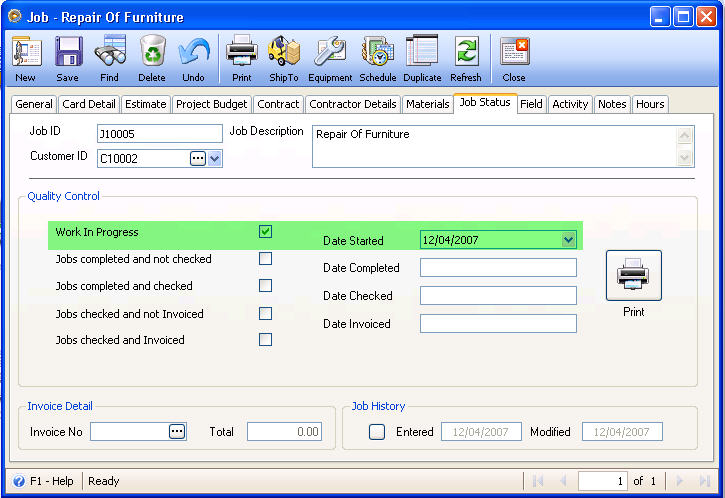
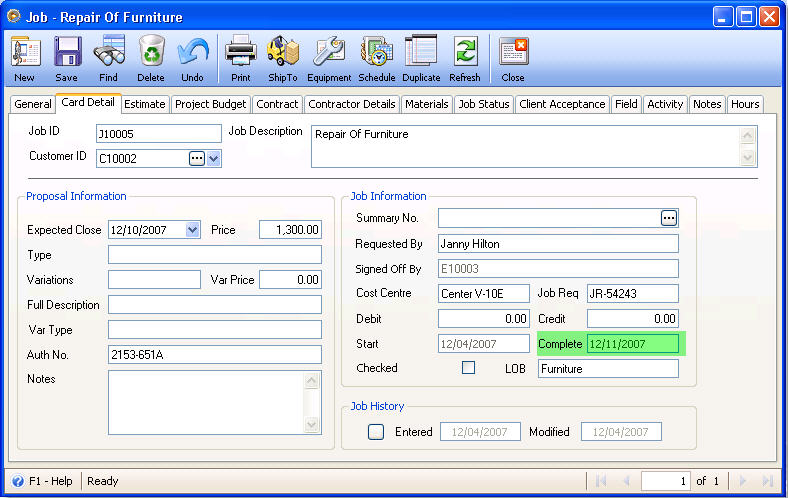
2. Go back to Jobs form - Job Detail tab. You will see that Start field in Job Information area of Card Detail tab and Date Started field in Job Status tab are now filled in with the same date the material for the job was issued. Also Work In Progress checkbox is automatically enabled.
You may click on Print button to bring you to the Report Manager where you can select to print Job Status report.
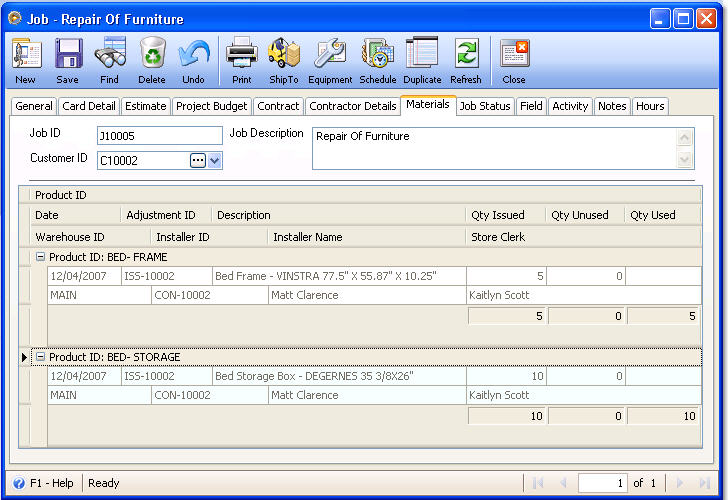
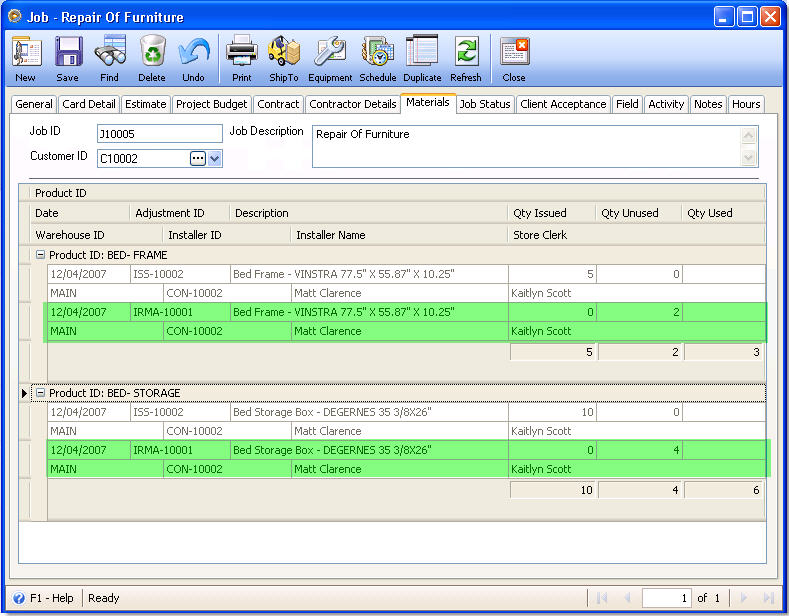
3. Click on Materials tab to review materials issued, materials unused and materials used. As of this time, you will only see materials issued transactions.
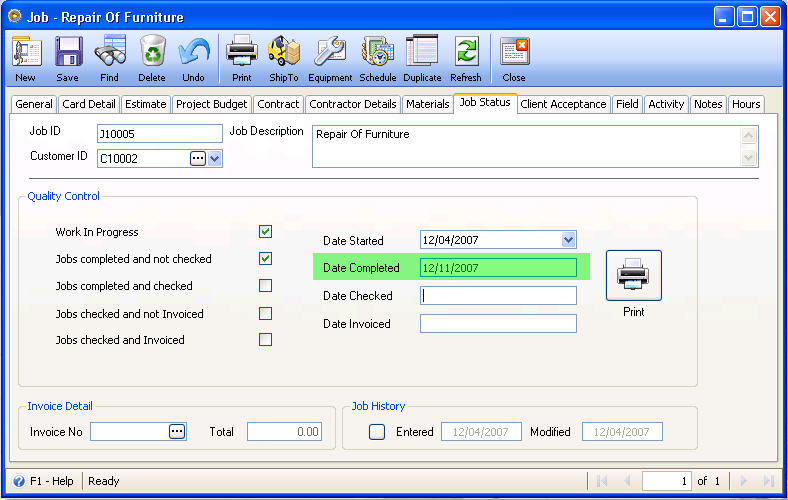
4. Update Job Status.
When Job Status has been updated, you may click the Print button to open the Report Manager where you can print Job Status report. The Job Status report will show Jobs in Progress, Jobs Completed and Not Checked, Jobs Completed and Checked, Jobs Checked and not Invoiced and Jobs Check?d and Invoiced.
5. Fill in Client Acceptance tab.
The Client Acceptance tab will be shown once the white box next to the Jobs completed and not checked is checked.
The Job Request Number field gets its value from the job request number entered in the Card Detail tab.
The Client Acceptance screen is completed when the contractor returns the Job Card to the Admin Dept. All Data when the job was completed is entered here. The client completes the job card and checks the boxes on the original job card.
The job card is returned to the Admin dept. as a job signed off sheet from the client.
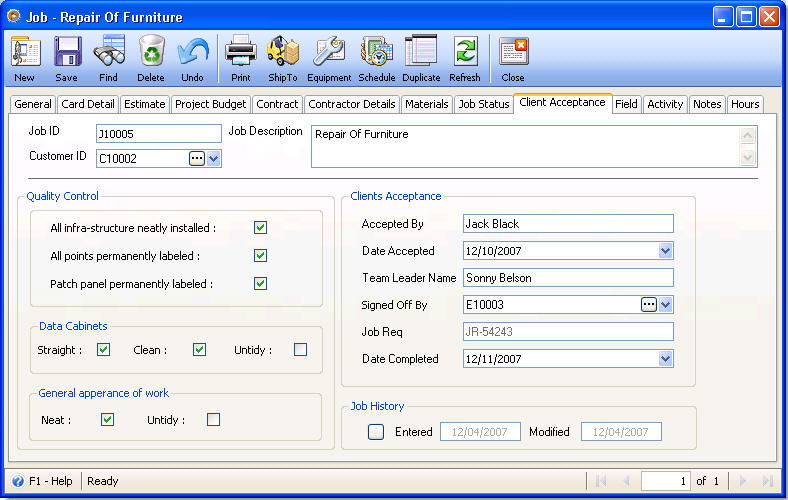
In the Date Completed field, enter the date the job is completed. As this field is filled in with the date, the Date Completed field next to Jobs completed and not checked in the Job Status tab and Completed field in Card Detail tab will automatically be filled in with this same date.
X. INVENTORY RMA (RETURN UNUSED MATERIALS)
1. Create new inventory RMA transaction to return unused materials.
To open Inventory Adjustment form – Material Return, go to Contacts> Project Management> Inventory RMA, this will open the Find Inventory Returns form. Click New button at the upper left hand corner of the form to open a new Material Return form.
Select a Job ID in the Job ID field. Once you place the focus on this field, an ellipse button will be shown. Click on that button to open the Job ID record selected.
In the Installer ID combo box, all contractors entered in the Contractor form will be displayed. Selecting a Contractor or Installer ID on this field will then fill in the Contractor Name or Installer Name. Next to this field is the Clerk Name. Enter a clerk name on this field.
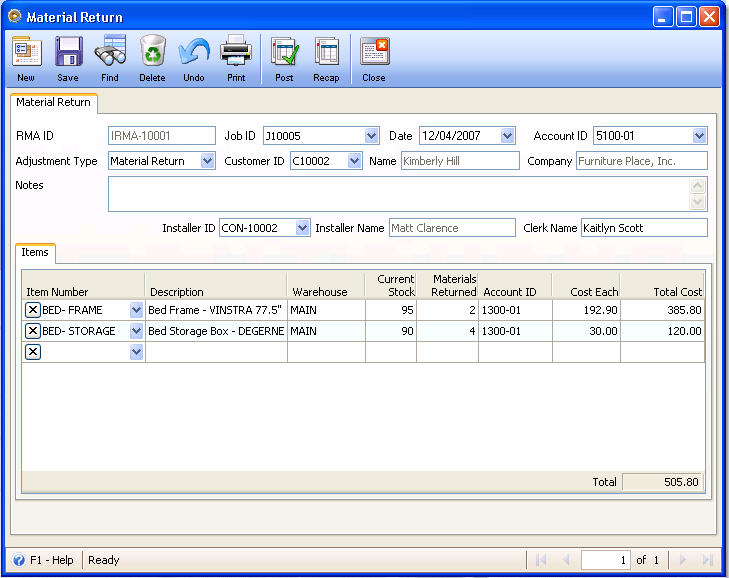
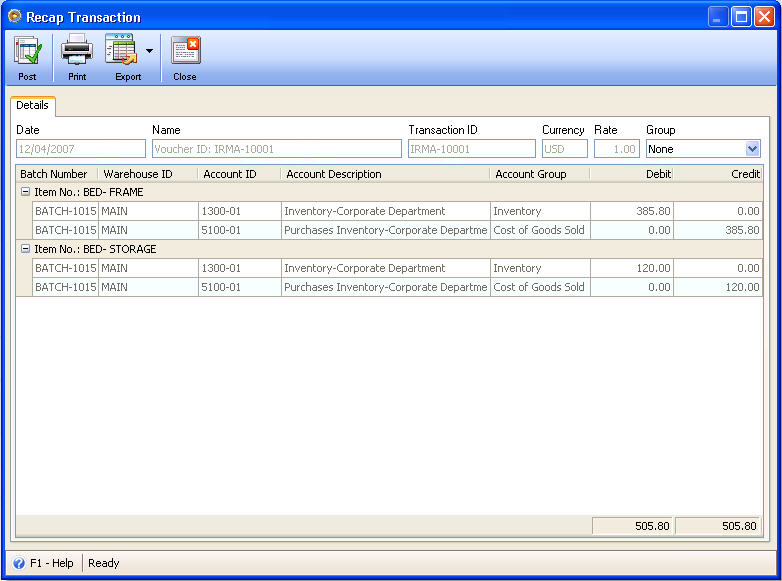
These are the accounts affected when this material return transaction is posted. Posting this transaction will also increase the in stock qty of the selected item.
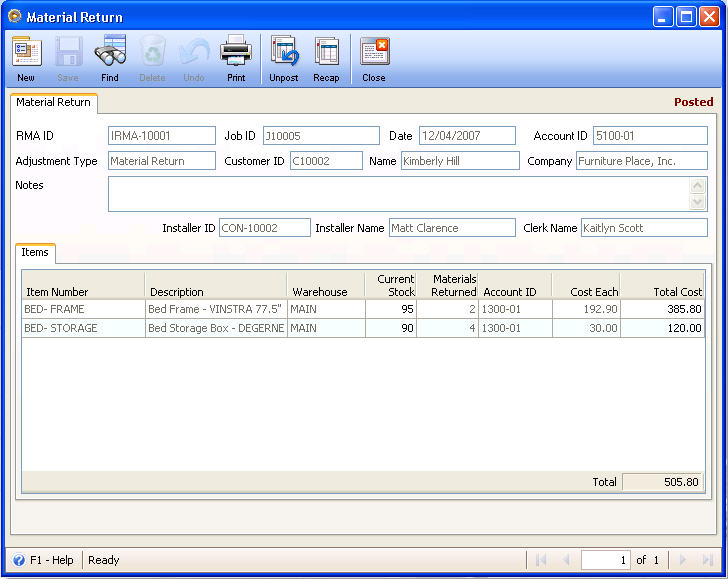
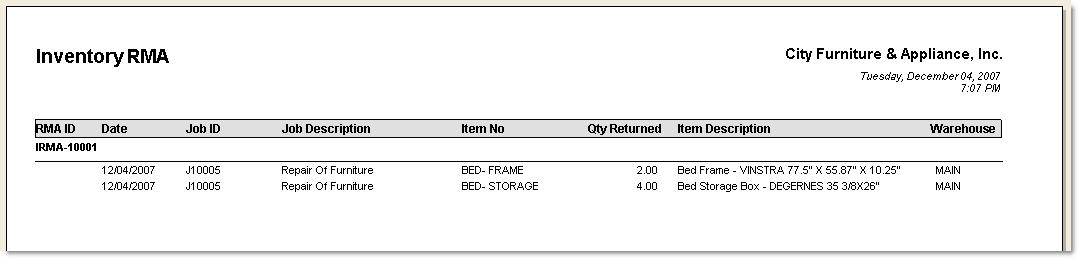
After posting a transaction to return unused materials, VisionCore will ask if you want to print a report. Click YES to print.
Go back to Jobs form – Materials tab to view the materials return transaction.
XI. JOB TRANSFER
Before you can transfer materials from one job to another, make sure that you have issued materials to the job source. Also, you must have more than one job record to do a job transfer.
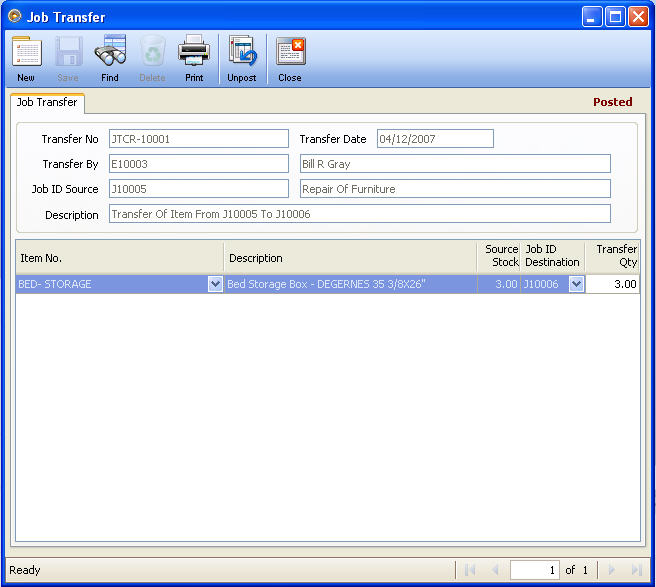
To transfer materials, go to Contacts menu > Project Management > Job Transfer. You will be brought to the Find Job Transfers form. Click the New button at the upper left hand corner of the form to open a new job transfer form.
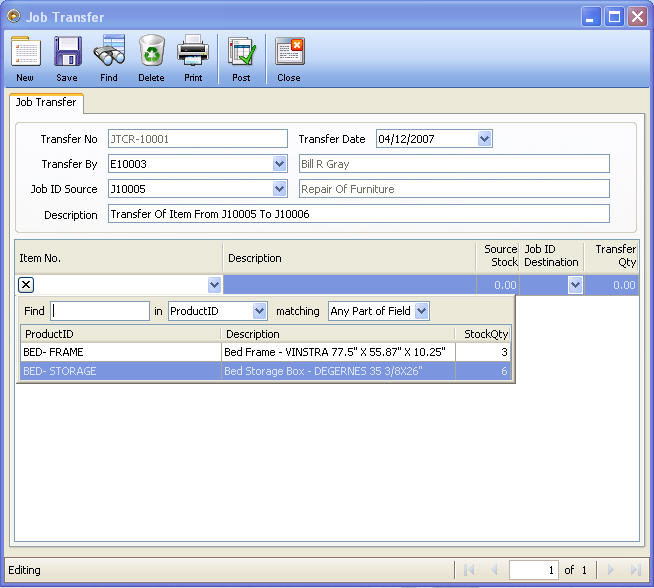
Select an Employee and the Job ID source. Enter a description for this job transfer.
In the Grid area, as you click the drop down arrow in the Item No. field, it will display only those inventory items that were issued to the job (job source).
Choose from the Job ID Destination field a job ID to where you want to transfer the inventory items to and enter the quantity to transfer.
XII. JOBS BILL
To create a jobs bill, go to Contacts menu > Project Management > Jobs Bill. You will be brought to the Find Bills form. Click the New button at the upper left hand corner of the form to open the Find the Job for this Jobs Bill form.
![]() Take note that only jobs set as Master Developer (in Jobs form – Contract tab) will be displayed.
Take note that only jobs set as Master Developer (in Jobs form – Contract tab) will be displayed.
Select a job to bring you to the Bill form. This transaction works like a standard Bill in VisionCore, the only difference is it specifically involves a job. You will notice that this form is filled in with information from the selected job like Contract ID, Job ID, Job Title and Contract Value.
The Complete (in percent) field is where you can enter a value that indicates how many percent will be added to the total percentage progress of the job. This same percentage will also be shown in the Recovery of Advance field.
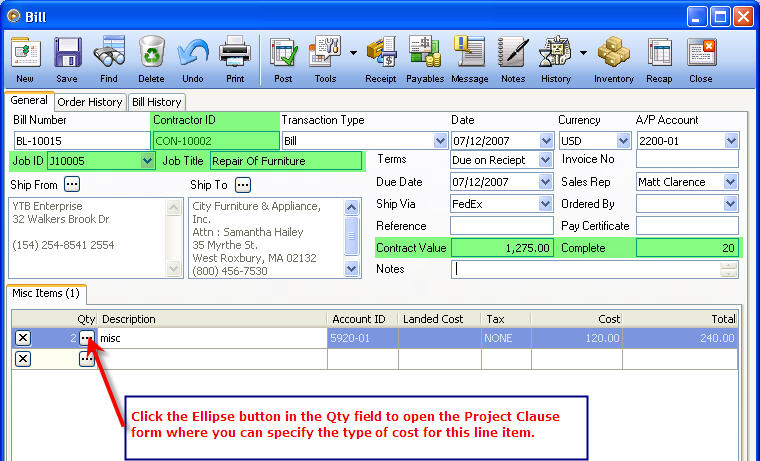
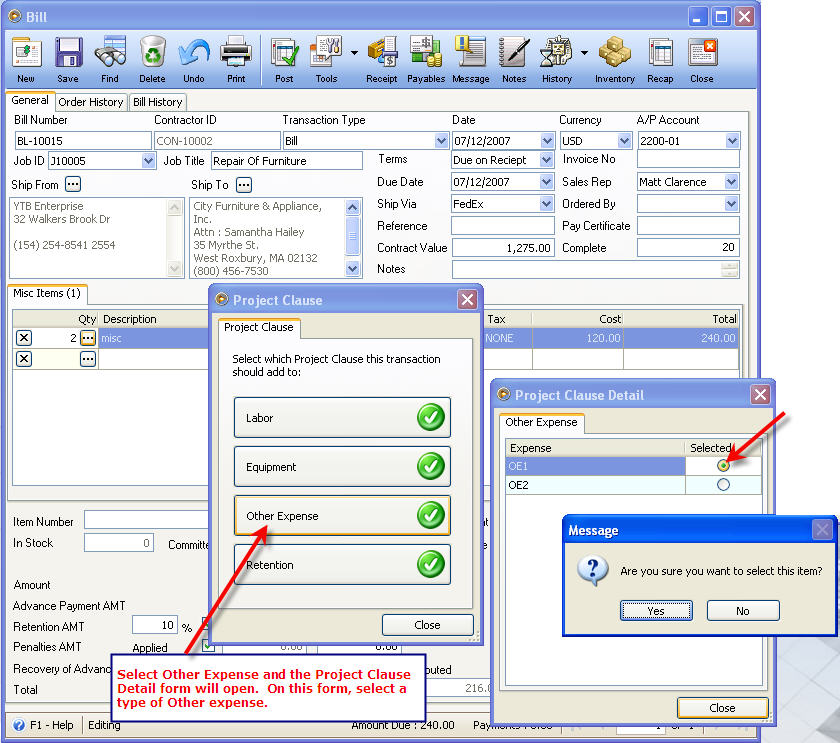
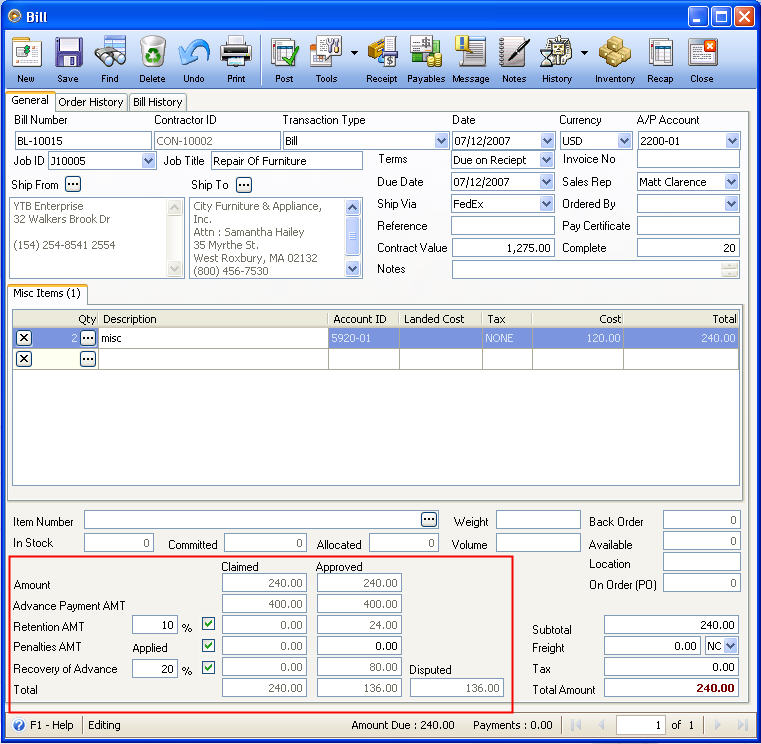
Enter costs incurred for the job in Misc Items tab. Click the Ellipse button in the Qty field to specify the cost of the line item. Project Clause will be discussed in the following sections of this documentation.
Other fields like Retention Amount (in percent), Penalties Amount, Recovery of Advance (in percent) fields are user input fields where you can enter/modify the value as necessary. Approved amount for Recovery of Advance is computed as Recovery of Advance percentage multiplied to the Advance Payment entered in Contract tab.
Then post this bill.
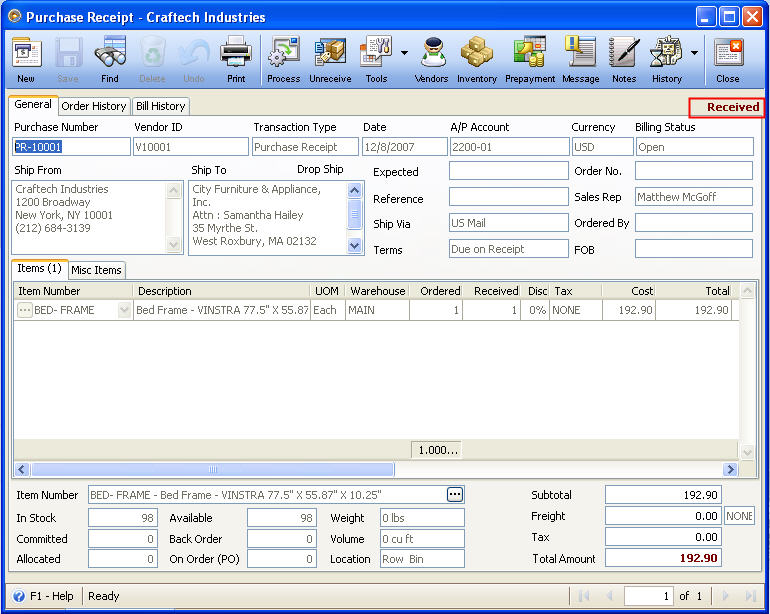
In case you would want to create a jobs bill that includes an inventory item, you will have to create a Purchase Receipt first. Here are the steps.
1. Create a new Purchase Receipt.
To open Purchase Receipt form, go to Purchasing> New Purchase Receipt, this will open the Find the Vendor for this Purchase Receipt form.
Select a vendor for that purchase receipt. When the Purchase Receipt form opens, enter inventory items in Items tab and receive these items.
2. Process this Purchase Receipt to Bill.
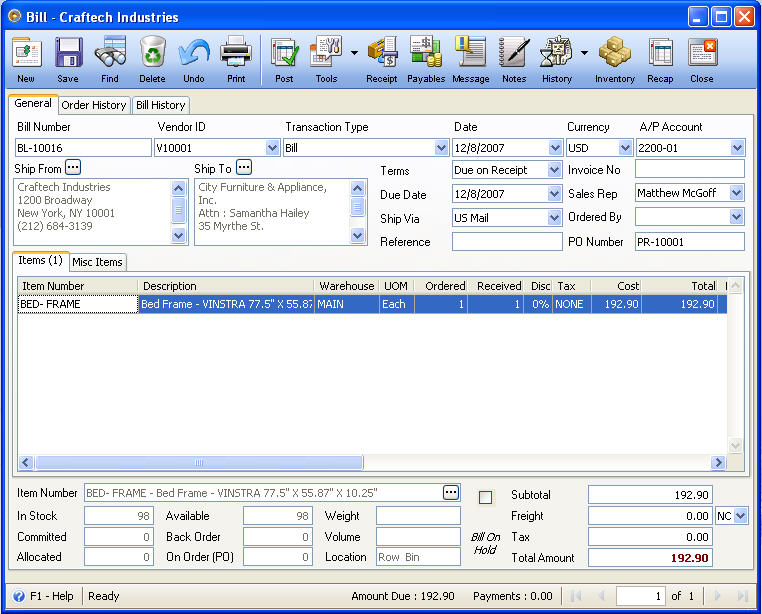
3. Save this Bill and take not of the Bill Number.
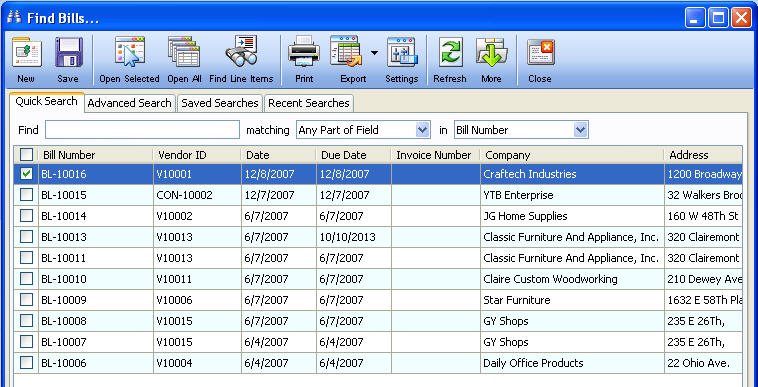
4. Now go back to Contacts Menu> Project Management> Jobs Bill. When the Find Bills form opens, select the previously created Bill (BL-10016).
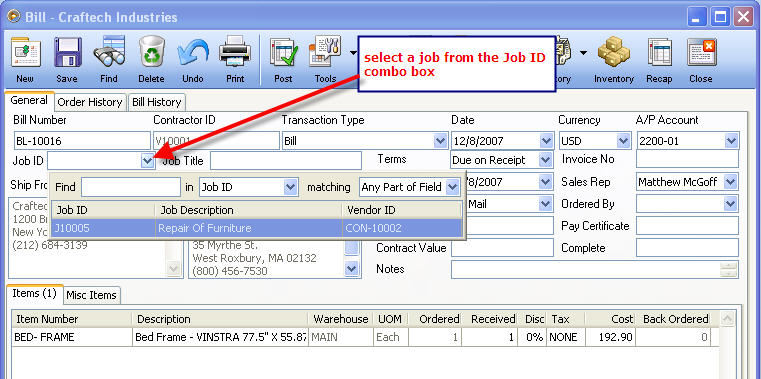
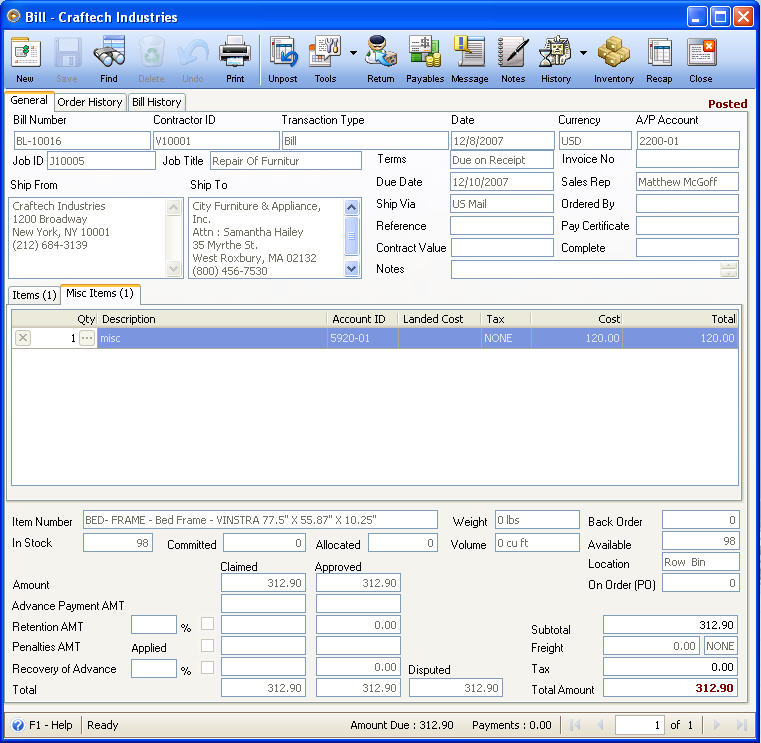
5. You can add Misc Items if you have it. Then assign a Project Clause and then post this Bill.
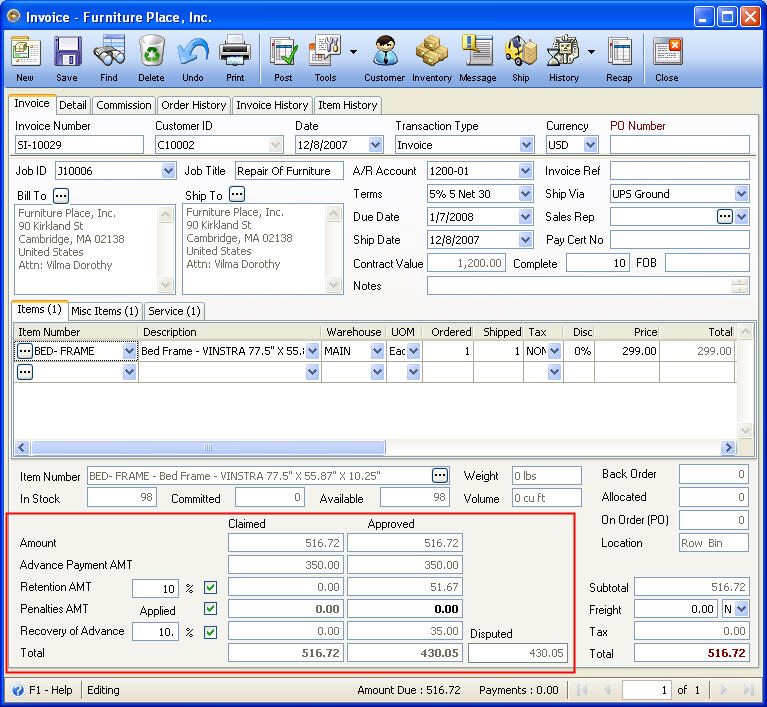
XIII. JOBS INVOICE
To create a jobs invoice, go to Contacts menu > Project Management > Jobs Invoice. You will be brought to the Find Invoices form. Click the New button at the upper left hand corner of the form to open the Find the Job for this Jobs Invoice form.
![]() Take note that only jobs set as Contract/Sub Contract (in Jobs form – Contract tab) will be displayed.
Take note that only jobs set as Contract/Sub Contract (in Jobs form – Contract tab) will be displayed.
Select a job to bring you to the Jobs Invoice form. This transaction works like a standard Invoice in VisionCore, the only difference is it specifically involves a job. You will notice that this form is filled in with information from the selected job like Job ID, Job Title and Contract Value.
The Complete (in percent) field is where you can enter a value that indicates how many percent will be added to the total percentage progress of the job. This same percentage will also be shown in the Recovery of Advance field.
Enter items for the job in Items tab.
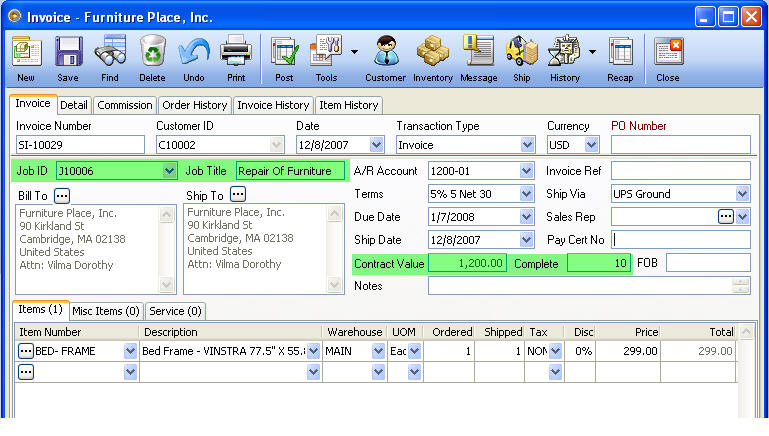
Enter additional costs incurred for the job in Misc Items and Service tabs. On each of the line item here, you will have to assign a Project Clause. Click the Ellipse button in the Quantity field (Misc Items tab) and Hours field (Service tab) to assign a project clause. Project Clause will be discussed in the following sections of this documentation.


Other fields like Retention Amount (in percent), Penalties Amount, Recovery of Advance (in percent) fields are user input fields where you can enter/modify the value as necessary. Approved amount for Recovery of Advance is computed as Recovery of Advance percentage multiplied to the Advance Payment entered in Contract tab.
Then post this invoice.
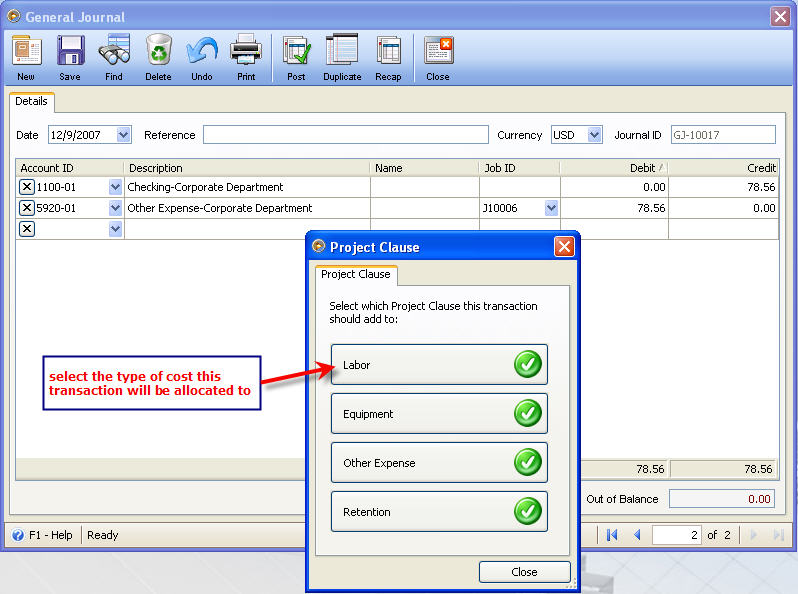
XIV. PROJECT CLAUSE
Project Clause is used to specify what expense is affected for every job related costs or is used to allocate the transaction amount as per the following default expenses: Labor, Equipment, Other Expense and Retention.
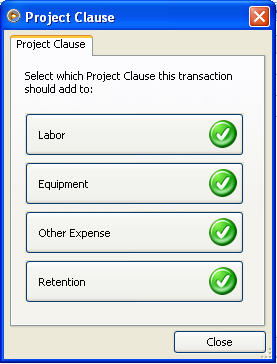
Jobs Bill, Jobs Invoice, General Journal, Write Checks, Withdrawals, Deposits, Credit Card Charge and Credit Card Returns are the only transactions where Project Clause form can be accessed. This Project Clause form will be opened right after assigning a Job ID or by clicking the ellipse button found in the Quantity or Hours field of the Jobs Bill and Jobs Invoice forms.
Example:
Create a General Journal. In the line items of this journal, click the drop down arrow button to select a Job ID.
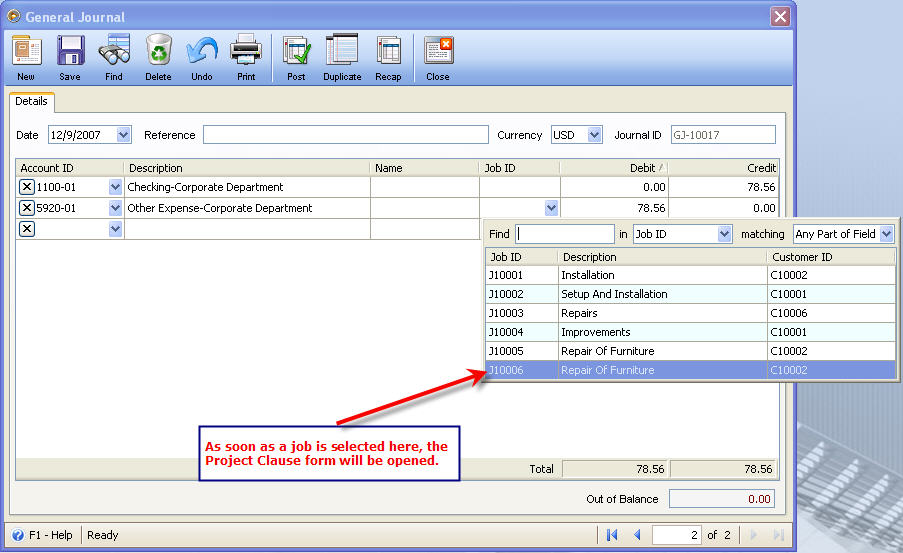
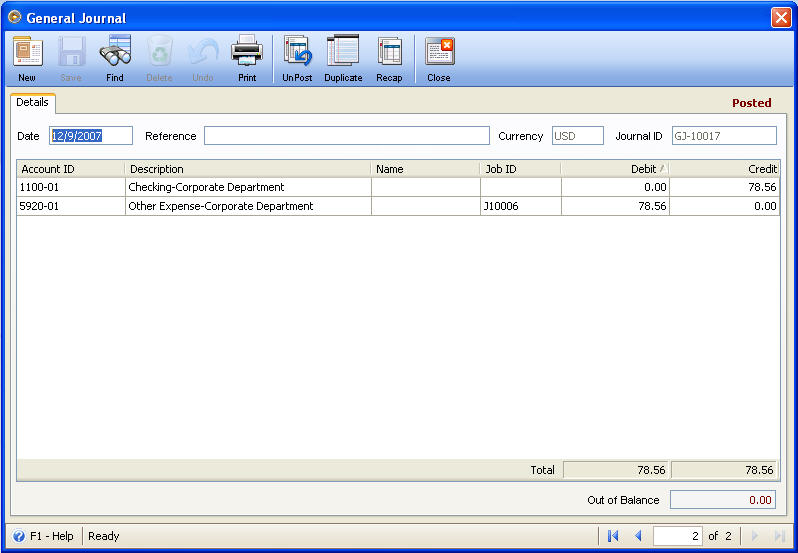
As soon as a Job ID is selected, the Project Clause form will then open. Select the type of cost and then post this journal.
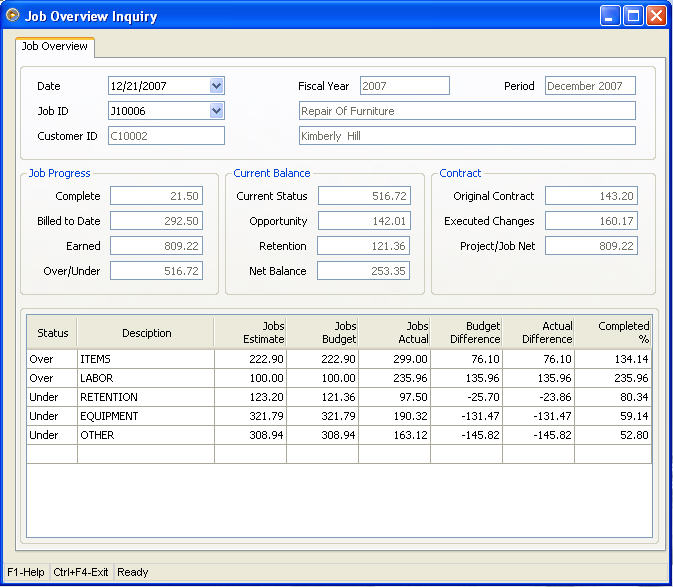
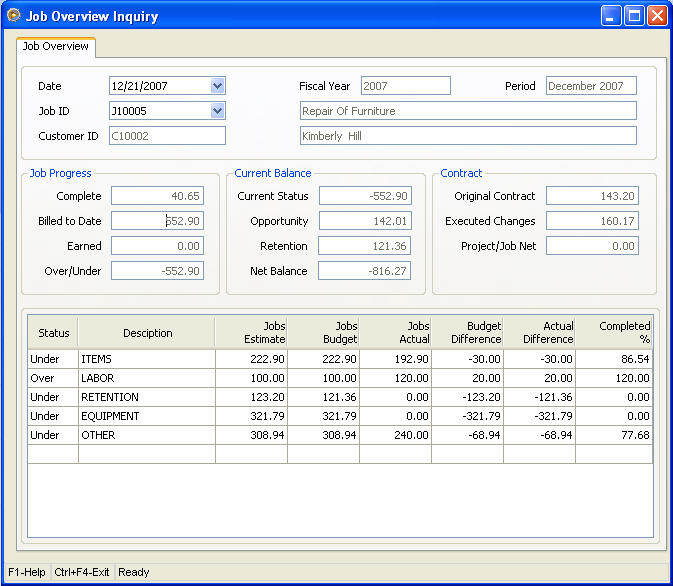
XV. JOBS OVERVIEW
Jobs Overview will display the expenses affected and information regarding the completion of a certain job. This form will also display the forecasted Budget vs. the Actual amounts from job related transactions.
Job Progress
Complete – This field will display a value that is equal to Billed to Date amount divided by Total Budget times 100. (Billed to Date/Total Budget x 100)
Billed To Date – This field will display the sum of all Debit amounts posted for a certain job.
Earned – This field will display the sum of all Credit amounts posted for a certain job.
Over/Under – This field will display the difference of Earned and Billed to Date amounts.
Current Balance
Current Status – This field will display an amount equal to that shown in Over/Under field.
Opportunity – This field will display the amount entered into the Opportunity Cost field in Project Budget tab (Job form).
Retention – This field will display the amount entered into the Retention Cost field in Project Budget tab (Job form).
Net Balance – This is computed as Current Status amount less Opportunity and Retention costs.
Contract
Original Contract - This field will display the amount entered into the Original Contract field in Project Budget tab (Job form).
Executed Changes – This amount is computed as:
![]() When Actual Difference is lower than Budget Difference, executed change is computed as Original Contract less (Actual Difference – Budget Difference).
When Actual Difference is lower than Budget Difference, executed change is computed as Original Contract less (Actual Difference – Budget Difference).
![]() When Actual Difference is higher than Budget Difference, executed change is computed as Original Contract plus (Actual Difference – Budget Difference).
When Actual Difference is higher than Budget Difference, executed change is computed as Original Contract plus (Actual Difference – Budget Difference).
Project\Job Net – This field will display an amount equal to that shown in the Earned field.
Grid area
Status – This will display Over when Jobs Actual amount is higher than the Jobs Budget amount. This will display Under when Jobs Actual amount is lower than the Jobs Budget amount.
Jobs Estimate – Amounts shown in this field are taken from Jobs form – Estimate tab.
Jobs Budget – Amounts shown in this field are taken from Jobs form – Project Budget tab.
Jobs Actual – This field will display the total of all posted job transactions that have project clause assigned to it.
Budget Difference – This is computed as Jobs Actual amount less Jobs Estimate.
Actual Difference – This is computed as Jobs Actual amount less Jobs Budget.
Completed % - This is computed as Jobs Actual divided by Job Budget times 100.
Here’s how the Jobs Overview form will look like after doing several transactions that are illustrated in this documentation.
For J10005:
For J10006: