Manufacturing Process
This documentation will show you how the new manufacturing process works.
I. Default Account Setup
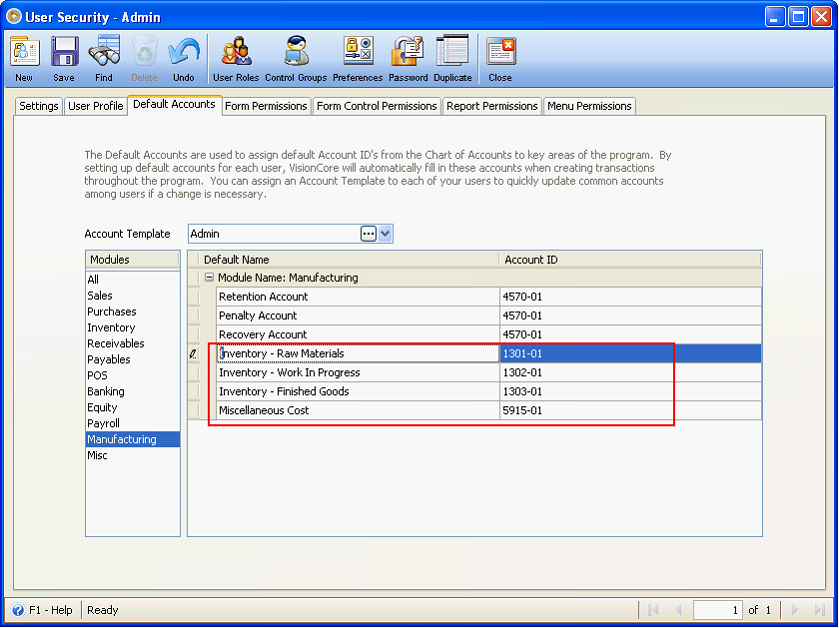
Setup your Default accounts for Manufacturing (Bill of Material Affected Accounts area).
![]() Note that Comtech Solutions strongly recommends to populate the fields in Security form > Default Accounts tab > Manufacturing module since this will help speed up data entry when you are adding a new manufacturing record/transaction. All the vital account codes will fill in automatically for you. If you want, you can override the default Account ID directly in the actual transaction form.
Note that Comtech Solutions strongly recommends to populate the fields in Security form > Default Accounts tab > Manufacturing module since this will help speed up data entry when you are adding a new manufacturing record/transaction. All the vital account codes will fill in automatically for you. If you want, you can override the default Account ID directly in the actual transaction form.
II. Inventory Setup
Before you configure your manufacturing setup, raw materials needed for manufacturing the product, by products created and manufacturing item type must be setup first in your inventory items.
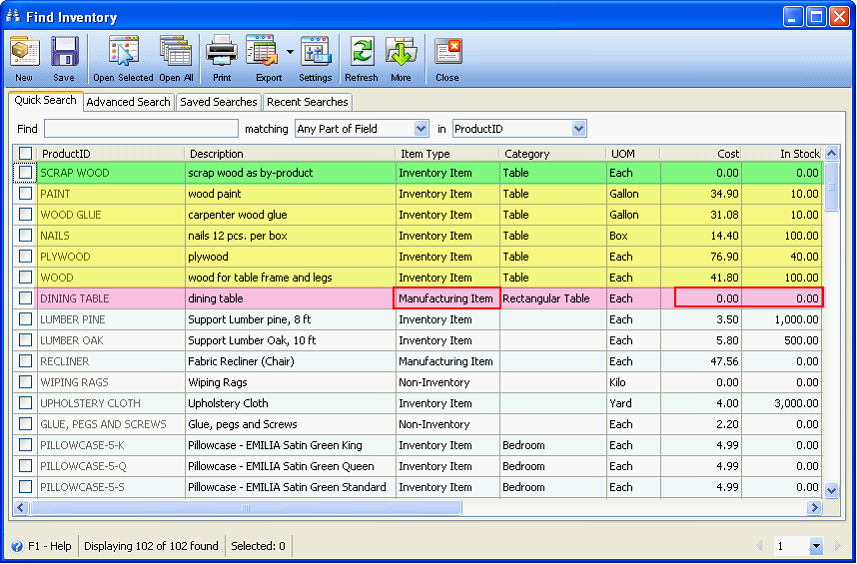
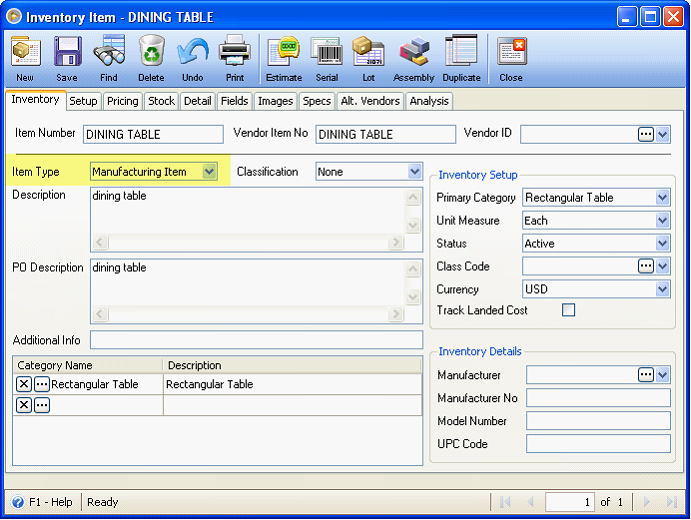
Here is an example of items created for manufacturing.
![]() Items highlighted in yellow are raw materials needed for manufacturing
Items highlighted in yellow are raw materials needed for manufacturing
![]() Item highlighted in green is the by-product item
Item highlighted in green is the by-product item
![]() Item highlighted in pink is the main item to be manufactured.
Item highlighted in pink is the main item to be manufactured.
As shown in this screenshot, Dining Table is set up as Manufacturing Item type. Last Cost and In Stock qty is still zero, these will be updated after completing the manufacturing process.
The next screenshot will show where you can set the main item as Manufacturing Item type.
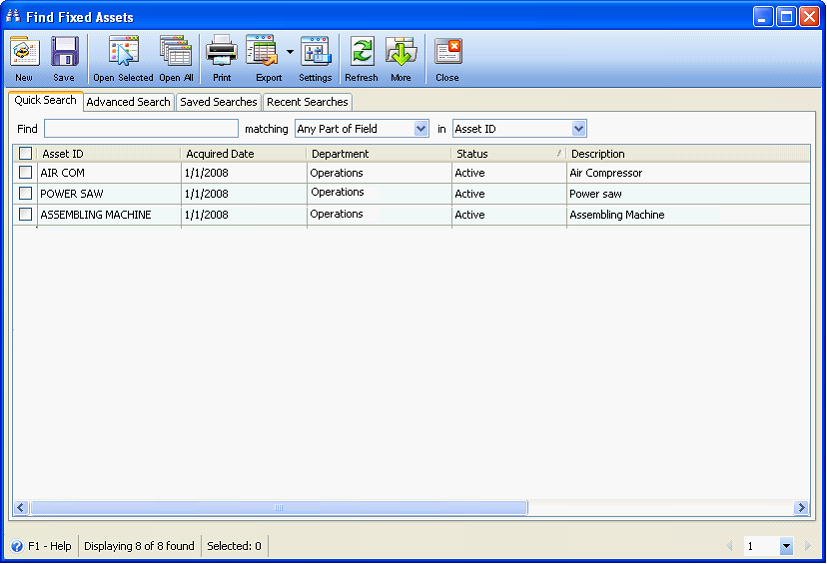
III. Fixed Asset Setup
After you have setup your items, machines needed for manufacturing must be added on the Fixed Assets form, if those do not yet exist on Fixed Asset record.
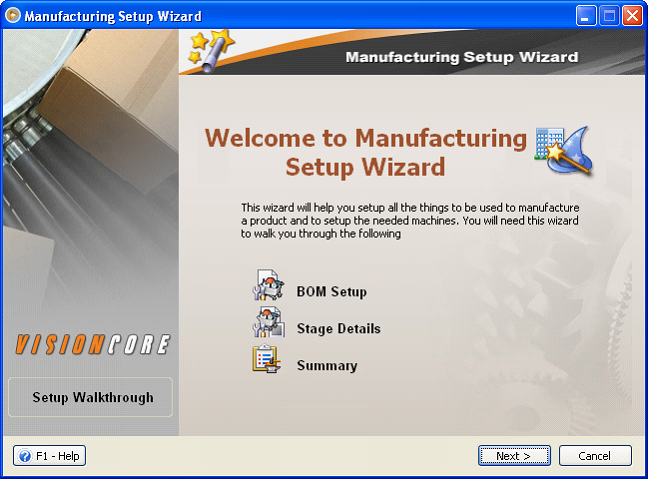
IV. Manufacturing Wizard
Now that all items are created and machines needed already exist on Fixed Assets record, you are ready for the manufacturing setup. Manufacturing process starts with setting up materials, machines, other expenses needed, stages that comprise the manufacturing process and by-products created. These things can be setup using the Manufacturing Setup Wizard. This wizard will walk you through the process of your manufacturing setup.
The Manufacturing Setup Wizard can be accessed from Manufacturing menu > Manufacturing Wizard. This wizard is divided into 3 parts:
![]() BOM Setup
BOM Setup
![]() Stage Details
Stage Details
![]() Summary
Summary
Each of the above parts will be discussed in detail below.
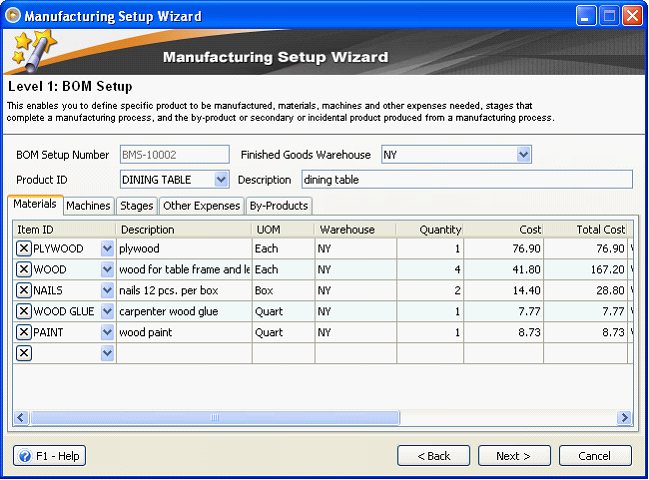
Level 1: BOM Setup
The BOM Setup page enables you to configure the product to be manufactured, materials needed to manufacture (in terms of unit of measure, quantity and warehouses), machines to be used, stages that complete the manufacturing process, other expenses directly or indirectly related in manufacturing the product, and the by-product or secondary product produced from a manufacturing process.
Fields at the top of the form
The BOM Setup Number will be automatically filled in with a unique number based on the starting number that is assigned in the Starting Numbers form > Manufacturing. This number is used as a reference for you and VisionCore to help find this transaction later if necessary. It can be manually changed on this form as long as it does not duplicate a previous BOM Setup Number.
The Finished Goods Warehouse is where you can set the warehouse where finished goods/products go to.
The Product ID field will show all items that are set as manufacturing type. In this field, select the main or primary item you would want to manufacture.
The Description field will automatically display the item’s description entered in the Inventory form though you can modify this if you need to.
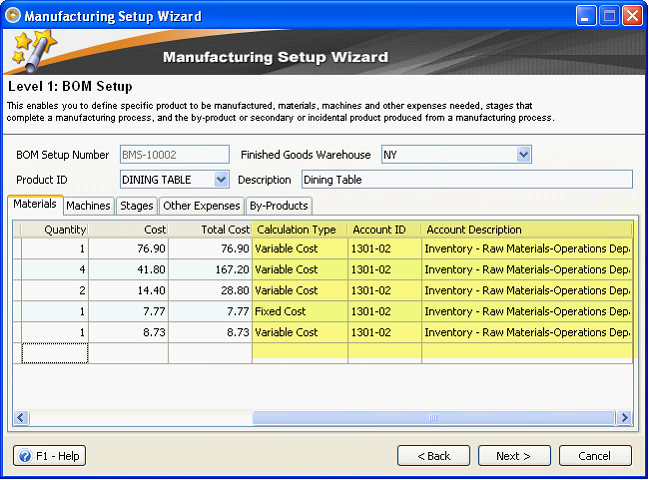
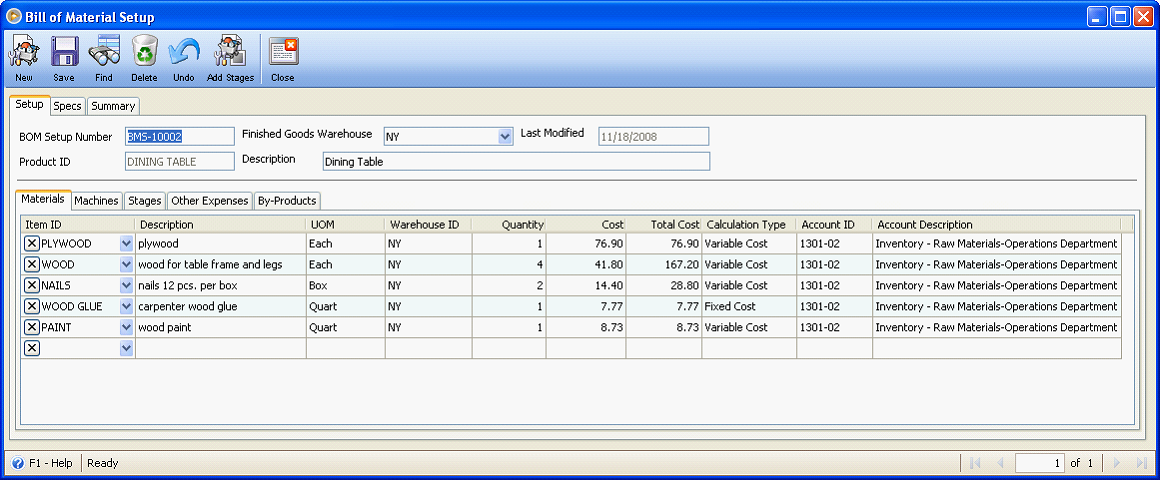
Material Setup
In the Material tab enter raw materials needed for manufacturing the main product in terms of unit of measure, warehouses and quantity.
Use the scroll bar to configure the Calculation Type and Inventory Account ID.
Options for Calculation Item Type:
![]() Fixed Cost – Product’s cost that does not change in quantity even if the number of products manufactured increases or decreases
Fixed Cost – Product’s cost that does not change in quantity even if the number of products manufactured increases or decreases
![]() Variable cost – Product’s cost that changes in quantity depending on the number of products manufactured.
Variable cost – Product’s cost that changes in quantity depending on the number of products manufactured.
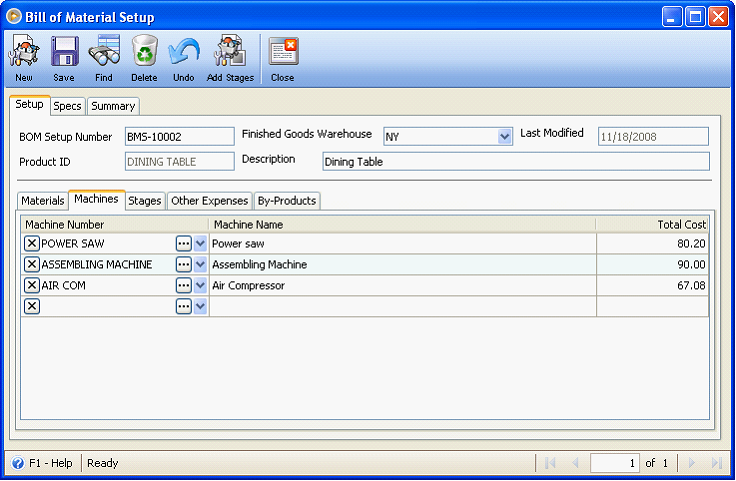
Machine Setup
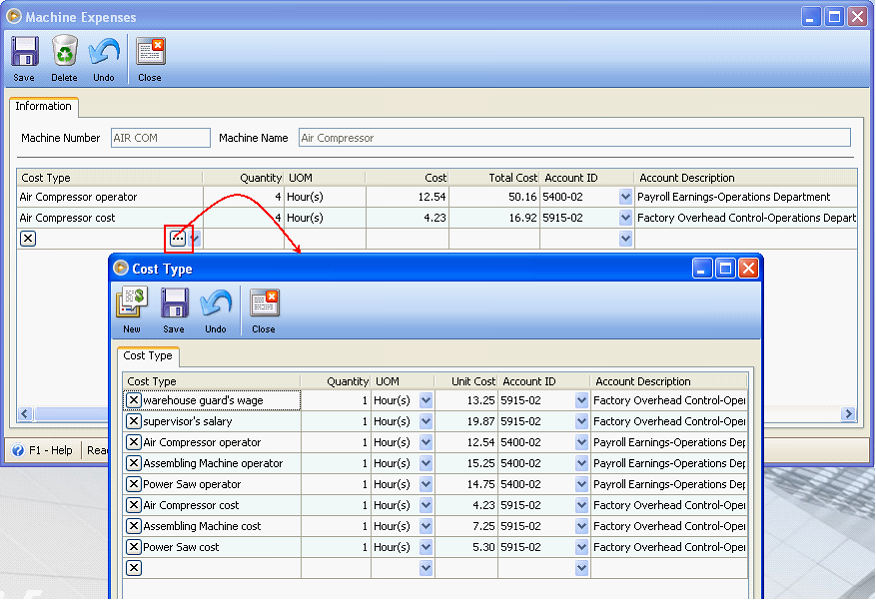
This Machine tab is used to enter machines needed for manufacturing, machine costs and other costs related to machines.
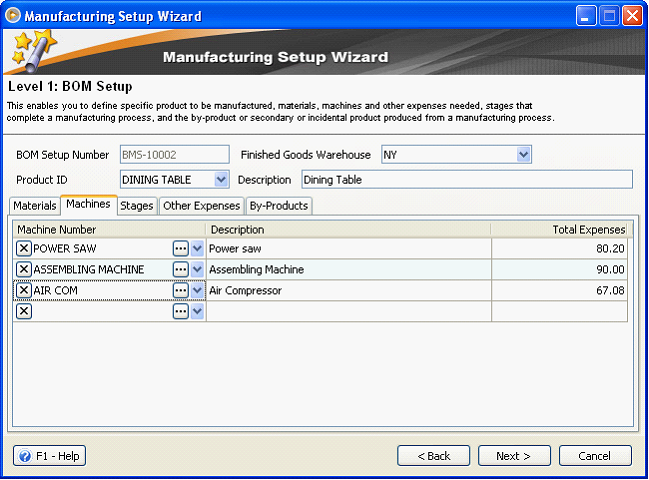
How machines and machine costs are setup:
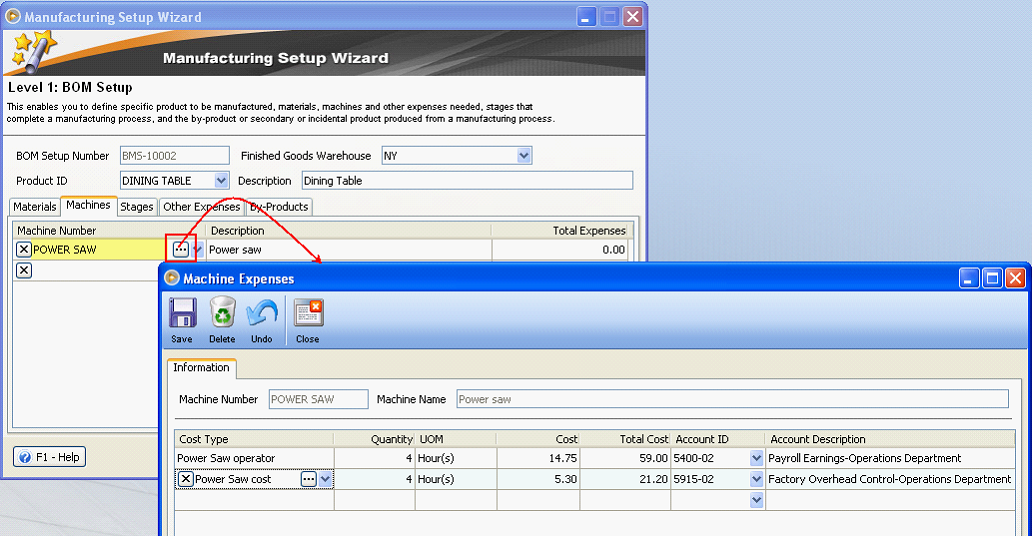
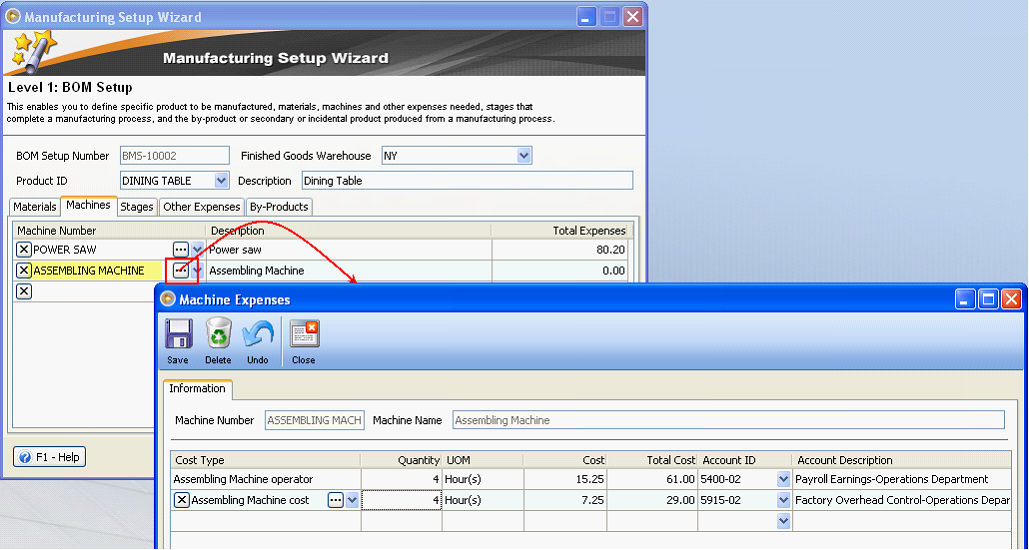

Click the ellipse button on Cost type field to open the Cost Type form where you can add other cost types.
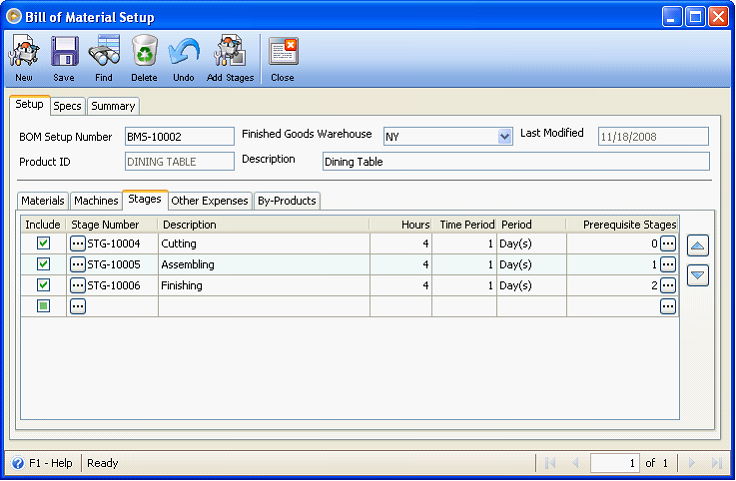
Stage setup
The Stage tab is used to add stages that complete the production process.
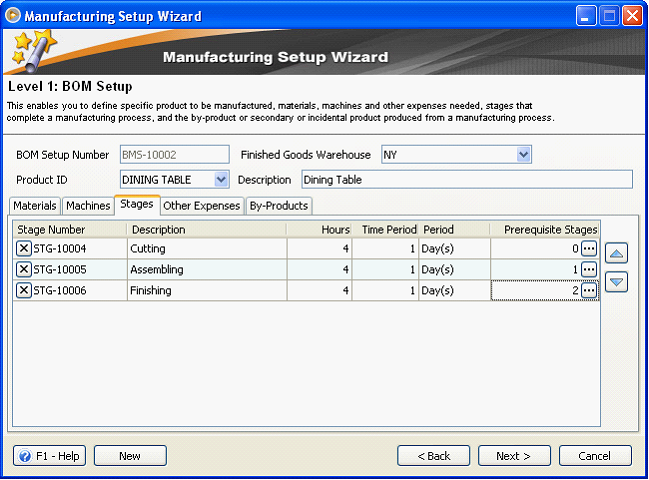
How stages are setup:
Click on the New button at the bottom left of the form to create a new stage
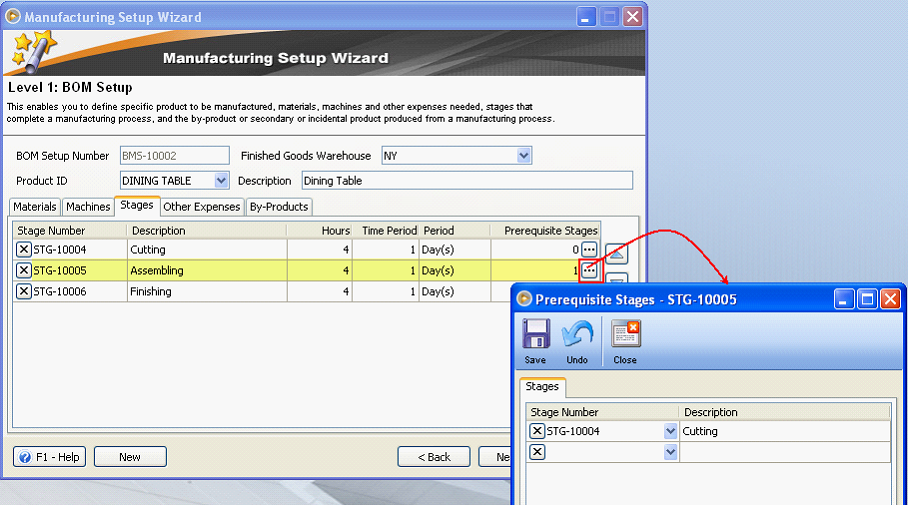
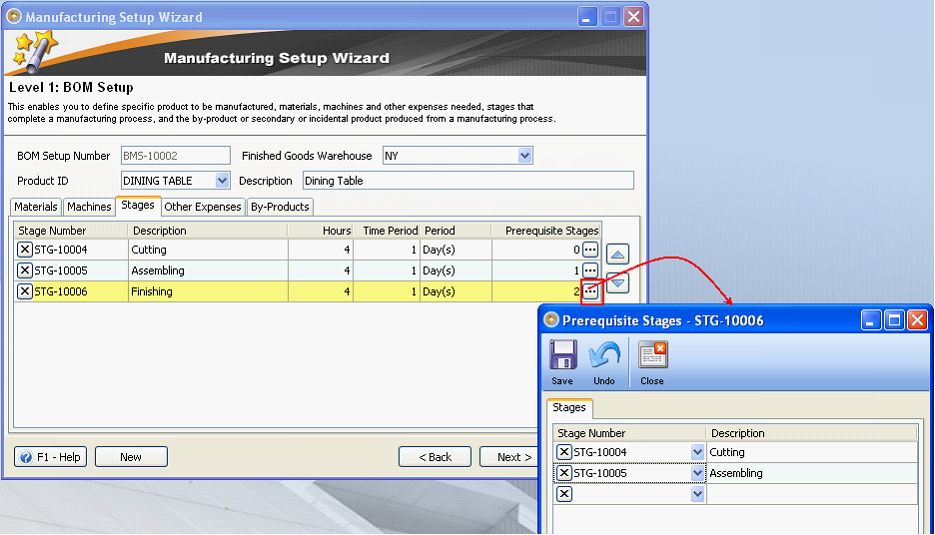
In the Prerequisite Stage field, click the ellipse button to assign prerequisite stage/s to a certain stage. Prerequisite Stages form will list all stages prior to the selected stage and it is on this form where you can configure what stages must be completed prior to completing the said stage.
So in Assembling Stage, Cutting stage must be completed first before the said stage can start.
In Finishing Stage, Cutting and Assembling stages must be completed first before the said stage can start.
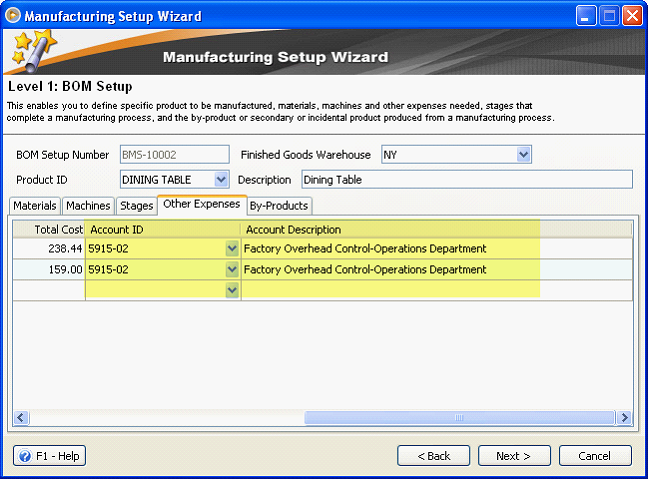
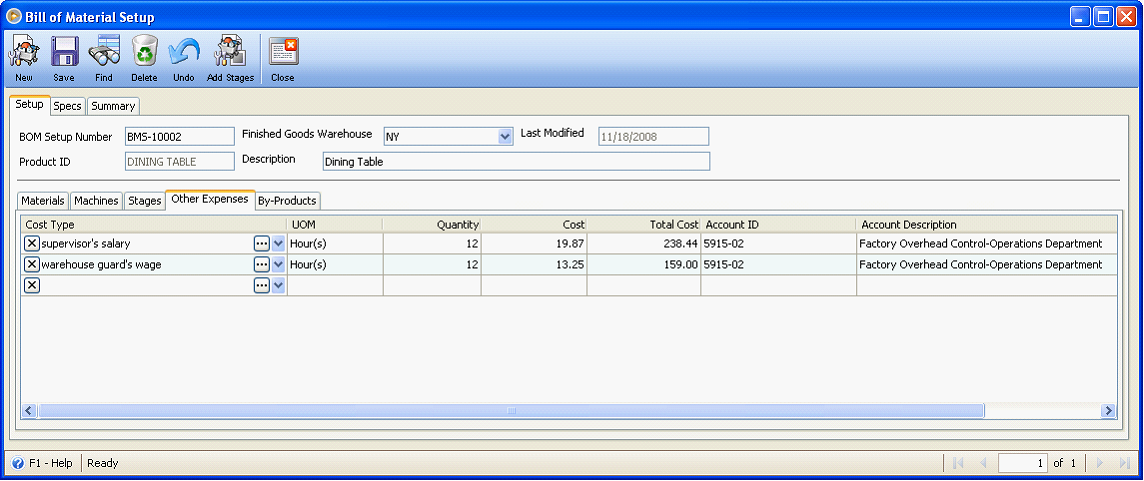
Other Expenses setup
The Other Expenses tab is used to add other expenses directly or indirectly related in manufacturing the product.
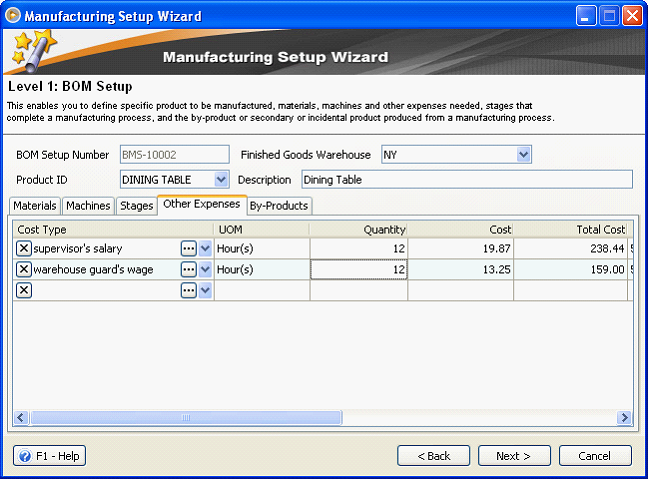
Use the scrollbar to configure accounts to be used.
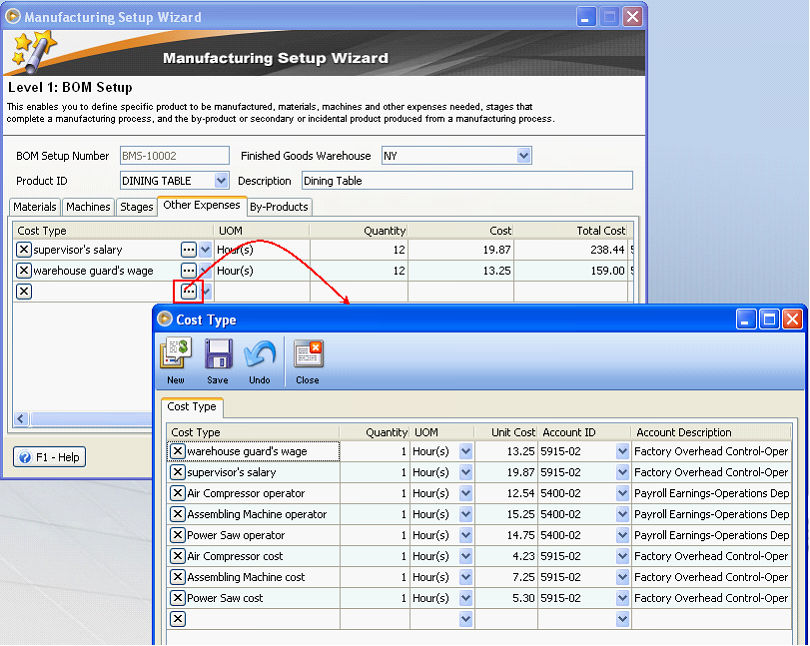
How other expenses are setup:
Click the ellipse button on Cost type field to open the Cost Type form where you can add other cost types.
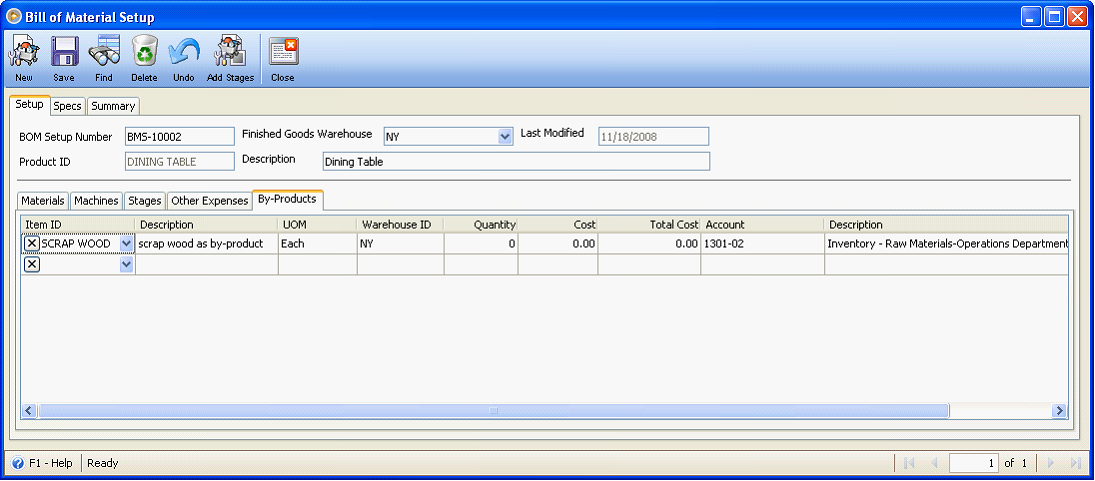
By-Products setup
The By-Products tab is used to enter secondary or additional product produced in the course of manufacturing the primary/main product.
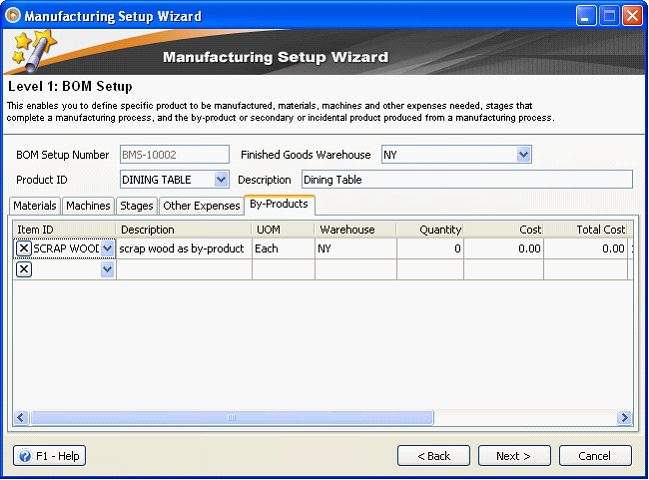
When you are through with the above setup, click Next button to move to the next level.
Level 2: Stage Details
The Stage Details page enables you to configure materials, machines and other expenses needed for a specific stage. You need also to configure the by-product/s to be manufactured in a specific stage, if there is.
In short, this is where you allocate what you have setup/configured in Level 1: BOM Setup.
![]() Note that you cannot allocate materials, machine costs and other costs that are more than what you have setup.
Note that you cannot allocate materials, machine costs and other costs that are more than what you have setup.
How to setup a stage:
Cutting Stage
1.Enter materials need for this stage.

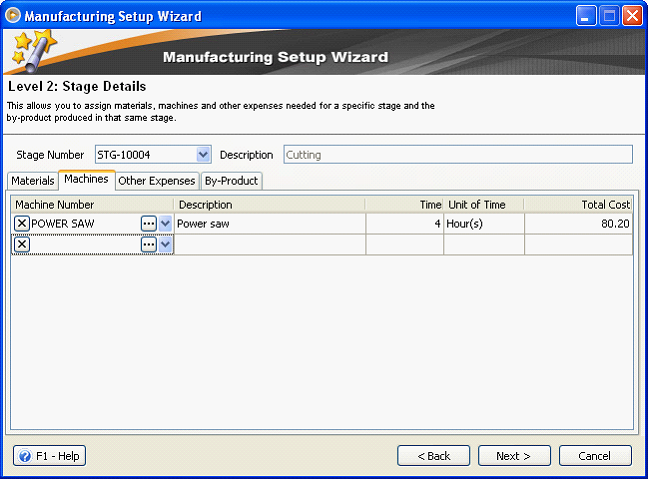
2.Enter machine expenses for this stage. To do this, enter first the machine needed for this stage, then click the ellipse button next to a stage to open Machine Expenses form where you can configure machine and other expenses related to the machine.

As you close Machine Expenses form after setting up machine expenses related to power saw machine, Total Cost field of Power Saw machine will show an amount equal to the sum of all machine expense previously setup. Then enter the equivalent time of 4 hours.
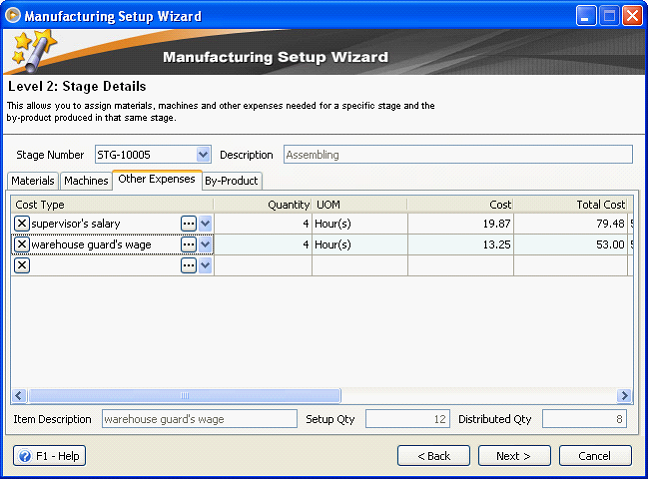
3.Enter Other Expenses for this stage

As shown on the above screenshot, when you assign a quantity, the Distributed Qty field at the bottom right of the form will be updated with how many hours will this stage use. With this, you’ll know how many hours had been allocated for a stage and how many hours are still available for other stages.
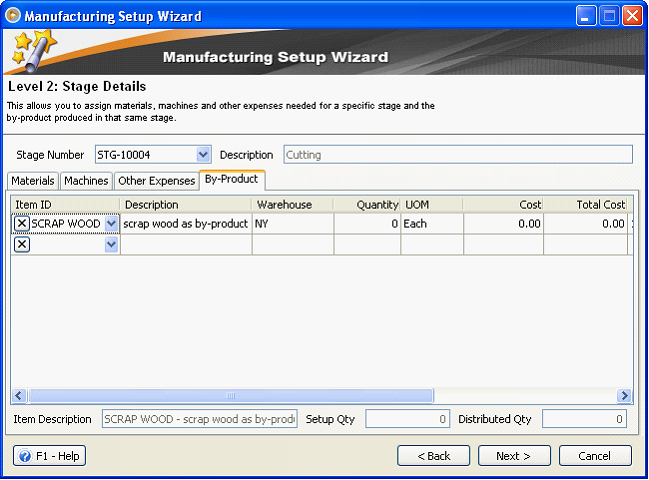
4.Enter By-product for this stage if there is.
Assembling Stage
1.Enter Materials for this stage.

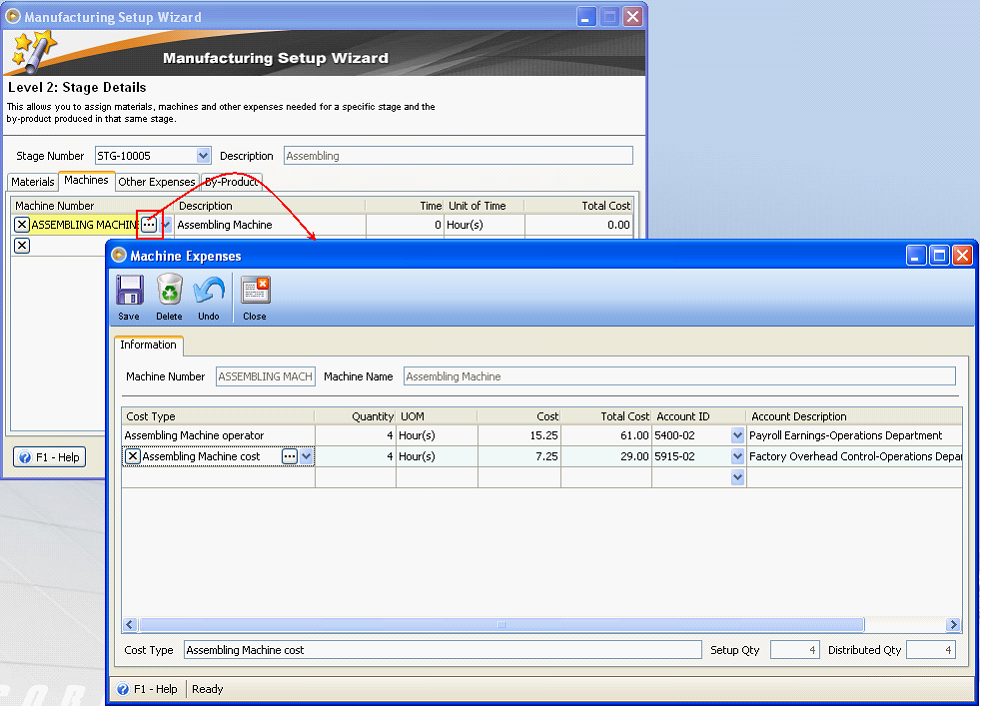
2.Enter Machine expenses for this stage
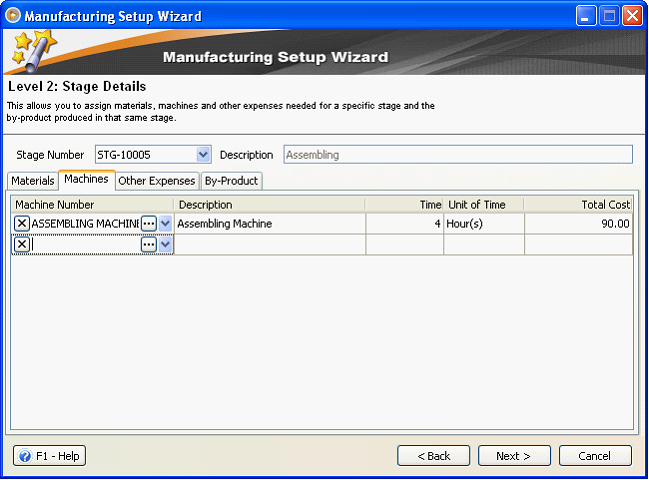
3.Enter Other Expenses for this stage.
As shown on the above screenshot, since 4 hours were allocated for Cutting stage and 4 hours for this stage, then Distributed Qty will now show 8 hours.
4.Since no by-product is produced in this stage, leave this blank.

Finishing Stage
1.Enter Material for this stage.

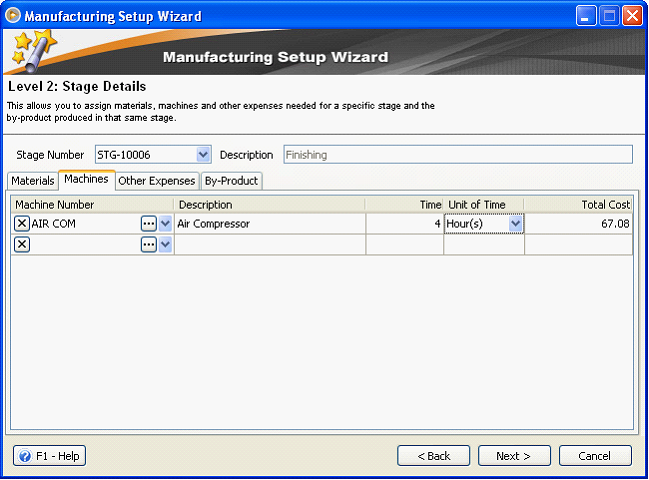
2.Enter Machine expenses for this stage

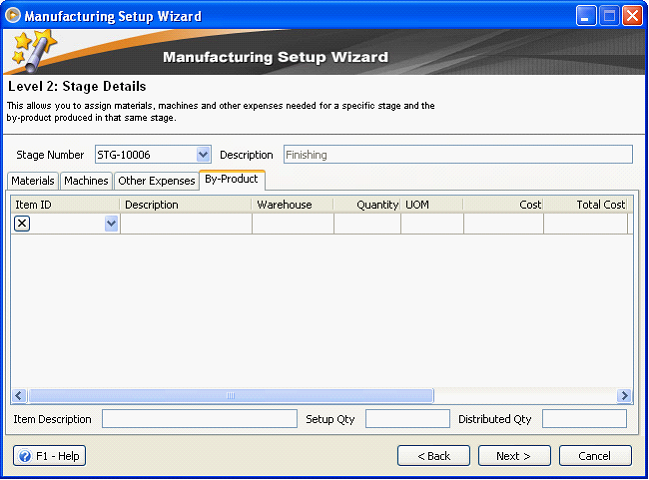
1.Other expenses for this stage

As shown on the above screenshot, since 4 hours were allocated for Cutting stage, 4 hours for Assembling stage and 4 hours for this stage, then Distributed Qty will now show 12 hours.
2.Since no by-product is produced in this stage, leave this blank.
When you are done with the stage detail setup, click Next button to move to the next level.
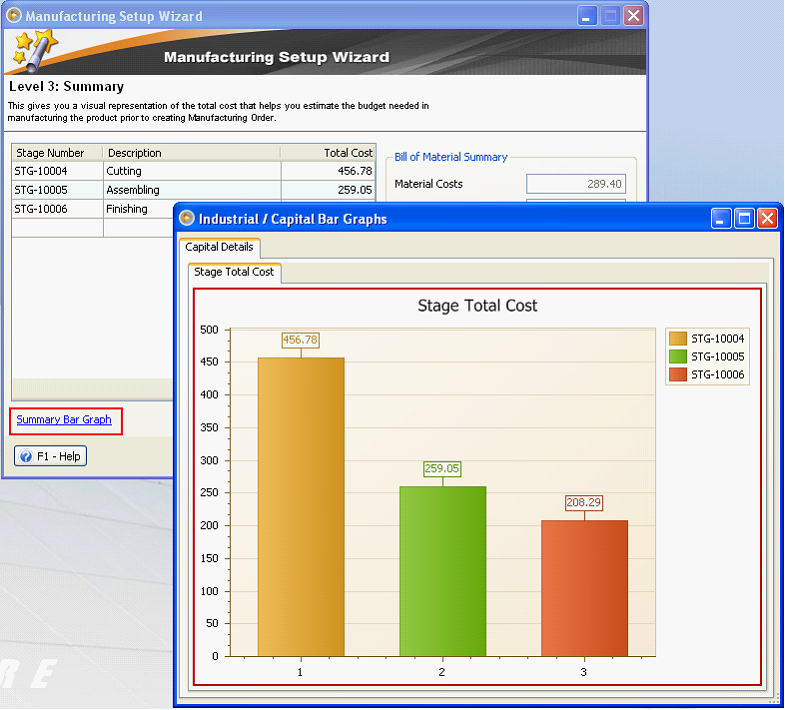
Level 3: Summary
The Summary page gives you a visual representation of the total cost of materials, machine expenses and other expenses as well as the total cost per stage.
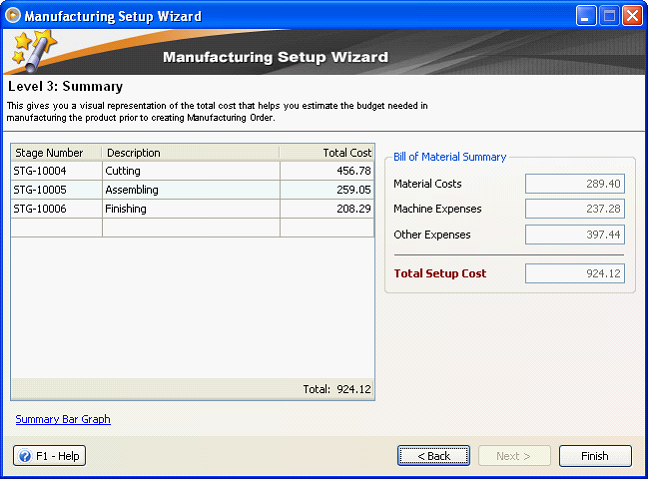
As shown in the above screen, Stage Cost Total and Total Setup Cost match. This means that material costs, machine and other expenses were all allocated to stages.
On this same page also, you can use the Summary Bar Graph link at the bottom left of the form to see a graphical representation of the cost incurred for each stage.
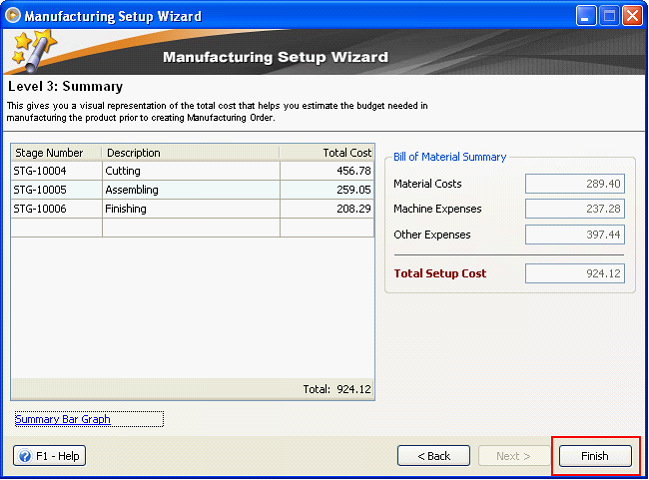
You are now through with Manufacturing setup. Click Finish button and Close.
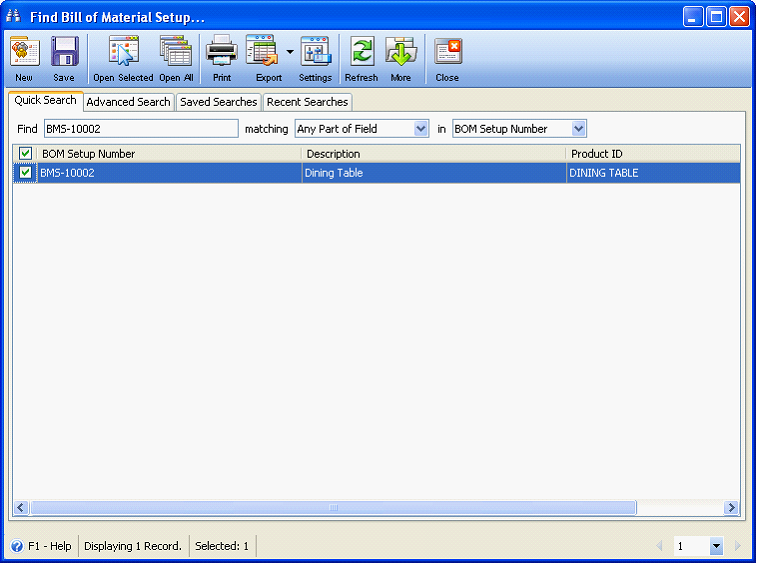
You can still view your manufacturing setup and even modify it using the Bill of Material Setup form. This form can be accessed from Manufacturing menu > Bill of Material Setup.
Bill of Material Setup
The Bill of Material Setup form will allow you to view the manufacturing setup that was previously added using the Manufacturing wizard, though you can add a new BOM setup on this form by clicking the New button.
In this example, let’s open the BOM Setup that was previously added.
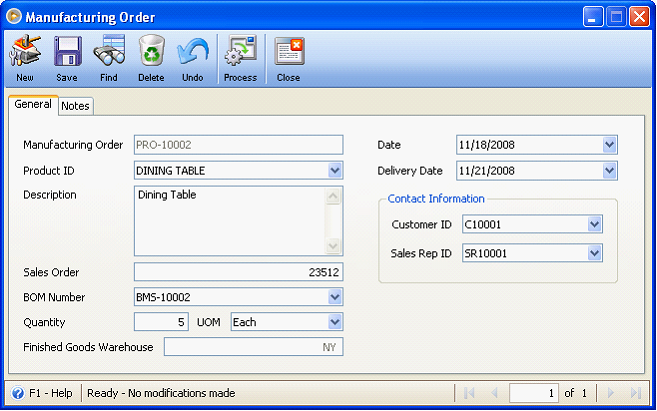
VI. Manufacturing Order and Stage to Process
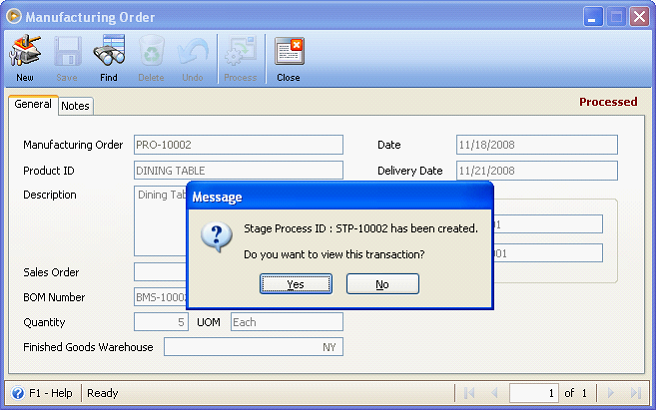
At this point, you can now create a Manufacturing Order.
Click the Process button to process this order. This message will be shown. Click OK.
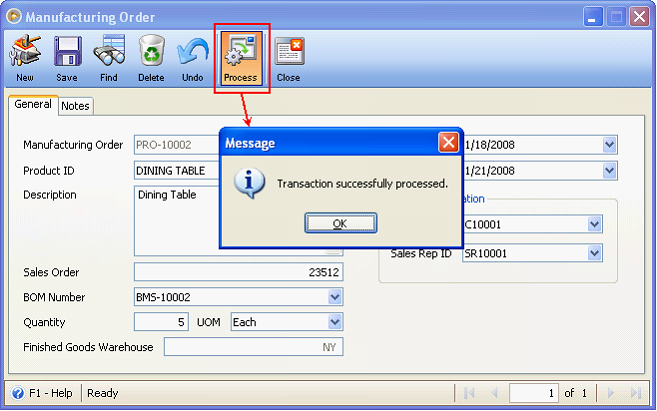
And this message will be shown. Click Yes to view the Stage To Process transaction created.
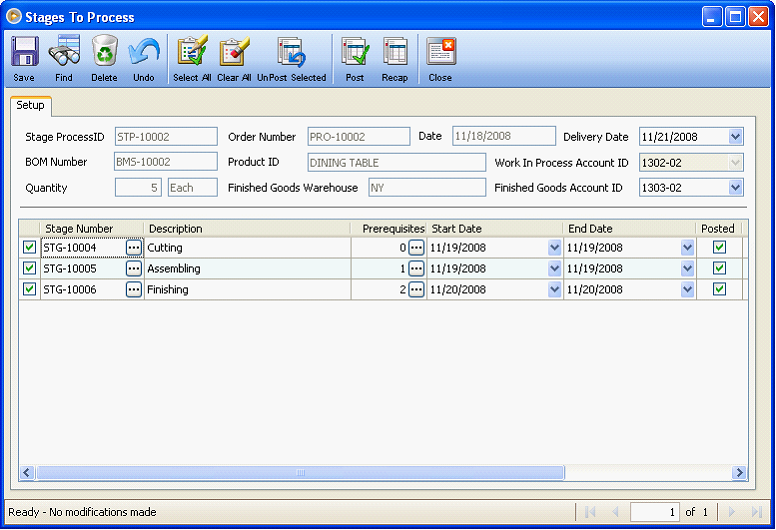
Then you will be brought to this form.
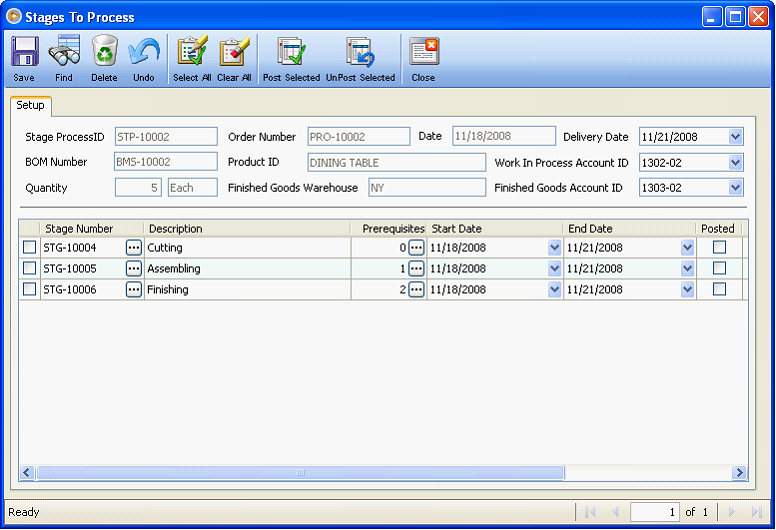
Configure the Start and End dates of each stage.
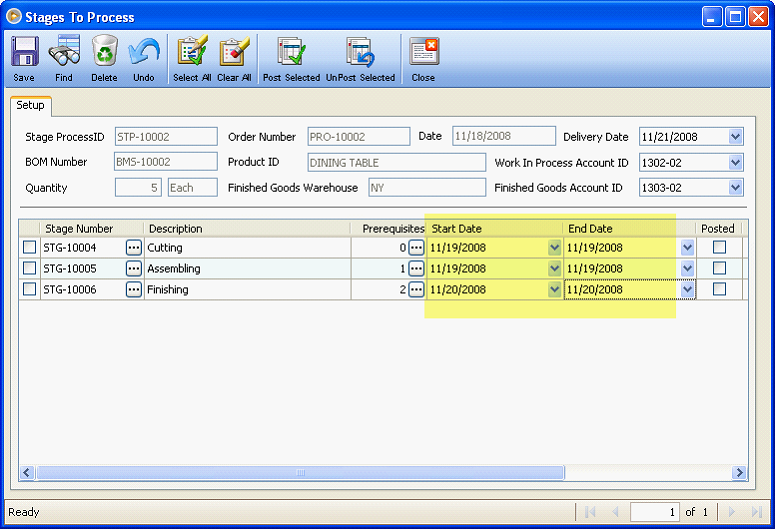
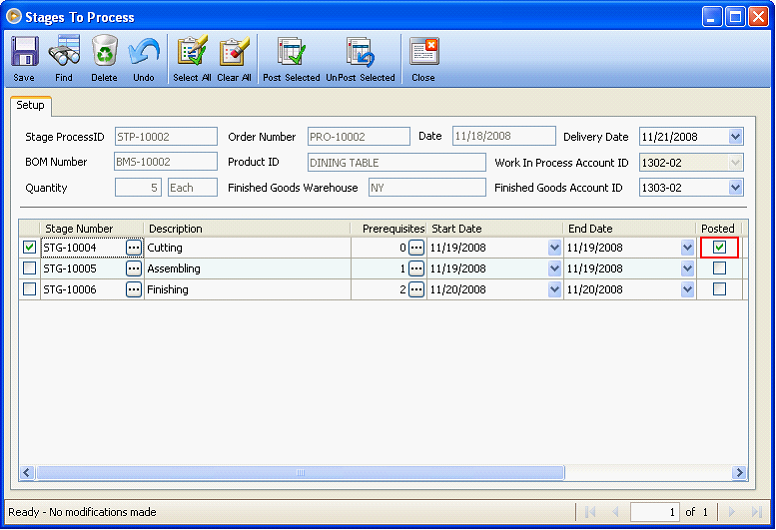
In the Stage to Process form, you can either post each of the stages, selected stages or post all stages.
![]() To post each stage one by one, click on ellipse button next to a stage.
To post each stage one by one, click on ellipse button next to a stage.
![]() To post all stages, click Select all button in the toolbar and click Post Selected button.
To post all stages, click Select all button in the toolbar and click Post Selected button.
![]() To post selected stages, use the checkbox before the Stage Number and click Post Selected button.
To post selected stages, use the checkbox before the Stage Number and click Post Selected button.
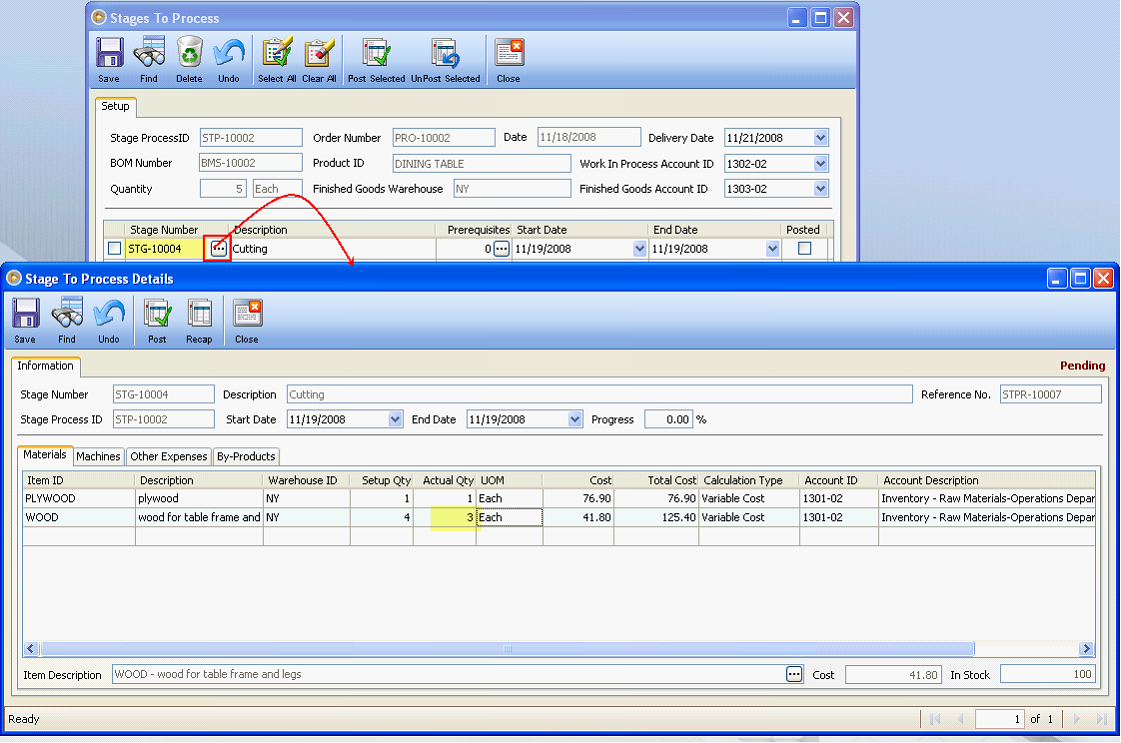
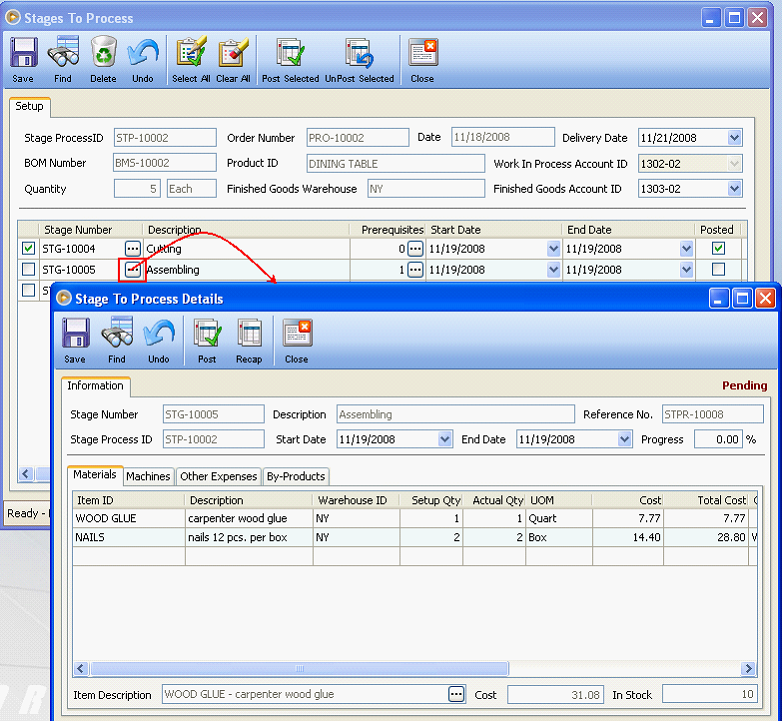
Let’s say not all that were setup for materials, machine costs and other expenses were actually used. You can use the Stage To Process Details form to specify what was actually used.
Click ellipse button next to the selected stage to open the Stage To Process Details form where you can specify the actual material, machine and other costs for that stage.
Here’s an example for Cutting Stage:
In here 3 out of 4 woods were used up for manufacturing the dining table. So out of 167.20 only 125.40 will be charged for material cost.
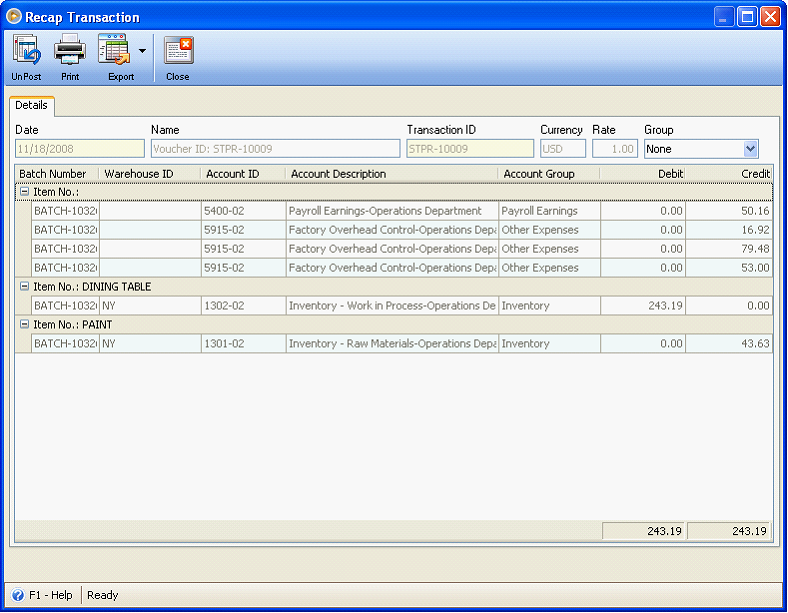
Here’s how the posting of this stage will look like.
After posting the Cutting Stage, the Posted checkbox in line with Cutting stage will be marked with check.
Assembling Stage
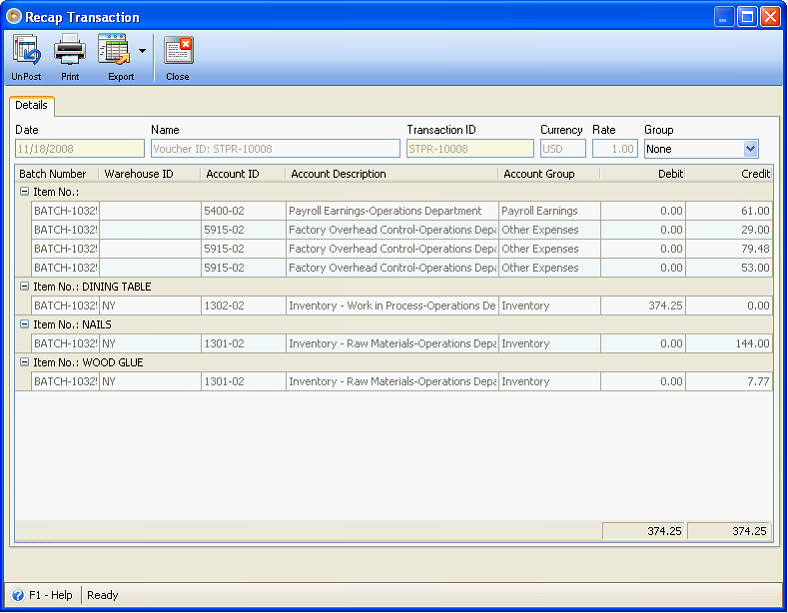
Here’s how the posting of Assembling Stage will look like.
Finishing Stage

Here’s how the posting of Assembling Stage will look like.
Now that the last stage was posted, you can now move everything that is on your Inventory – Work in Process to Inventory – Finished Goods by posting the entire Stage to Process.
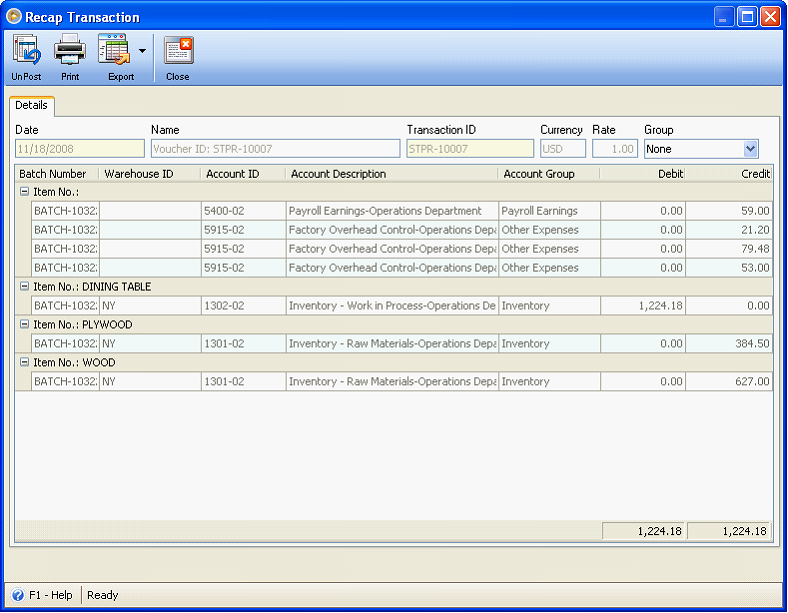
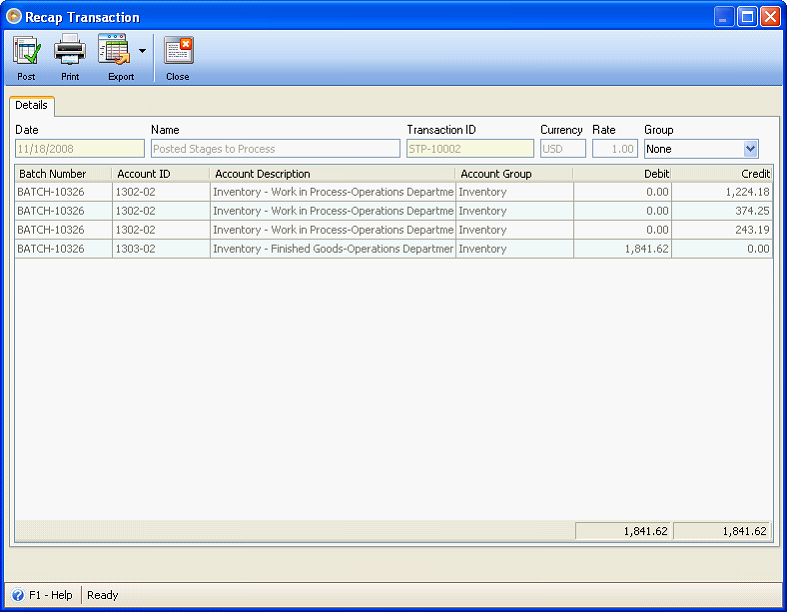
Let’s recap first the amounts that were posted to the Inventory – Work in Process account.
STG-10004 (Cutting) |
1,224.18 |
STG-10005 (Assembling) |
374.25 |
STG-10006 (Finishing) |
243.19 |
|
1,841.62 |
Now here’s how the recap will look like when entire Stage to Process transaction will be posted. This will move what was in your Inventory – Work in Process account to Inventory – Finished Goods.
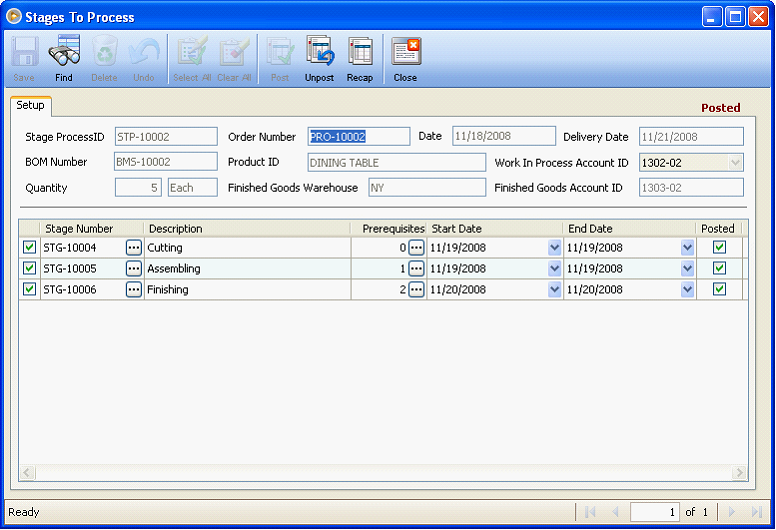
Now Post the entire transaction.
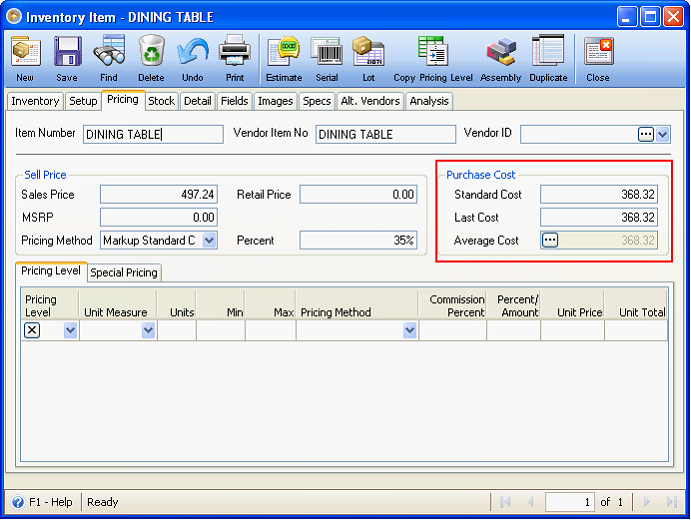
Let’s go back to the main item. Purchase Cost area will then be updated with the cost of the item. (Note that next time this item is manufactured, only the Last Cost and Average Cost, if average cost method is used, will be updated).
Here’s how item cost is computed: Finished Goods / Production Order qty, so using the example above,
1,841.62 / 5 = 368.324 is the cost of the item
Since the cost has been updated with the item’s manufacturing cost, you may now configure your pricing method. In this example, Percent of margin, which is 35% is selected, thus having 497.24 items’s selling price.
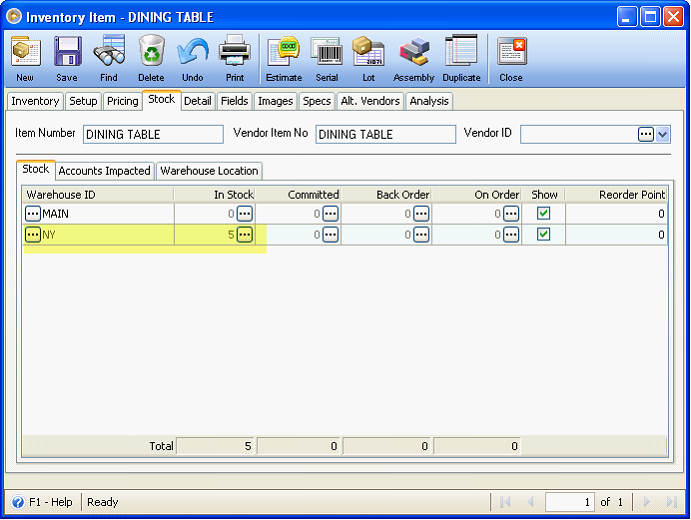
Also the stock in the NY warehouse will also be updated with the qty produced, which is 5.
VII. Industrial / Capital
This form can be accessed from Manufacturing menu > Industrial/Capital. This form is used for comparing your Manufacturing Budget figures vs. Manufacturing Actual figures.
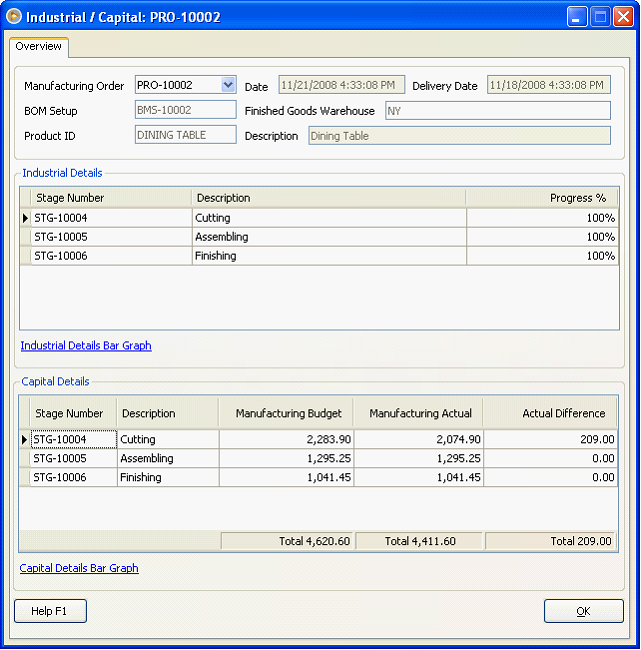
Here’s how the Actual Difference in the above example is computed.
|
Qty |
Cost |
Total Cost |
Material Cost (setup) |
4 |
41.80 |
167.20 |
Actual Material Cost used in Cutting Stage |
3 |
41.80 |
125.40 |
|
|
|
41.80 |
|
|
|
|
Total Setup Cost |
|
924.12 |
|
Total Cost from Stages |
|
882.32 |
|
|
|
41.80 |
|
Qty Ordered (Manufacturing Order) |
|
5.00 |
|
Actual Difference |
|
209.00 |
|
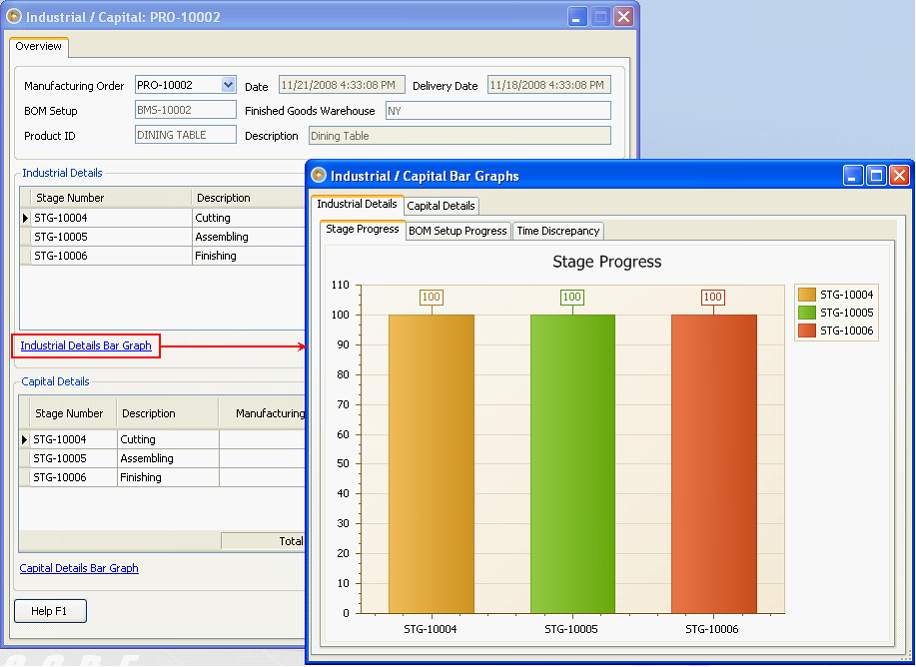
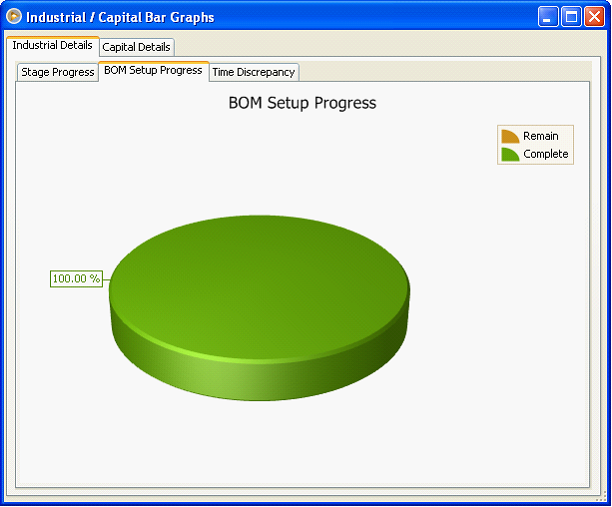
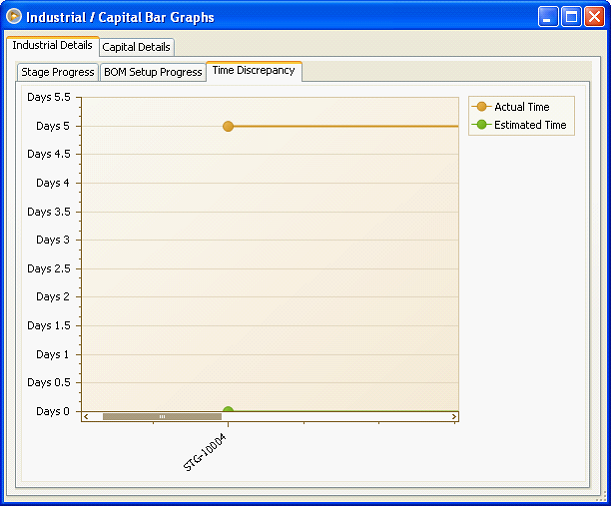
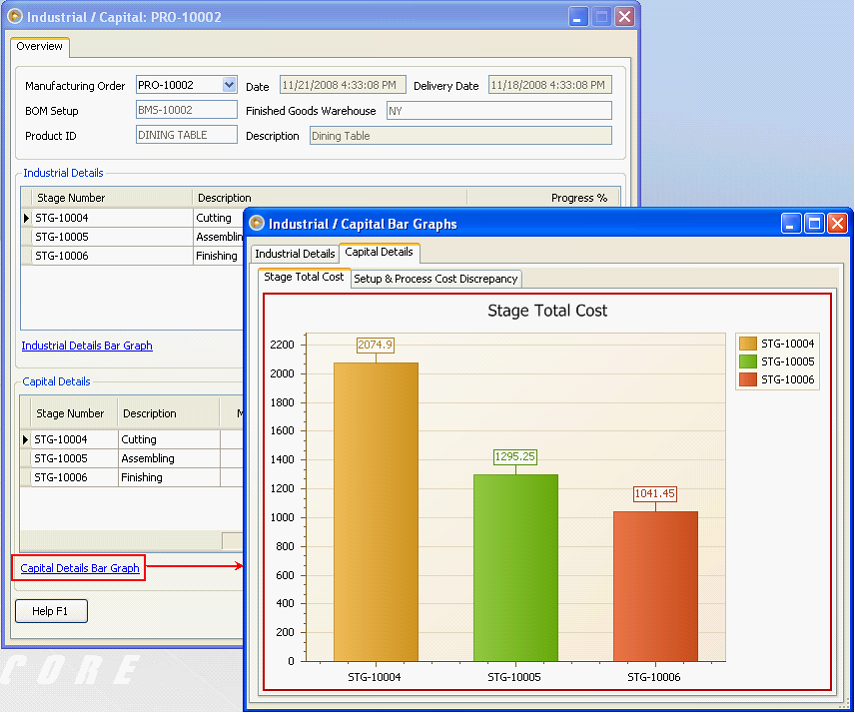
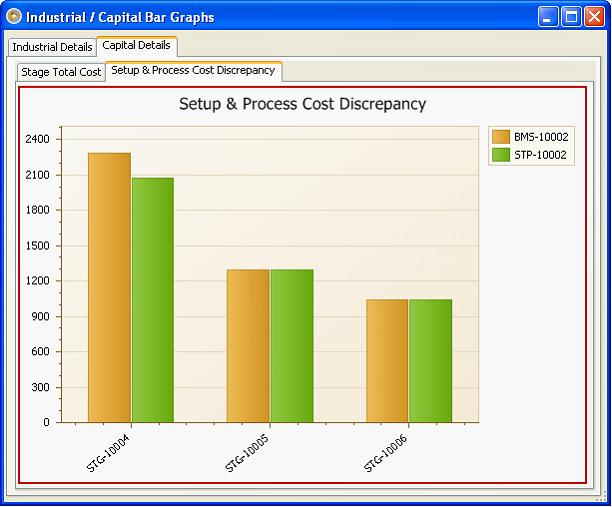
Click the Industrial Details Bar Graph and Capital Details Bar Graph links to open the Industrial /Capital Bar Graphs form where graphical representations on these figures are shown.
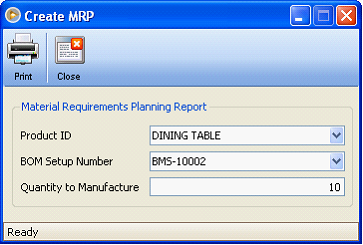
VIII. Create MRP
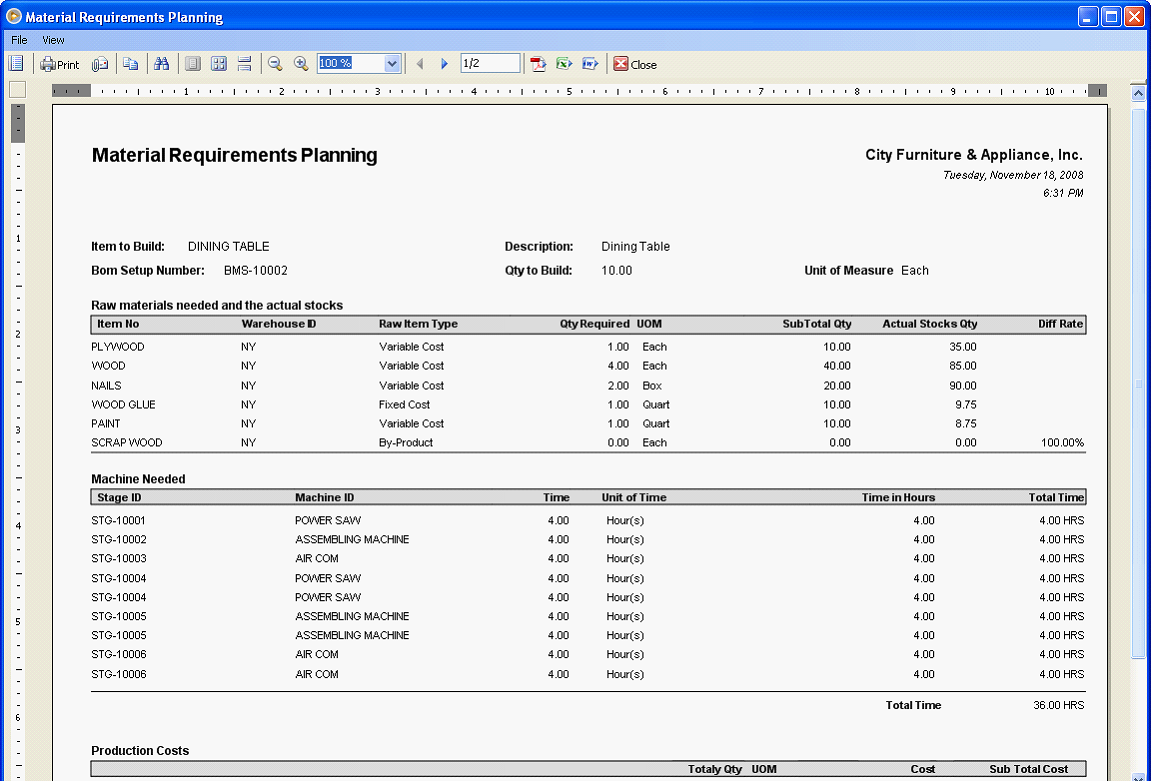
This form is a tool that can be used to project/estimate the total cost of manufacturing an item. This is very simple to use, just select the Product ID, the BOM setup under the selected product and enter the quantity to manufacture. Then click Print button to show you the details of that cost.
This report is useful because this can be used to identify the costs to be incurred when manufacturing the item. And out of this, managers or upper level of management can create a budget out of the results derive on this form.