BB&T- Specifications for NACHA
The will guide you on how to create Direct Deposit Template for BBT-ACH.
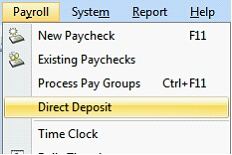
1.BBT-ACH template can be opened from Payroll menu > Direct Deposit.
2.When Direct Deposit form opens, select Deposit in the Generate Type field and Template in the Format field.
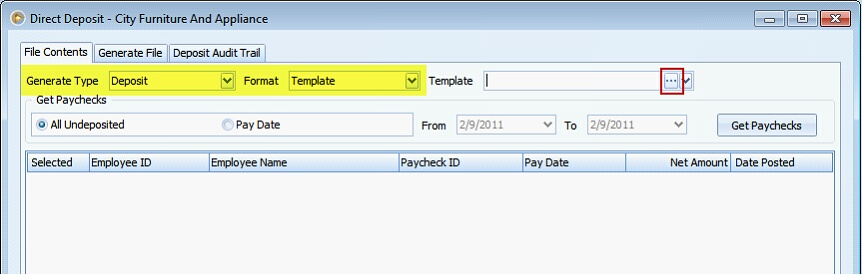
3.Click on the ellipse button in the Template field to open Direct Deposit Template form where you can set your file specification for the BBT-ACH template
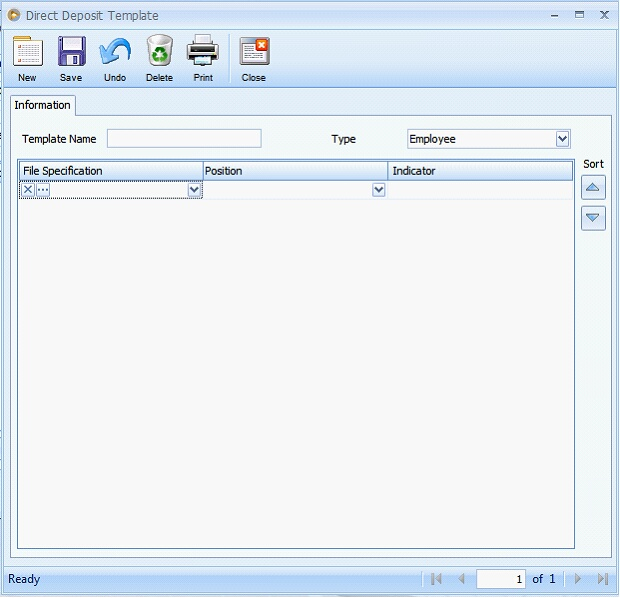
a)First enter the Template Name in the Template Name field.
b)In the Type field, you have the option to select either Employee and Paycheck. This option will determine how direct deposit template generation will be done especially on how information is sorted and whether or not Batch Header and Batch Footer positions will be available.
•When Paycheck is selected, whatever the sorting you used when direct deposit is generated, the same order will be followed. The Batch Header and Batch Footer positions will not be available.
•When Employee is selected, the sorting will be by batch and where Employee ID is sorted in an ascending manner.
![]() Note that the sorting buttons will not affect the generation part. The sequence will always be Header>Batch Header>Detail>Batch Footer>Footer. However, if a certain type of Position is displayed or is selected more than once, then sorting will work accordingly but for their respective type only.
Note that the sorting buttons will not affect the generation part. The sequence will always be Header>Batch Header>Detail>Batch Footer>Footer. However, if a certain type of Position is displayed or is selected more than once, then sorting will work accordingly but for their respective type only.
c)The File Specification field in the grid area is used to create or select a file specification. Click on the dropdown arrow button to display the combo box where you can select from existing file specifications. To create a new file specification, key in the name/value and press enter key. You will be prompted with a message that says the value entered is not included in the list, do you want to add it. Click Yes to add.
•Click on the Ellipse button to open the Direct Deposit Template Part Detail form where file specification properties/configurations are made.
•Click on the little x button beside the ellipse button to remove the file specification from the grid area.
![]() Note that value entered on this field must be unique.
Note that value entered on this field must be unique.
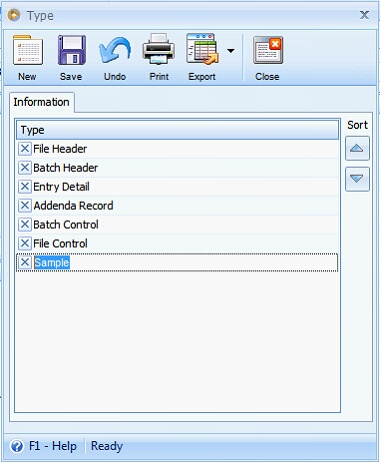
4.In creating a new file specification, enter the value in File Specification field then press Enter key. This message will be shown, click Yes button.

5.Type form will open. Right after you save this, it will now be added in the File Specification combo box.
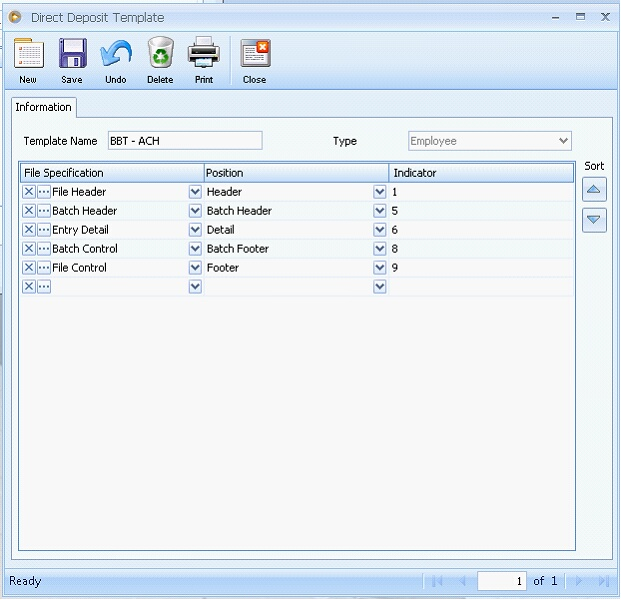
6.The Position field is used to set where the selected file specification is positioned. Each option is described in detail below.
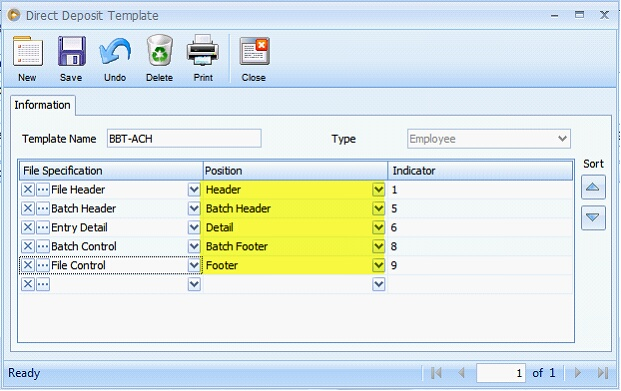
•Header – information will be displayed only at the beginning of the generated file
•Batch Header – information will be displayed per employee generated
•Detail – information will be displayed per Paycheck generated and will be under its employee
•Batch Footer – information will be displayed per employee generated
•Footer – information will be displayed only at the end of the generated file
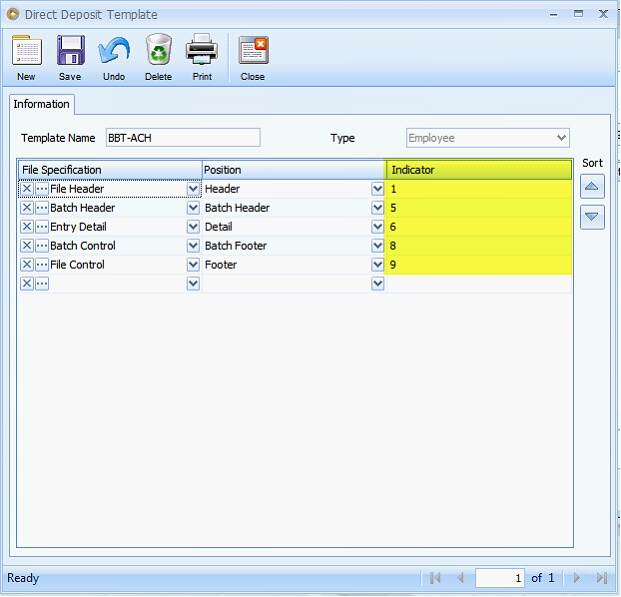
7.The Indicator field is used to enter any value that you would want to be displayed on the Generated File tab provided that Record Type is added in the Direct Deposit Template Part Detail of the selected File Specification.
Direct Deposit Template Part Detail form
Clicking File Specification’s Ellipse button will open the Direct Deposit Template Part Detail from where File specification’s properties/configurations are made.
File Header
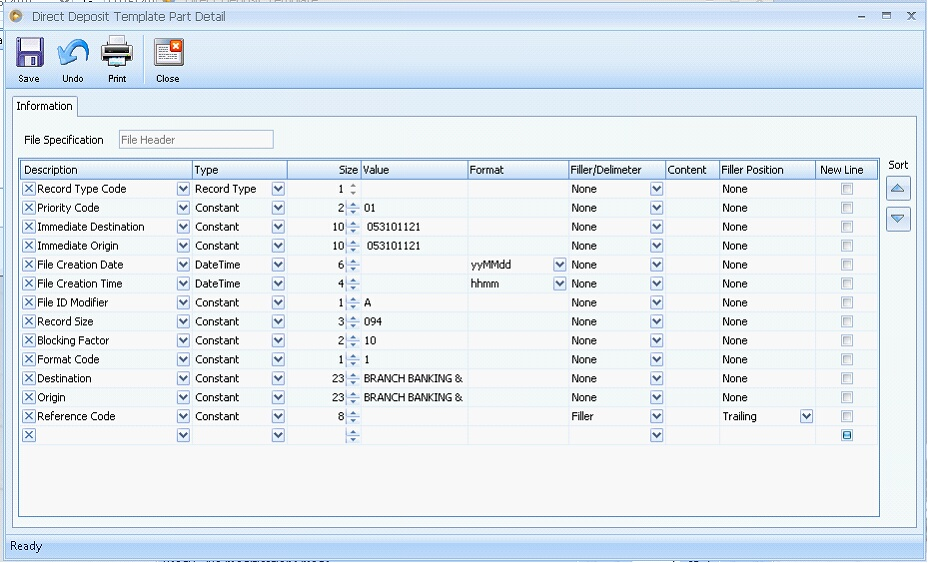
File Specification’s Field Properties for File Header specification:
•Record Type – when this type is selected, the Size field next to it will display the number of characters or length of the value entered in the Indicator field of the selected File Specification
•DateTime – when this type is selected, “MM\dd\yyyy” will be shown in the Format field by default. Click dropdown button in the format field to select other date formats.
•Constant – whatever character is entered in the Value field will be the same value displayed on the Generated File.
Batch Header
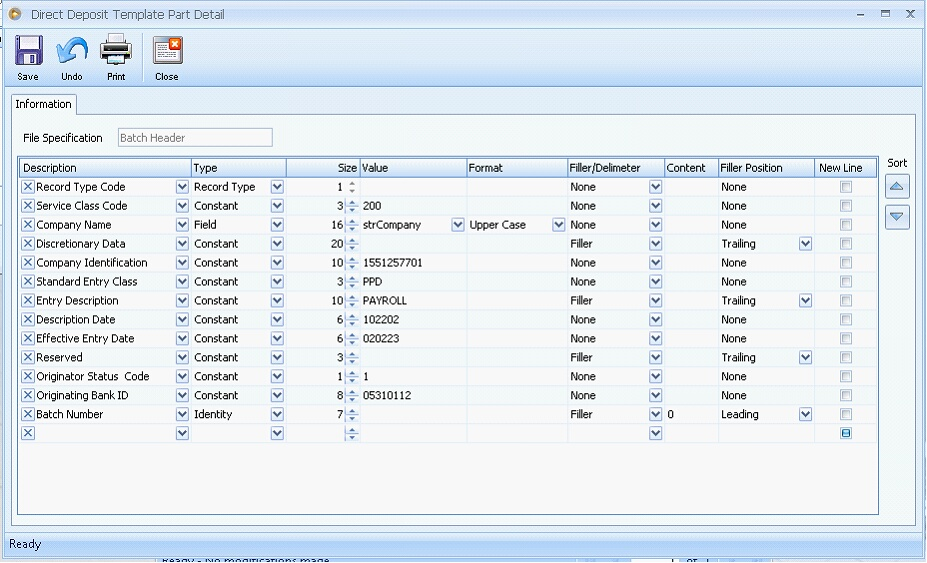
File Specification’s Field Properties for Batch Header specification:
•Record Type – when this type is selected, the Size field next to it will display the number of characters or length of the value entered in the Indicator field of the selected File Specification
•DateTime – when this type is selected, “MM\dd\yyyy” will be shown in the Format field by default. Click dropdown button in the format field to select other date formats.
•Constant – whatever character is entered in the Value field will be the same value displayed on the Generated File.
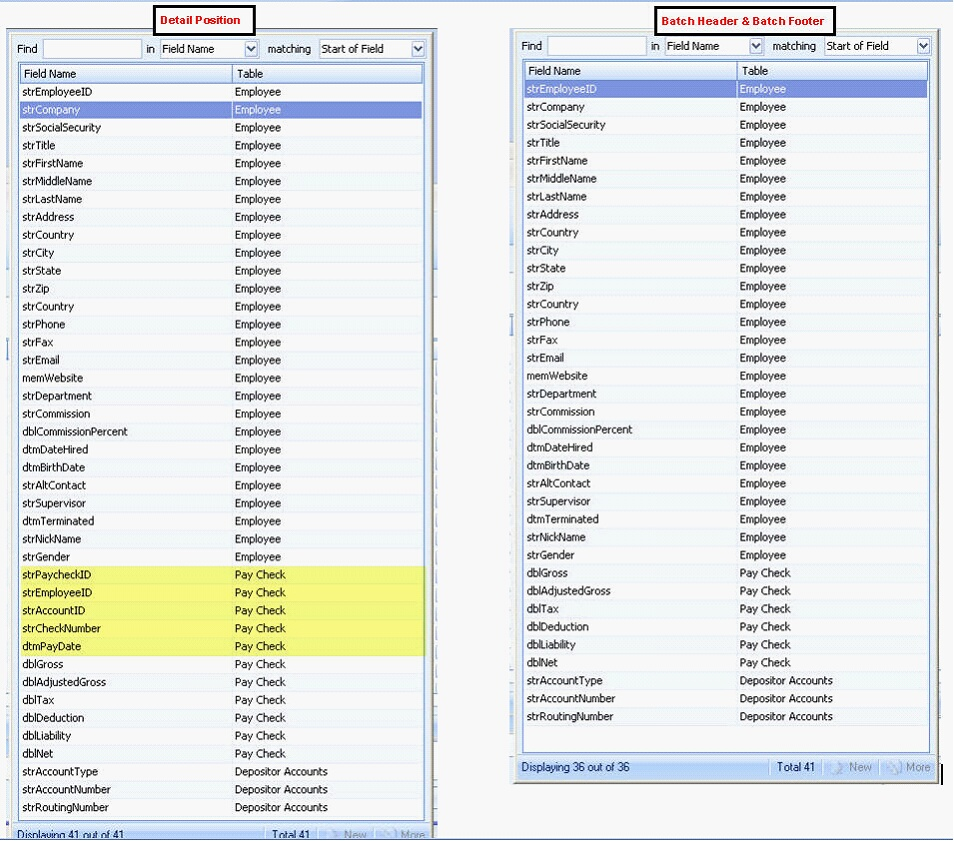
•Field – there are two kinds of Field combo box, one is when Position = Detail and the other is Position = Batch Header or Batch Footer. The only difference of the two is that there are fields that are present in Position = Detail but is not present in Position = Batch Header or Batch Footer. See highlighted items below for the fields that are present in Position = Detail but is not present in Position = Batch Header or Batch Footer.
•Identity – only numeric data type can be entered here. This is used to identify each Type of File Specification when generating the file by incrementing each type by one according to the value that will be given. Identity increment should start at one (1) not zero.
Entry Detail
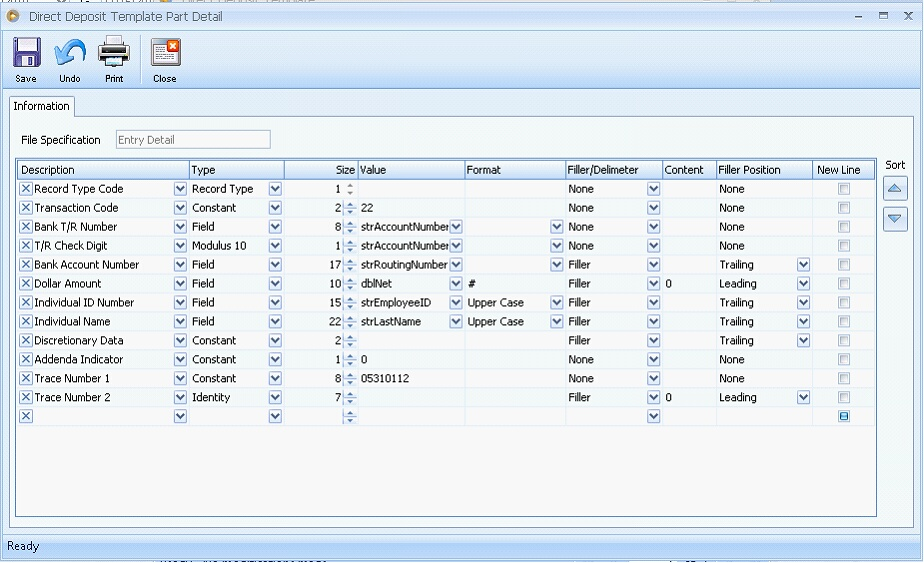
File Specification’s Field Properties for Batch Header specification:
•Record Type – when this type is selected, the Size field next to it will display the number of characters or length of the value entered in the Indicator field of the selected File Specification
•DateTime – when this type is selected, “MM\dd\yyyy” will be shown in the Format field by default. Click dropdown button in the format field to select other date formats.
•Constant – whatever character is entered in the Value field will be the same value displayed in the Generated File.
•Field – there are two kinds of Field combo box, one is when Position = Detail and the other is Position = Batch Header or Batch Footer. The only difference of the two is that there are fields that are present in Position = Detail but is not present in Position = Batch Header or Batch Footer. See highlighted items below for the fields that are present in Position = Detail but is not present in Position = Batch Header or Batch Footer.
•Identity – only numeric data type can be entered here. This is used to identify each Type of File Specification when generating the file by incrementing each type by one according to the value that will be given. Identity increment should start at one (1) not zero.
•Multiple – this is used to connect multiple “Types” into a single File Specification part. Types included are Constant, Date Time and Field.
•Modulus 10 – This computes a check digit for the selected numeric field.
![]() Note that format for field uses Upper Case, Lower Case, and Normal Case characters
Note that format for field uses Upper Case, Lower Case, and Normal Case characters
Batch Control
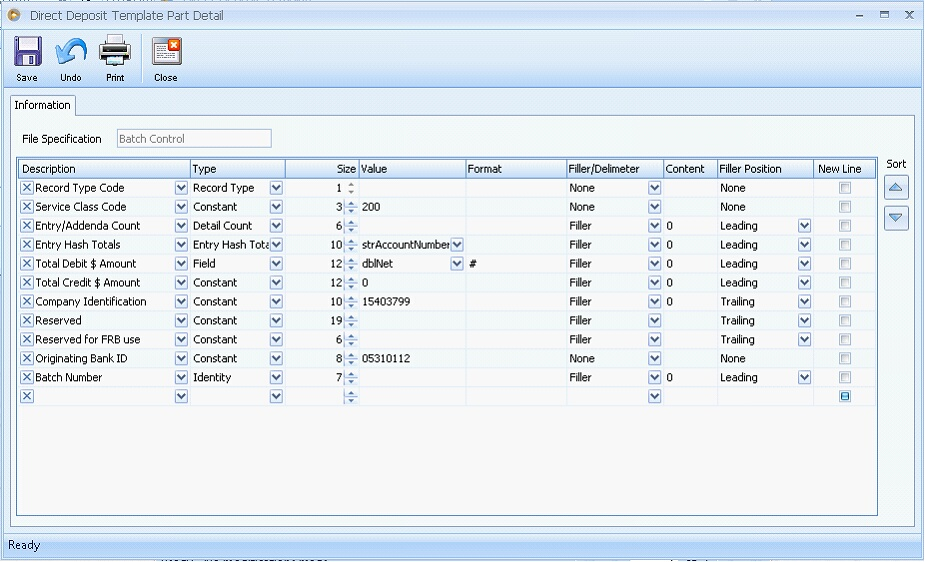
File Specification’s Field Properties for Batch Control specification:
•Record Type – when this type is selected, the Size field next to it will display the number of characters or length of the value entered in the Indicator field of the selected File Specification
•DateTime – when this type is selected, “MM\dd\yyyy” will be shown in the Format field by default. Click dropdown button in the format field to select other date formats.
•Constant – whatever character is entered in the Value field will be the same value displayed in the Generated File.
•Field – there are two kinds of Field combo box, one is when Position = Detail and the other is Position = Batch Header or Batch Footer. The only difference of the two is that there are fields that are present in Position = Detail but is not present in Position = Batch Header or Batch Footer. See highlighted items below for the fields that are present in Position = Detail but is not present in Position = Batch Header or Batch Footer.
•Identity – only numeric data type can be entered here. This is used to identify each Type of File Specification when generating the file by incrementing each type by one according to the value that will be given. Identity increment should start at one (1) not zero.
•Detail Count (Batch Footer) – denotes the total number of paychecks per employee.
•Entry Hash Total – adds a numeric field together from the Entry Detail is new in Batch Control.
File Control
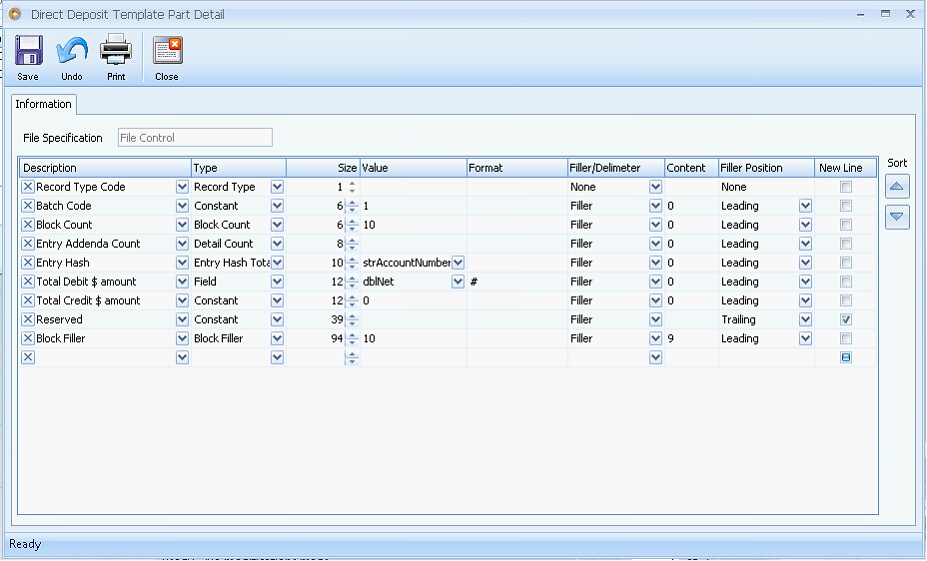
File Specification’s Field Properties for File Control specification:
•Record Type – when this type is selected, the Size field next to it will display the number of characters or length of the value entered in the Indicator field of the selected File Specification
•DateTime – when this type is selected, “MM\dd\yyyy” will be shown in the Format field by default. Click dropdown button in the format field to select other date formats.
•Constant – whatever character is entered in the Value field will be the same value displayed in the Generated File.
•Field – there are two kinds of Field combo box, one is when Position = Detail and the other is Position = Batch Header or Batch Footer. The only difference of the two is that there are fields that are present in Position = Detail but is not present in Position = Batch Header or Batch Footer. See highlighted items below for the fields that are present in Position = Detail but is not present in Position = Batch Header or Batch Footer.
![]() Note that if File Specification’s Position is Batch Header or Batch Footer, all fields in the Employee table will be shown plus those fields that are Numeric data type (with prefix dbl) in the Paycheck table from the dropdown list on the value column
Note that if File Specification’s Position is Batch Header or Batch Footer, all fields in the Employee table will be shown plus those fields that are Numeric data type (with prefix dbl) in the Paycheck table from the dropdown list on the value column
•Detail Count (Footer) – denotes the total number of paychecks for all employees.
•Entry Hash Total – adds a numeric field together from the Entry Detail is new in Batch Control.
•Batch Count – denotes the total number of employees selected.
•Block Count – It computes the number of blocks that is available in a file. It denotes the amount from overall paychecks divided by the Block Count Value.
•Block Filler – allows you to specify how much blocks a file should have and it computes the filler lines.
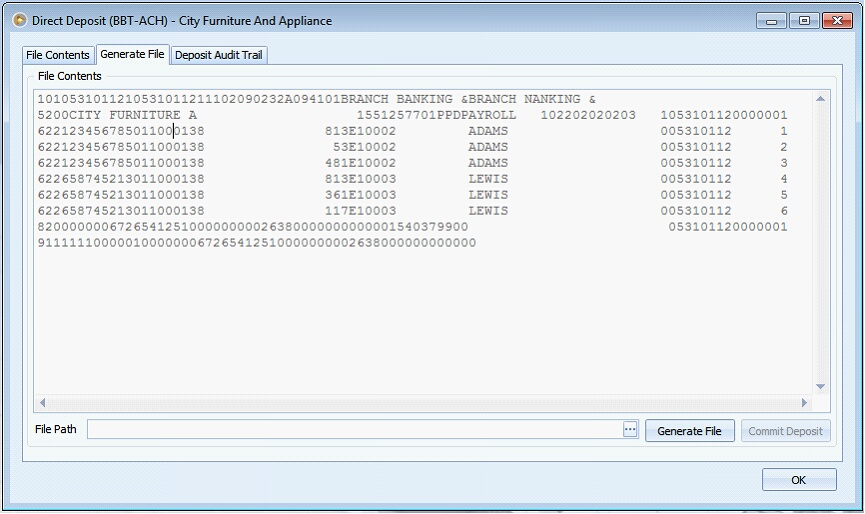
Example:
Using the setup above where six different Paychecks are selected.

Generated file will look like this.
Other fields from Direct Deposit Template Part Detail:
•Format is enabled only when DateTime Type is selected.
• Filler is used to fill in the extra space when Size set is greater than the Value entered. Filler Position can be set as either Leading or Trailing. This determines where the filler is added or shown. When Leading is selected, filler will be shown before the value entered while when Trailing is selected, filler will be shown after the value entered.
•Delimeter is used to cut some part of the characters when the Value is longer than the Size setup.
• Content is an alphanumeric character used for Filler/Delimeter.
![]() Note that Trailing and Leading on Delimeter only affect at which side the characters will be cut off and not the position of the Content Value.
Note that Trailing and Leading on Delimeter only affect at which side the characters will be cut off and not the position of the Content Value.